[Solved] Quick Screenshots Not Saving on Mac Automatically
Get 6 solutions to fix your Mac screenshots not saving:
- 1. Use professional AnyRec Screen Recorder as the alternative.
- 2. Ensure the shortcuts to take screenshots is workable.
- 3. Chekc the screenshot saving path is what you need.
- 4. Update your Mac to the latest Sonoma system version.
- 5. Perform a NVRAM reset to avoid misconfiguration.
- 6. Unlock the screenshot folder to easily open the screenshots.
100% Secure
100% Secure
Find you Mac screenshots not saving automatically after the update of Mac Catalina? It may be caused by many reasons like wrong shortcut settings, changed saving path, and more. Although the built-in shortcuts on Mac is an easy and quick way to take screenshots, to avoid saving problems, you can also have a try on other professional tools. Read more to solve Mac screenshots not saving issue with 6 efficient ways.
Best Mac Alternative Screenshot App 5 Ways to Fix Mac Screenshots Not Saving Issues- 2.1 Check Mac Screenshot Shortcut Settings
- 2.2 Check the Default Screenshot Saving Path
- 2.3 Update Your Mac to the Latest System Version
- 2.4 Perform a NVRAM Reset
- 2.5 Unlock the Screenshot Folder
Best Mac Alternative Screenshot App
No matter what causes your Mac screenshots not saving, you can directly go for the professional AnyRec Screen Recorder for Mac/Windows. It is not only a powerful screenshot toolkit but has powerful editing features as well. It also provides customizable shortcuts to capture screenshots and record videos on Mac. Without finding no screenshots saving on Mac, you can change the destination path every time according to your need.

Capture full-screen, windowed and customized region screenshots easily.
Powerful screenshots editing tools to add annotations and make adjustments.
Export to all popular image formats such as PNG, JPG/JPEG, BMP and GIF.
Set customized hotkeys and destination path to save screenshots easily.
100% Secure
100% Secure
Step 1.Download and install the best Mac alternative screenshot app from the website. Click the "Snapshot" button on the upper right side of the window.

Step 2.Drag your mouse cursor to select a screen region, release the mouse button, a screenshot would be automatically taken for you.
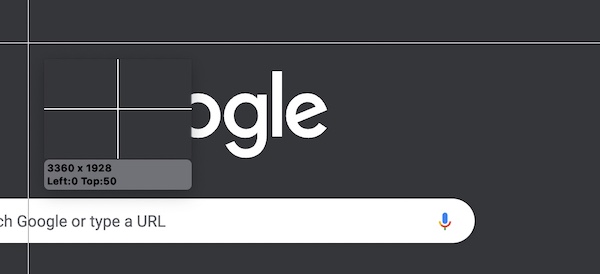
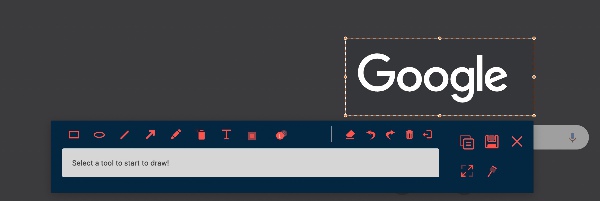
Step 3.A toolbar would appear below the screenshot giving you advanced editing features. Once the editing is finished, click the "Save" button once the editing is completed.
Note: If you are having trouble with screen utilities on Windows PC, or trying to take iPhone screenshots for Facetime, we also have complete guides to help you out.
5 Ways to Fix Mac Screenshots Not Saving Issues
2.1 Check Mac Screenshot Shortcut Settings
It's possible that your Mac screenshot utility was running, but you just pressed an unrelated key combination and of course found that no screenshot was saved. Follow the steps down below to reset your screenshot keyboard shortcuts.
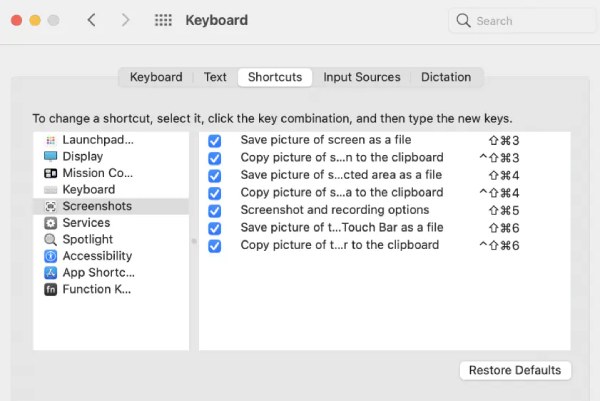
Step 1.Open the "Settings" app and find "System Preferences". Then, navigate to the "Keyboard" option and click the "Shortcuts" button.
Step 2.Click the "Screenshots" button on the left panel. On the right side of the panel, make sure the screenshot functionalities are enabled.
Step 3.Click the "Restore Defaults" button to reset all the keyboard shortcuts to default. Then, check if your Mac screenshot can be saved with shortcuts.
2.2 Check the Default Screenshot Saving Path
You might change the default screenshot folder to another one besides the Desktop folder, resulting in the screenshots not appearing on the Desktop. Thus, you may think that mac screenshots are not saved at all. Follow the steps to change the destination path of taken screenshots.
Step 1.On any screen, press the "Shift + Cmd + 5" key combinations.

Step 2.Click the "Options" button on the toolbar. In the "Save to" selections, click the "Desktop" button.
2.3 Update Your Mac to the Latest System Version
Another possible reason is that your Mac OSX system is updated or needs to be repaired. It would be ideal if you already had a backup copy of your system. If not, see the detailed steps below:
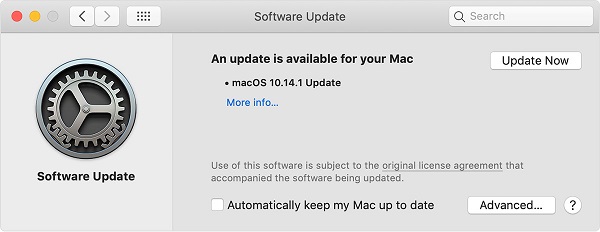
Step 1.Open the "System Preferences" app. Click the "Software Update" button.
Step 2.You might encounter a notification telling you an update is available for your Mac. Click the "Update Now" button and follow the instructions.
2.4 Perform a NVRAM Reset
Another common issue that your Mac might be facing is NVRAM misconfiguration. Sometimes issues with your Mac OSX system couldn't be fixed until you perform a NVRAM reset.
Step 1.Restart your Mac. Once you hear the startup sound, press the "Cmd + Option + P + R" key combination immediately.
Step 2.Keep holding the buttons for around 20 seconds, your Mac might appear to be restarting multiple times.
Step 3.Release the buttons afterward and boot into your system normally.

2.5 Unlock the Screenshot Folder
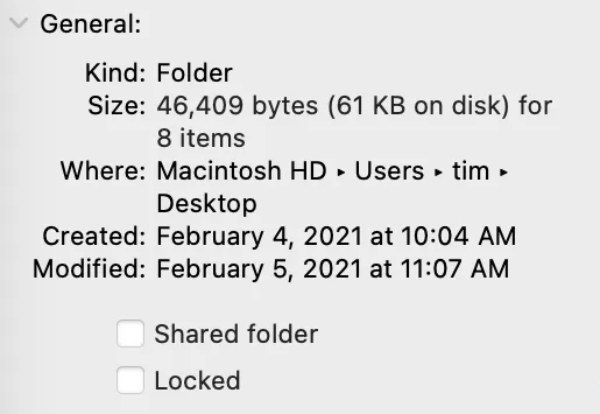
Another possible reason causing your Mac screenshots not saving on Mac is locked folder. Although you had changed the saving folder to the default desktop, it may be locked by system and prevent you opening it. Get the detailed steps to solve it:
Step 1.Go to the set saving folder. The default setting is desktop.
Step 2.Right-click on the folder and click the "Get Info" button from the drop-down list.
Step 3.Under the "General" section, you should make sure the "Locked" checkbox is not ticked.
FAQ about Mac Screenshots
-
How to fix: You don't have permission to save in this location on Mac?
Open the "Finder" app, and navigate to your "Home" folder. On the menu bar, navigate to "File > Get Info" and find the "Sharing & Permissions" section. Make sure the "Privilege" option is showing "Read & Write".
-
How do I change the Mac screenshot formats from png to jpg?
If you wish to change the screenshot formats, open up a terminal window, and enter the following commands: "defaults write com.apple.screencapture type JPG." Press the "Enter" key to apply your changes.
-
Why I can't take screenshots on Mac with the Apple TV app?
The default Mac screenshot utility would be automatically disabled with Apple TV app. You can use a third-party screen snapshot app instead.
Conclusion
As we have discussed in the article, these are the 6 best possible solutions when your Mac screenshots aren't saving to your desktop. Even though the reasons vary, we strongly suggest you use the best screen capture - AnyRec Screen Recorder as an all-in-one solution for your Mac screen recording tasks.
