How to Fix Default Screenshot Shortcuts Not Working on Mac
Quickly look at the 6 efficient methods to fix screenshot not working on Mac Catalina/Sonoma and more:
- 1. Try another snapshot tool like AnyRec Screen Recorder.
- 2. Restart your Mac and refresh the screenshot tool.
- 3. Check and change the screenshot savinhg location.
- 4. Confirm the Dropbox settings and find your screenshots.
- 5. Reset the hotkeys for taking quick screenshots on Mac.
- Reset the Non-Volatile Random-Access Memory settings.
100% Secure
100% Secure
The easiest way to take screenshots on Mac is using the built-in straightforward shortcut keys. But you may encounter screenshot on Mac not working issue! After pressing the command combinations, you can’t hear the sound of the camera's shutter, and your captured photos are nowhere to see on Mac's desktop. So, what are the possible causes and solutions when the screenshot is not responding on Mac? Learn from this article the 6 efficient methods to fix this problem.
Guide List
Best Workaround When Screenshot Not Working on Mac 5 Workable Methods to Fix Screenshot Not Working on Mac FAQs about How to Take Screenshots on MacBest Workaround When Screenshot Not Working on Mac
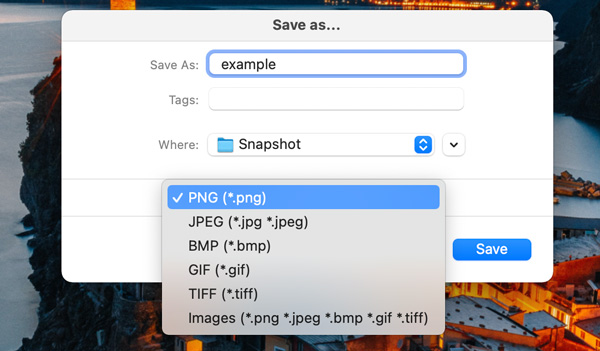
Get the easiest method here to solve screenshots not working on Mac! Just rely on the best alternative AnyRec Screen Recorder to take snapshots on Mac with a certain area. Moreover, it provides advanced editing tools to add real-time drawings and annotations with custom colors and sizes before saving. You can also save your Mac screenshots in the desired folder and with different file formats such as PNG, JPG, BMP, GIF, and TIFF.

Capture screen activity on your Mac using the full or custom screenshot.
Save screenshots in multiple formats, such as PNG, JPG, BMP, GIF, and TIFF.
Provide drawing tools to add annotations, callouts, shapes, and texts to screenshots.
Handle your screenshots with the built-in editing and managing tools.
100% Secure
100% Secure
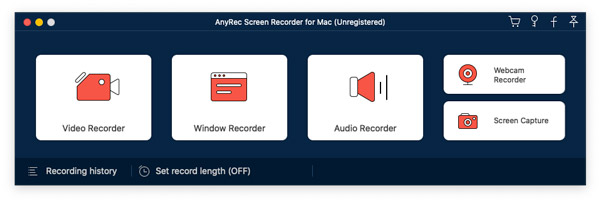
Step 1.Download and launch AnyRec Screen Recorder on your Mac when your Mac's screenshot feature is not working. Then, click the "Screen Capture" button from the main interface.
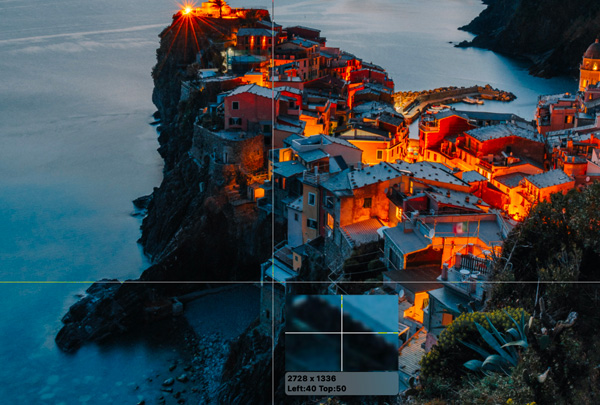
Step 2.Drag the cursor to select the desired part of the screen, or even take Facetime screenshot. Release the left-click mouse to get a captured image immediately.
Step 3.After that, you can add more annotations as you like. Click the "Save" button to choose the folder and desired formats. Finally, click the "Save" button again to start.
5 Workable Methods to Fix Screenshot Not Working on Mac
Method 1: Restart Your Mac
Using your Mac for an extended period may cause it to malfunction, which the screenshot not working on your Mac or cannot find the captured screenshots, especially when there are lots of tasks running at the same time. You'd better restart your device to find whether it works.
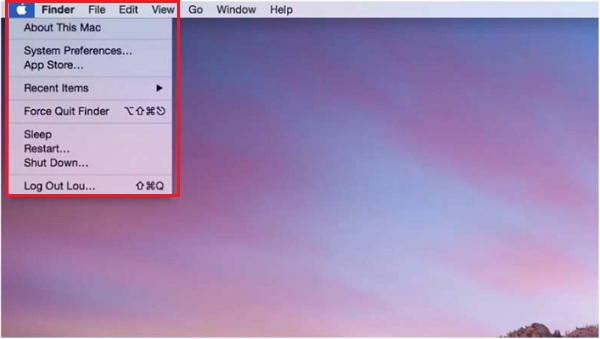
Step 1.Once you have closed all the programs on your MacBook, click the "Apple Menu" button to restart your MacBook.
Step 2.Click the "Restart" button drop-down list, you can also restart the device. After that, you can press the "Command + Shift + 3" button again to find whether it works.
Moreover, you can also use the shortcut keys "Control + Command + Eject/Power" button to restart the device when the screenshot is not responding on Mac.
Method 2: Check the Screenshot Location
What should you do if you still cannot find the taken screenshot? You must be aware if the screenshot's location is in the correct folder. Here are the steps to determine the location folder of screenshot photos on Mac.
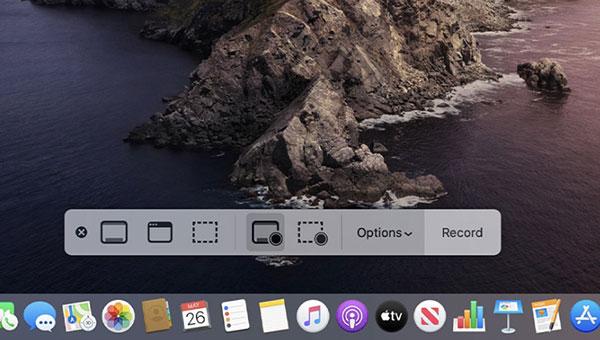
Step 1.Open the "Screenshot" app of Mac by pressing the shortcut button "Shift + Command + 5" simultaneously to launch the onscreen.
Step 2.Tap the "Options" button located at the screenshot toolbar. Proceed to the Save To option. After that, look for your current screenshot saved folder.
Step 3.Find out why the screenshot is not working on Mac. Furthermore, you can select a new folder to be the new destination of your screenshots.
Method 3: Confirm the Dropbox Settings
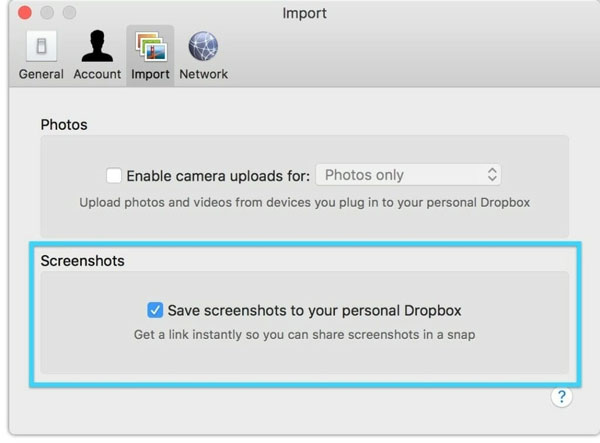
Dropbox has added an import feature that automatically uploads screenshots to Dropbox and creates a sharing link. When you cannot find the screenshot, it does not mean the screenshot not working on Mac. You can change the settings to get everything as your requirements.
Step 1.Open Dropbox on your Mac and choose the "Settings" option on the top right corner to fix the screenshot not working on Mac.
Step 2.Click the "Preferences" button and then click the "Import" button from the drop-down list to uncheck the "Share screenshots using Dropbox" button.
Step 3.After that, you can check and change the destination folder for the screenshot. Just take another screenshot to find whether it works.
Method 4: Reset the Hotkeys for Screenshots
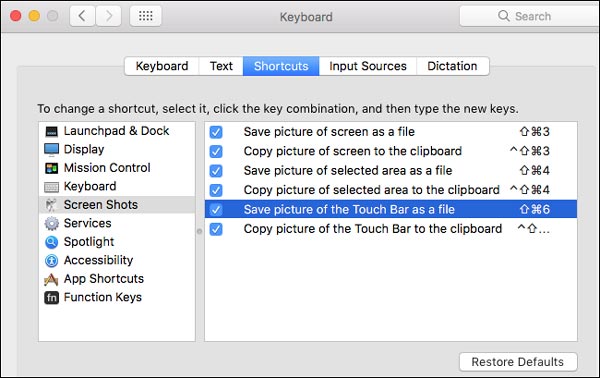
When you need to capture the screenshots for gameplay, which might have a conflict for the hotkeys, you have to reset them if the screenshot not working on Mac. You can customize the screenshot keyboard shortcuts from your Mac's keyboard preferences.
Step 1.Choose the Apple menu on your MacBook and click the "System Preferences" button. It will launch a window to set up the system preferences, including hotkeys.
Step 2.Click the "Keyboard" button and proceed to the "Shortcuts" tab. Click the "Keyboard" button from the left menu to check your hotkeys for taking screenshots on Mac.
Step 3.Check your shortcut keys have been disabled or alter the default settings by clicking the Restore Defaults button to fix the screenshot not working on Mac.
Method 5: Reset the NVRAM
Non-Volatile Random-Access Memory (NVRAM) is a memory used by Mac devices to access and store settings, such as sound volume, time difference, display, and shortcut keys. By restarting NVRAM, you can resolve misplaced hotkeys and a non-working screenshot on Mac.
Step 1.Go to the Apple menu and choose the Shut Down option to turn off your MacBook before resetting the NVRAM.
Step 2.Turn on your Mac and as soon as you power up your Mac, hold down the "Command + Option + P + R" keys for 10 to 20 seconds.
Step 3.Don't let go of the keys until you hear the sound of Mac starting up. For other latest versions of Mac, don't let go of the keys until the Apple logo disappears instead of sound popping out.
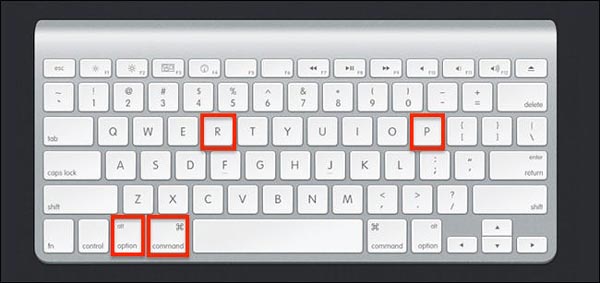
If you have an Apple M1 Mac, you don't need to reset NVRAM by hand as it auto-resets, if necessary, at every time your Mac startup.
FAQs about How to Take Screenshots on Mac
-
Where is the default destination folder of screenshots on Mac?
The default location of the screenshots is the desktop. If you do not know whether the screenshot not working, you can simply type kMDItemIsScreenCapture:1 into the window's search field.
-
Why Mac saves a blank screenshot with hotkeys?
Usually, the blank Mac screenshots are related to the corrupted.plist file, incorrect keyboard settings, malware infection, or other third-party incompatibility issues.
-
What is the default snipping tool for Mac?
Of course, the easiest and built-in method to take screenshots on Mac is to use shortcut keys. In addition, you can use other apps such as Grab and Preview to take snapshots.
Conclusion
Facing technical issues such as not working screenshots on Mac can make you stressed and anxious. For that reason, you have given the tips and ideas that can help you solve the problem. Moreover, you can also use VLC screenshot or AnyRec Screen Recorder to capture features to get the desired snapshots. With the various shared methods to fix your screenshot on Mac and the best alternative, we hope that we help you in any way.
100% Secure
100% Secure
