How to Make Audacity Record Computer Audio? Ways and More!
Ever need to record sound from a video or mic with Audacity? Knowing how Audacity records computer audio will make it possible for you to create tutorials, podcasts, and more! No matter your operating system, Windows, Mac, or Linux, fortunately, this guide offers solutions. Showed here today are four easy ways to record internal audio on computer with Audacity and more details to capture any sound no matter what. Get ready now to record anything with ease!
Guide List
How to Use Audacity Record Computer Audio on Windows 11/10 How to Record Computer Audio and Microphone on Mac with Audacity How to Record Desktop Audio with Audacity on Linux Use Audacity Alternative to Record System Audio and Microphone Better Fix Audacity Won't Record Computer Audio with Those SolutionsHow to Use Audacity Record Computer Audio on Windows 11/10
The popular open-source audio recorder and editor, Audacity, lets you record system audio, including sound from videos, games, music apps, and more. While it needs a little bit of setup to capture the computer sound, you can ensure a complete manipulation of your audio right on your Windows PC.
The steps below just outline the way how Audacity records computer audio on Windows 11/10:
Step 1.On your Windows PC, right-click on the "Volume" button in the taskbar and aim for "Sounds". Here, go to the "Recording" tab, right-click on "Stereo Mix" and then "Enable".
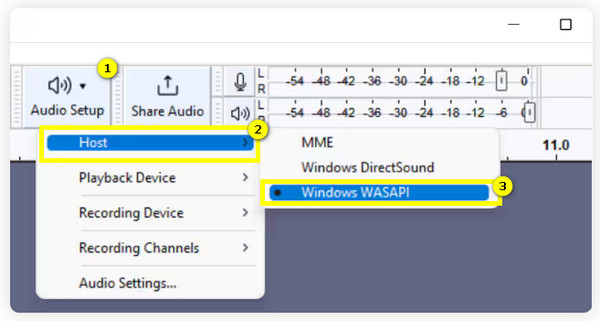
Step 2.Open Audacity. Click the "Audio Setup" button, then "Host" and switch to "Windows WASAPI". Next, go to the "Recording Device" and choose the proper option based on your setup, like Stereo Mix or WASAPI. Also, ensure you’ve picked the correct channels.
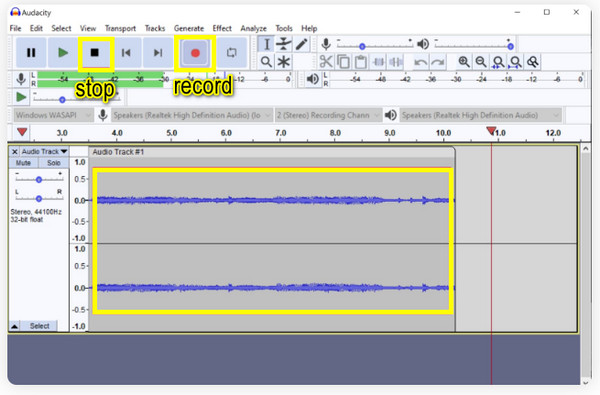
Step 3.When everything is set, click the "Record" button, then play the audio you wish to capture on your computer, and the program must capture it directly.
How to Record Computer Audio and Microphone on Mac with Audacity
What about recording both system and mic audio on Mac? Just like the previous method for Audacity to record computer audio, this requires a setup. macOS does not support recording system audio directly. Still, fortunately, you can route the system audio to the program using additional software like Soundflower to record both system audio and mic input at once.
Here are the detailed steps to make Audacity record PC sound and mic on your Mac:
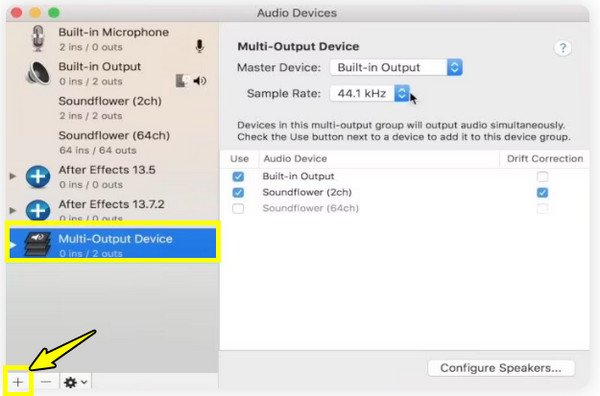
Step 1.Get the Audacity installed on your Mac, as well as the virtual audio routing software like Sounflower. Once done, open the "Audio MIDI Setup" by searching it in Spotlight.
Click the "Add" button in the down left corner and pick the "Multi-Output Device" option, then check the boxes of your mic and Soundflower.
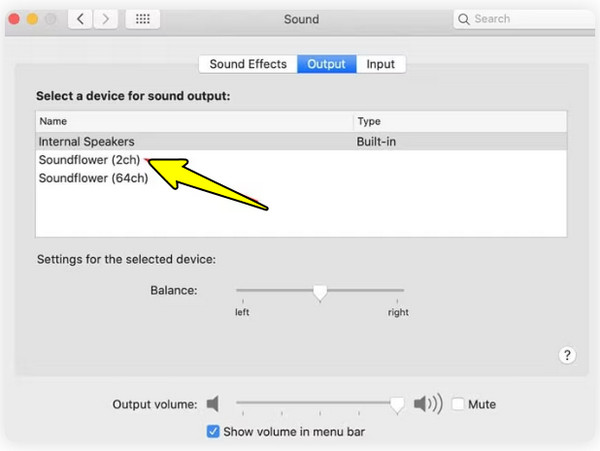
Step 2.Next, go to the "System Preferences" and then "Sound", in the "Output" tab, pick "Soundflower" as your output device to route your system audio into it. Then, in the "Input" tab, choose your microphone to use for recording.
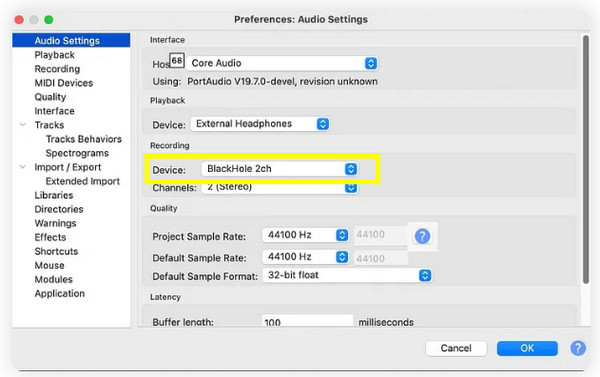
Step 3.Launch Audacity on Mac now. Open "Preferences" and go to "Audio Settings". Here, select the "Soundflower" as the "Device" from the "Recording" section. Click the "OK" button to proceed to the recording session.
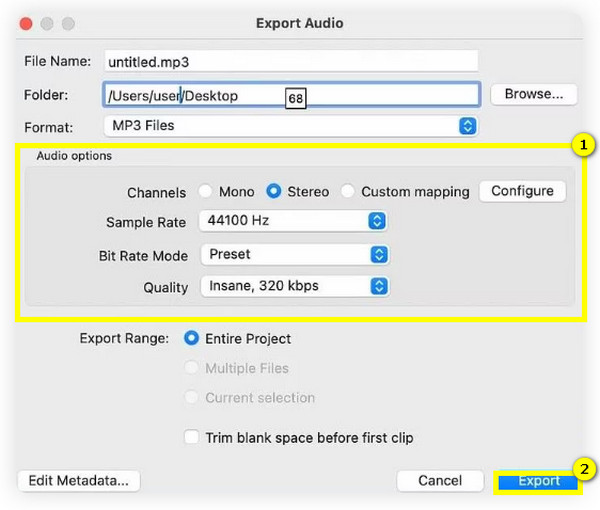
Step 4.After a while, click the "Stop" button. Then, you have a chance to adjust the export settings, like format, sample rate, bit rate, quality, and more. Once finished, click the "Export" button.
How to Record Desktop Audio with Audacity on Linux
Meanwhile, recording computer audio with Audacity on Linux can be a bit more challenging than those first two operating systems. Linux does not have support for recording audio in the same way. To do so, you need some specific tools and configurations, e.g., PulseAudio, to route your system audio into Audacity for audio recording.
To understand it more, here’s how to record computer audio with Audacity on your Linux system:
Step 1.Install Audacity on Linux using your distribution’s package manager.
For Ubuntu/Debian: sudo apt install audacity. For Fedora: sudo dnf install audacity; and for Arch Linux: sudo pacman -S audacity.
Step 2.After that, install the PulseAudio Volume Control, depending also on your distributor.
For Ubuntu/Debian: sudo apt install pavucontrol. For Fedora: sudo dnf install pavucontrol, and for Arch Linux: sudo pacman -S pavucontrol.
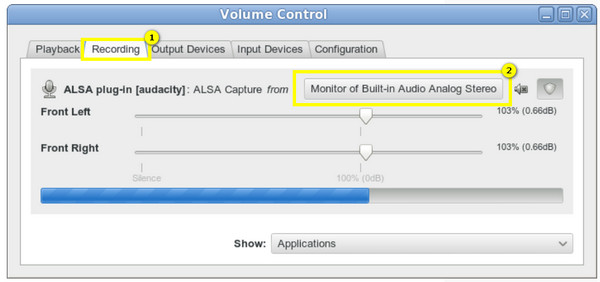
Step 3.Now, launch the PulseAudio Volume Control, head to the "Recording" tab and ensure Audacity is running. There, choose "Monitor of Built-in Audio Analog Stereo" as your input device.
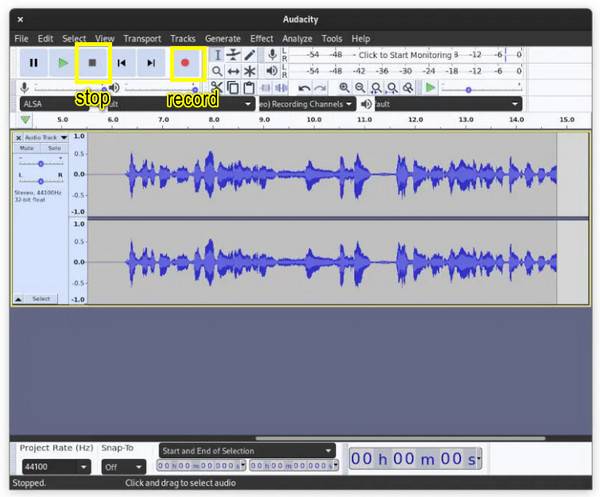
Step 4.Run Audacity, click the "Device Toolbar" above, and set the "Audio Host" to "PulseAudio". Then, make sure the "Monitor of Built-in Audio Analog Stereo" is chosen in the "Recording Device", and the "Stereo" as your input channel. Click the "Record" button on this Linux screen recorder.
Use Audacity Alternative to Record System Audio and Microphone Better
While Audacity is a popular tool for recording and editing audio, you may not find its process to record computer audio easiest, especially on Windows and macOS. Therefore, instead of using Audacity to record computer audio, one excellent alternative for both system and mic capture is AnyRec Screen Recorder. It features a friendly interface, simplifying the whole recording process compared to Audacity records computer audio and mic sound. Aside from capturing both the system and mic, you can customize the recording settings, too, giving you superb quality without running through complicated settings. It also has impressive noise reduction and mic enhancement features to guarantee you'll get a precise and professional-quality recording.

Can capture system and mic easily, either individually or simultaneously.
Fine-tune audio settings like format, sample rate, and more for your needs.
Do a sound test first to avoid having audio recording challenges.
Advanced mic enhancement features for a high-quality output.
100% Secure
100% Secure
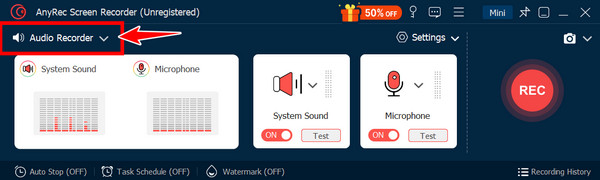
Step 1.After launching AnyRec Screen Recorder, select a recording mode from the upper left side (usually set as Video Recorder), from the list, aim for "Audio Recorder"
Step 2.Next, turn on the "System Sound" and "Microphone" switch buttons, then change their volume levels as desired by dragging the sliders.
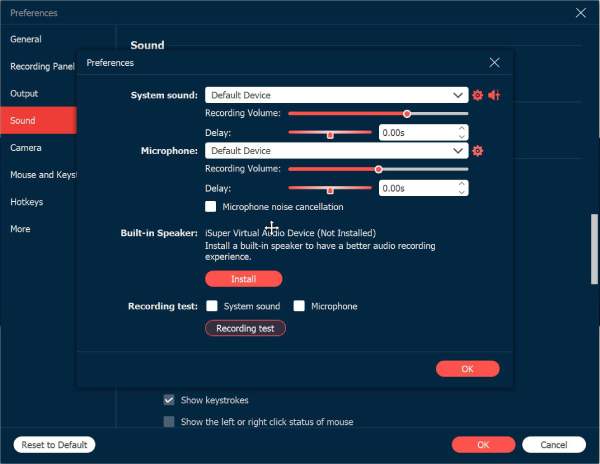
To improve the sound, go to "Settings" then "Sound" and click the "microphone noise cancellation" box to mark check on it.
Step 3.Once everything is set to your taste, click the "REC" button to begin recording. The procedure is straightforward. Throughout the session, you can adjust the audio volume.

Step 4.When you’re done recording, click the "Stop" button to review your file and remove any unwanted segments. Click the "Done" button to save the recording to your computer.
100% Secure
100% Secure
Fix Audacity Won't Record Computer Audio with Those Solutions
Sometimes, even after setting it up correctly to start the desktop audio recording, you may still face issues when recording computer audio. These issues can be no audio, laggy audio, low-quality sound, or others that are, luckily, solvable with the right adjustments.
Fix 1. Check Output Device.
When Audacity records nothing, ensure your system audio is outputting to the correct device. For example, if you use Soundflower on macOS, ensure the correct routing. Also, check on your system volume and the application’s audio output and make sure they are not muted.
Fix 2. Disable Audio Enhancements.
For fuzzy, distorted sound in Audacity, you can try disabling any enhancements in the Sound settings, then right-click on the icon and head to Playback Devices, then Properties. Otherwise, you can ensure that the sample rate matches your audio system.
Fix 3. Lower Latency.
If your audio is out of sync with the playback, lessen the buffer size under Latency, which you can see in Edit, then Preferences to Devices. Here, you can adjust with smaller sizes, but not too small since it may lead to glitches.
Conclusion
Recording computer audio with Audacity on all platforms offers a powerful solution for everyone looking to capture high-quality sound. Whether you want to record system sound and content or create podcasts, Audacity has a range of tools to enhance your recording experience. However, its setup is complex, so the AnyRec Screen Recorder emerges as the best alternative. This tool not only has a simple audio recording process for both the system and the mic, but it also has additional features like mic enhancement, editing tools, etc. Get a smooth, hassle-free, and high-quality recording now!