Κορυφαία 5 συσκευή εγγραφής οθόνης με χρονοδιακόπτη για PC/Mac/iPhone/Android
Οι προγραμματισμένες εγγραφές είναι χρήσιμες για την αυτόματη λήψη διαδικτυακών σεμιναρίων, ζωντανών ροών, τηλεοπτικών εκπομπών, διαδικτυακών μαθημάτων και άλλων ειδών χρονομετρημένων εργασιών. Δεν χρειάζεται να κάθεστε μπροστά στον υπολογιστή σας για να ενεργοποιήσετε την εγγραφή οθόνης με μη αυτόματο τρόπο. Μια συσκευή εγγραφής οθόνης με χρονοδιακόπτη μπορεί να σας βοηθήσει να κάνετε τα πάντα. Ρυθμίστε τη συγκεκριμένη ώρα έναρξης και διακοπής (ίσως με τη λειτουργία ημερήσιας ή εβδομαδιαίας επανάληψης). Αργότερα, μπορείτε να αυτοματοποιήσετε τις εργασίες εγγραφής και να αποτυπώσετε έξυπνα τις συνεχείς δραστηριότητες. Δεν έχετε ιδέα ποιο εργαλείο να επιλέξετε; Ελέγξτε τις παρακάτω συστάσεις με λεπτομερείς αναλύσεις και βήματα.
Λίστα οδηγών
Κορυφαία 5 συσκευή εγγραφής οθόνης με λογισμικό χρονοδιακόπτη- • AnyRec Screen Recorder [Windows, Mac, iPhone, Android]
- • QuickTime Player [Μόνο Mac]
- • OBS [Windows, Mac, Linux]
- • Συντομεύσεις + Εγγραφή οθόνης iOS [iPhone με iOS 11 και μεταγενέστερες εκδόσεις]
- • AZ Screen Recorder [Android]
Top 5 Καλύτερες συσκευές εγγραφής οθόνης με χρονόμετρο για Windows, Mac, iPhone και Android
Εδώ μπορείτε να λάβετε λεπτομερείς εισαγωγές σχετικά με τη λειτουργία χρονοδιακόπτη κάθε συσκευής εγγραφής οθόνης. Απλώς διαβάστε και βρείτε την καλύτερη επιλογή σας.
#1. AnyRec Screen Recorder [Προγραμματισμός εγγραφής κατά χρόνο, μήκος και μέγεθος αρχείου]
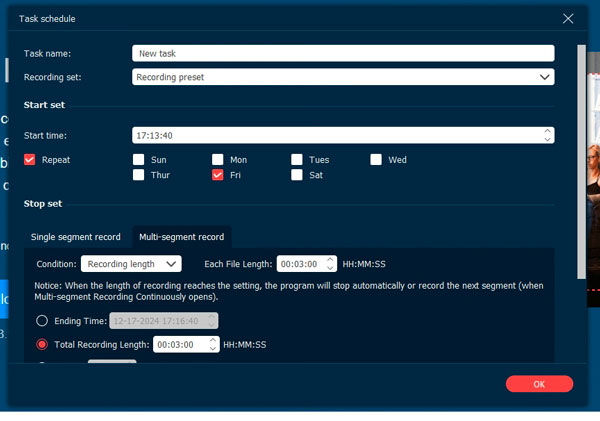
AnyRec Screen Recorder παρέχει Πρόγραμμα εργασιών και Αυτόματη διακοπή για χρονομετρημένη εγγραφή οθόνης. Σε αντίθεση με τους ανταγωνιστές, μπορείτε να έχετε περισσότερες επιλογές για προγραμματισμένες εγγραφές. Υποστηρίζεται η ρύθμιση χρονοδιακόπτη με διάρκεια εγγραφής, μέγεθος αρχείου και ώρα λήξης. Επιπλέον, μπορείτε να δημιουργήσετε μια προγραμματισμένη εργασία εγγραφής για να κάνετε εγγραφή πολλαπλών τμημάτων. Με αυτά τα προγράμματα εγγραφής, μπορείτε να ρυθμίσετε ένα χρονόμετρο με ευελιξία.
Αυτό που μου αρέσει:
- Δημιουργήστε ένα χρονοδιάγραμμα εργασιών για να κάνετε μια εγγραφή ενός ή πολλαπλών τμημάτων σε πολλαπλές λειτουργίες εγγραφής.
- Σχεδιάστε μια εργασία εγγραφής ορίζοντας προσαρμοσμένη διάρκεια εγγραφής, μέγεθος αρχείου και χρόνο λήξης.
- Προγραμματίστε μια εγγραφή πολλαπλών τμημάτων με προσαρμοσμένα κομμάτια (με μήκος εγγραφής και μέγεθος αρχείου).
- Ρυθμίστε να μην κάνει τίποτα, τερματίστε τη λειτουργία του υπολογιστή, θέστε τον υπολογιστή σε αδράνεια ή τερματίστε το πρόγραμμα μετά από χρονομετρημένη εγγραφή.
- Εγγραφή βίντεο και ήχου σε iPhone και Android με mirroring.
Αυτό που δεν μου αρέσει:
- Ο προηγμένος επεξεργαστής είναι διαθέσιμος μετά τη συνδρομή.
100% Secure
100% Secure
#2. QuickTime Player [Need Automator for Mac Schedule Recording]
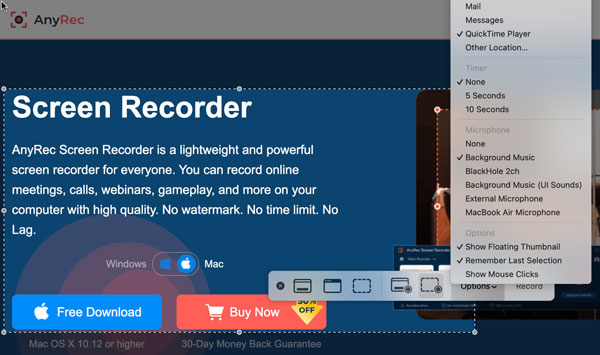
Δεν υπάρχει προεπιλεγμένο χρονόμετρο στο QuickTime Player. Εάν θέλετε να ξεκινήσετε και να σταματήσετε την εγγραφή σε Mac χρησιμοποιώντας το QuickTime Player αυτόματα, πρέπει να χρησιμοποιήσετε το AppleScript ή το Automator για να προγραμματίσετε την εγγραφή οθόνης. Ωστόσο, η ρύθμιση ενός χρονοδιακόπτη για τον έλεγχο της αυτόματης εγγραφής οθόνης QuickTime είναι αρκετά περίπλοκη, ειδικά για αρχάριους.
Αυτό που μου αρέσει:
- Το QuickTime Player είναι μια προεπιλεγμένη εφαρμογή Mac. Δεν χρειάζεται να εγκαταστήσετε επιπλέον εργαλεία.
- Μπορείτε να λάβετε ένα χρονόμετρο για εγγραφή στην οθόνη με το QuickTime Player 5 ή 10 δευτερόλεπτα αργότερα.
Αυτό που δεν μου αρέσει:
- Δεν υπάρχει ενσωματωμένος χρονοδιακόπτης εγγραφής στο QuickTime Player. Η λειτουργία της διαδικασίας εγκατάστασης είναι δύσκολη.
#3. OBS [Χρήση Advanced Scene Switcher Plugin ή Scheduling Python/Lua Script]
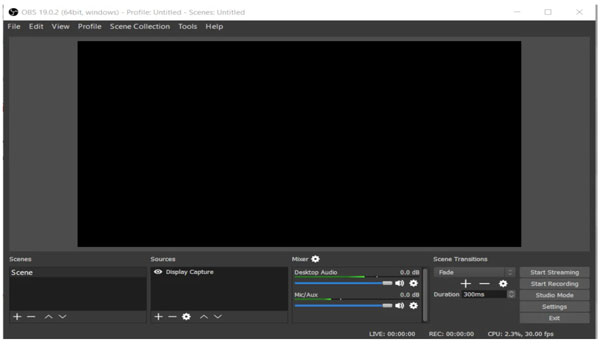
Το OBS δεν διαθέτει ενσωματωμένο χρονόμετρο για προγραμματισμένη εγγραφή. Εάν προτιμάτε το OBS για ροή και εγγραφή, χρησιμοποιήστε ένα πρόσθετο ή πρόγραμμα τρίτου κατασκευαστή. Η εγκατάσταση της προσθήκης Advanced Scene Switcher από το OBS Tools είναι μια ευκολότερη επιλογή. Μεταβείτε στην καρτέλα "Γενικά" και βρείτε τη λειτουργία "Χρονόμετρο" για να προγραμματίσετε την εγγραφή OBS.
Ή μπορείτε να δημιουργήσετε μια δέσμη ενεργειών χρονοδιακόπτη OBS με τα ακόλουθα σενάρια, η οποία συνιστάται από το φόρουμ του OBS. Μετά από αυτό, ανοίξτε τα Εργαλεία OBS και κάντε κλικ στο "Σενάρια" για να ενεργοποιήσετε το εργαλείο προγραμματισμού OBS.
- obs.timer_start = συνάρτηση()
- obs.obs_frontend_recording_start()
- obs.timer_add(function()
- obs.obs_frontend_recording_stop()
- τέλος, 60000) — Σταματά την εγγραφή μετά από 60 δευτερόλεπτα
- τέλος
Αυτό που μου αρέσει:
- Το OBS παρέχει εξαιρετικά προσαρμόσιμους ελέγχους κατά την εγγραφή και τη ροή.
- Το OBS είναι δωρεάν και ανοιχτού κώδικα για όλους τους χρήστες επιτραπέζιων υπολογιστών, συμπεριλαμβανομένων των Windows, Mac και Linux.
Αυτό που δεν μου αρέσει:
- Οι αρχάριοι μπορεί να έχουν δυσκολίες με την εγκατάσταση εξωτερικού χρονοδιακόπτη εγγραφής OBS.
- Το OBS διακόπτεται συχνά σε παλαιότερα και λιγότερο ισχυρά συστήματα.
#4. Συντομεύσεις + Εγγραφή οθόνης iOS [για iOS 11 και νεότερη έκδοση, συμπεριλαμβανομένου του iOS 18]
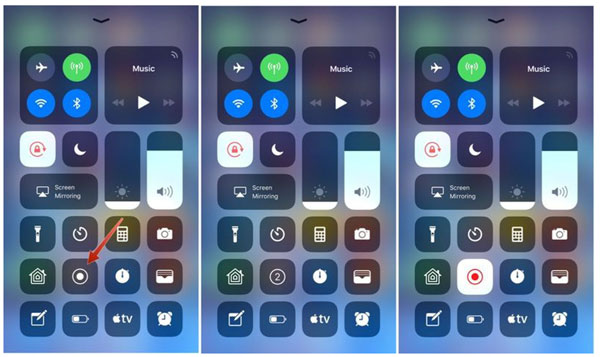
Δεν υπάρχει τέτοιο ενσωματωμένο χρονόμετρο για εγγραφή οθόνης iPhone. Αλλά μπορείτε να χρησιμοποιήσετε την εφαρμογή Συντομεύσεις για να ρυθμίσετε προγραμματισμένες εγγραφές. Έτσι το Εγγραφή iOS η λειτουργία μπορεί να ξεκινήσει αυτόματα σε μια συγκεκριμένη ώρα.
Όσο για τη συσκευή εγγραφής οθόνης iPhone με τη διαδικασία ρύθμισης χρονοδιακόπτη, απλώς ακολουθήστε τα εξής βήματα: ενεργοποιήστε την Εγγραφή οθόνης iOS > ανοίξτε την εφαρμογή Συντόμευση > πατήστε το κουμπί "+" > ρυθμίστε τις ενέργειες Αναμονή, Έναρξη εγγραφής και Διακοπή εγγραφής > Μεταβείτε στο " ενότητα Αυτοματισμός" στην εφαρμογή Συντομεύσεις > πατήστε "Δημιουργία Προσωπικού Αυτοματισμού" > επιλέξτε ώρα της ημέρας και προσθέστε συντομεύσεις > ξεκλειδώστε το iPhone σας και περιμένετε για το χρονομετρημένο iPhone εγγραφή οθόνης.
Αυτό που μου αρέσει:
- Η εφαρμογή εγγραφής οθόνης iOS και Συντομεύσεις είναι προεγκατεστημένα στο iPhone. Δεν χρειάζεται να κατεβάσετε επιπλέον εφαρμογές. Χωρίς επιπλέον πληρωμή.
- Μπορείτε να ορίσετε τους χρόνους έναρξης και διακοπής για αυτόματη εγγραφή iPhone.
Αυτό που δεν μου αρέσει:
- Το iPhone σας θα πρέπει να ξεκλειδωθεί για να εκτελέσετε μια προγραμματισμένη εργασία εγγραφής. Διαφορετικά, ο αυτοματισμός δεν μπορεί να εκτελεστεί σωστά.
- Εάν το iPhone σας βρίσκεται σε λειτουργία εξοικονόμησης ενέργειας, η χρονομετρημένη εγγραφή οθόνης iPhone μπορεί να σταματήσει απροσδόκητα.
#5. AZ Screen Recorder [Need Tasker for Scheduled Screen Recorder στο Android]
Το AZ Screen Recorder δεν υποστηρίζει εγγενώς χρονομετρημένη εγγραφή. Επομένως, εάν θέλετε να προγραμματίσετε μια εγγραφή οθόνης στο Android, απαιτείται μια εφαρμογή αυτοματισμού Tasker από τρίτους. Ολόκληρη η διαδικασία ρύθμισης εγγραφής χρονομετρημένης Android είναι περίπλοκη.
Μπορείτε να ακολουθήσετε απλά βήματα εδώ: Ανοίξτε την εφαρμογή Tasker > μεταβείτε στην καρτέλα "Tasker" > πατήστε το κουμπί "+" > ονομάστε τη νέα εργασία > Προσθήκη ενεργειών για έναρξη και διακοπή εγγραφής ξεχωριστά > Μεταβείτε στην καρτέλα Προφίλ, πατήστε το " κουμπί +" και επιλέξτε "Ώρα" ως έναυσμα, πρέπει να δημιουργήσετε 2 προφίλ για να ρυθμίσετε ένα χρονόμετρο στην εγγραφή οθόνης Android.
Αυτό που μου αρέσει:
- Μπορείτε να αυτοματοποιήσετε τις περισσότερες εργασίες εγγραφής προγραμματισμού στο Android συνδέοντας το AZ Screen Recorder με το Tasker.
- Δεν χρειάζεται να κάνετε root το Android για αυτοματοποιημένη εγγραφή οθόνης.
Αυτό που δεν μου αρέσει:
- Η όλη διαδικασία εγκατάστασης είναι περίπλοκη για αρχάριους.
- Η εφαρμογή Tasker δεν είναι δωρεάν για χρήση. Μόλις τελειώσει η δοκιμαστική του έκδοση, πρέπει να πληρώσετε για την άδειά του.
- Δεν μπορώ εγγραφή τηλεφώνου Android σε κατάσταση αναστολής λειτουργίας.
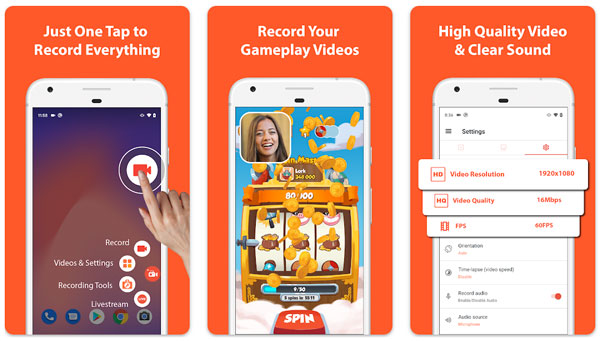
Πώς να προγραμματίσετε την εγγραφή οθόνης σε Windows και Mac
1. Δωρεάν λήψη, εγκατάσταση και άνοιγμα του AnyRec Screen Recorder. Κάντε κλικ στο κουμπί "Πρόγραμμα εργασιών" στο κάτω μέρος του προγράμματος.
100% Secure
100% Secure
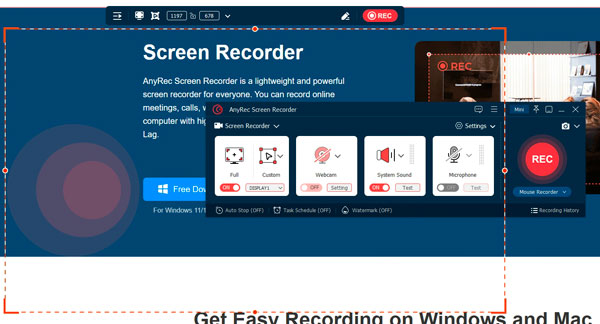
2. Κάντε κλικ στο κουμπί "+". Εισαγάγετε ένα όνομα για να ορίσετε ένα χρονόμετρο εγγραφής οθόνης.
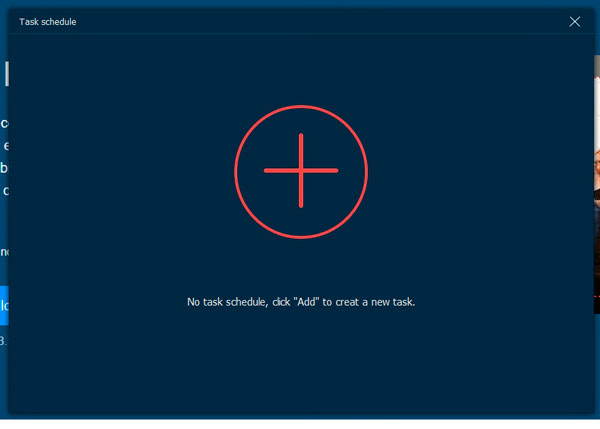
3. Ξεδιπλώστε τη λίστα "Σετ εγγραφής", επιλέξτε τη λειτουργία εγγραφής από το "Screen Recorder", "Game Recorder", "Window Recorder" και άλλα.
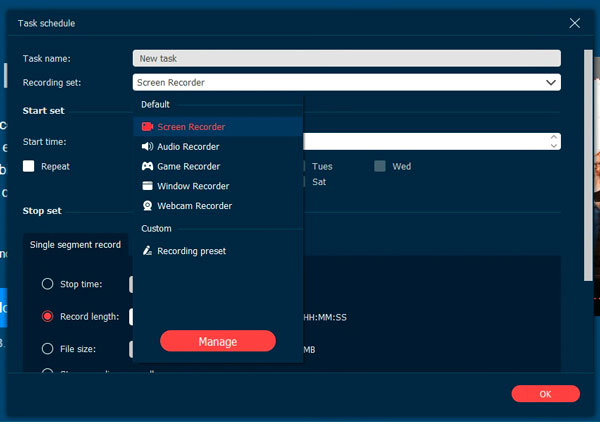
4. Αργότερα, κάντε κλικ στο κουμπί "Διαχείριση" παρακάτω. Μπορείτε να καθορίσετε την περιοχή εγγραφής, την πηγή ήχου εισόδου, την κάμερα web και το υδατογράφημα. Κάντε κλικ στο κουμπί "Εφαρμογή" για να αποθηκεύσετε τις αλλαγές.
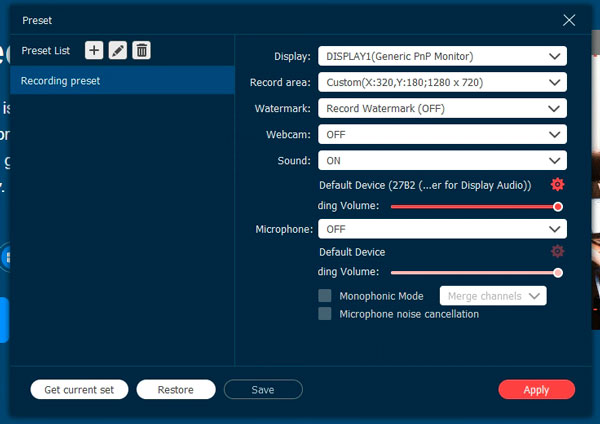
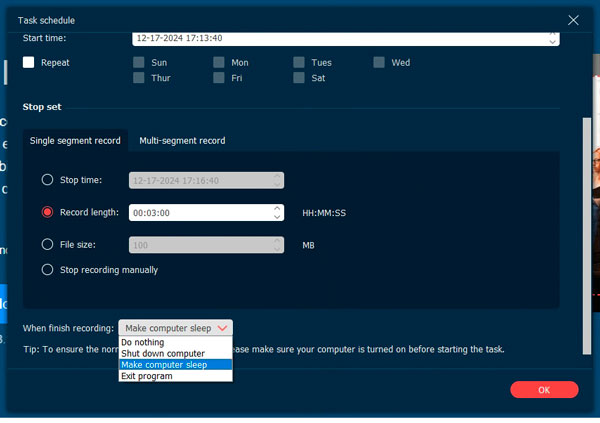
5. Καθορίστε την ώρα έναρξης, τις επιλογές επανάληψης και τη ρύθμιση διακοπής. Στην ενότητα "Διακοπή ρύθμισης", μπορείτε να ορίσετε πώς θα σταματά αυτό το χρονόμετρο (κατά χρόνο διακοπής, διάρκεια εγγραφής, μέγεθος αρχείου ή μη αυτόματη διακοπή). Μην ξεχάσετε να ξεδιπλώσετε τη λίστα "Όταν τελειώσει η εγγραφή". Πείτε σε αυτήν τη συσκευή εγγραφής οθόνης με χρονόμετρο τι να κάνει μετά την εγγραφή.
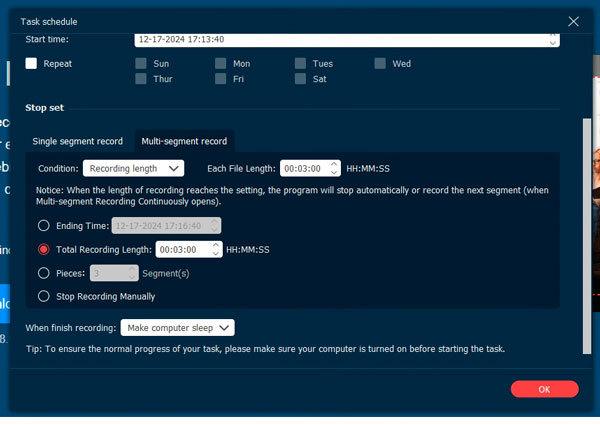
6. Εάν θέλετε να εγγράψετε βίντεο σε τμήματα χρησιμοποιώντας χρονοδιακόπτη, μεταβείτε στην ενότητα "Εγγραφή πολλαπλών τμημάτων". Καθορίστε λεπτομέρειες με "Συνθήκες", "Μήκος κάθε αρχείου", "Ώρα λήξης", "Συνολικό μήκος εγγραφής" και άλλα. Τέλος, κάντε κλικ στο κουμπί "OK" για να αποθηκεύσετε τις αλλαγές. Το χρονόμετρο εγγραφής θα αρχίσει να λειτουργεί μόλις συμπληρωθεί η ώρα έναρξης.
Συμβουλές για το χρονοδιάγραμμα ηχογράφησης
1. Δοκιμή εκ των προτέρων: Κάντε μια δοκιμή πριν εκτελέσετε μια ακριβή προγραμματισμένη εγγραφή.
2. Μείνετε ξύπνιοι και ξεκλειδώστε: Αποφύγετε τη μετάβαση του υπολογιστή ή του τηλεφώνου σας σε κατάσταση αναστολής λειτουργίας ή κλειδώματος οθόνης κατά την εγγραφή.
3. Βελτιστοποιήστε τις ρυθμίσεις: Θυμηθείτε να ρυθμίσετε τις πηγές ήχου εισόδου και να ελέγξετε τις ρυθμίσεις ήχου/βίντεο.
4. Αρκετός αποθηκευτικός χώρος: Εάν η χρονομετρημένη εγγραφή οθόνης σας διαρκεί για ώρες, ελέγξτε τον χώρο αποθήκευσης και την κατάσταση της μπαταρίας. Επιπλέον, μπορείτε να χρησιμοποιήσετε τον χώρο αποθήκευσης cloud για αυτόματη δημιουργία αντιγράφων ασφαλείας.
συμπέρασμα
Ρυθμίζοντας ένα χρονόμετρο, μπορείτε να εγγράψετε βίντεο και ήχο οθόνης χωρίς να κάθεστε μπροστά στους υπολογιστές για ώρες. Πολλές συσκευές εγγραφής οθόνης για επιτραπέζιους υπολογιστές και φορητές συσκευές δεν διαθέτουν χρονοδιακόπτη που είναι χρήσιμος. Αλλά μην ανησυχείτε για αυτό. Το AnyRec Screen Recorder είναι το σωστό καταγραφικό οθόνης με χρονόμετρο σε όλες τις πλατφόρμες που μπορείτε να επιλέξετε. Απλώς κατεβάστε δωρεάν το πρόγραμμα και προγραμματίστε εγγραφή βίντεο/ήχου/κάμερας web/παιχνιδιού ανά ώρα, μέγεθος αρχείου, ώρα λήξης και άλλα!
100% Secure
100% Secure
