[Ratkaisut] TeamViewer-etäistunnon ja -kokouksen tallentaminen helposti
TeamViewer on maailmanlaajuinen etäkäyttöohjelmisto, jossa on sisäänrakennettu näytön tallennustoiminto. Voit tallentaa etäohjaimia ja verkkokokouksia TeamViewer Classicilla, mukaan lukien videota, ääntä, IP-puheluita, web-kameran kuvia ja paljon muuta. Lyhyesti sanottuna voit tallenna TeamViewer-istuntoja ja kokouksia Windows- ja Mac-tietokoneilla. Kun ohjaat virtuaalisesti jonkun tietokonetta etänä, voit tallentaa kaikki näytöllä tapahtuvat toiminnot reaaliajassa. Mitä sinun tulee tietää siitä? Jatka vain lukemista.
Opasluettelo
Tallenna lähtevä etäistunto TeamViewerilla Tallenna lähtevät/saapuvat TeamViewer tietokoneesi näytöllä Ota TeamViewerin automaattinen tallennus käyttöön ja pakota se FAQsLähtevän/saapuvan etäistunnon tai kokouksen tallentaminen TeamViewerilla
Kun muodostat yhteyden etälaitteeseen, voit tallentaa sen samanaikaisesti. Kaikki näytöllä näkyvät video- ja äänitoiminnot voidaan tallentaa. Voit siis hyödyntää tallennettuja istuntoja täysimääräisesti seurantaan ja harjoitteluun.
Vaihe 1.Käynnistä TeamViewer-ohjelmasi. Aloita istunto ja kirjaudu sisään etätietokoneeseen.
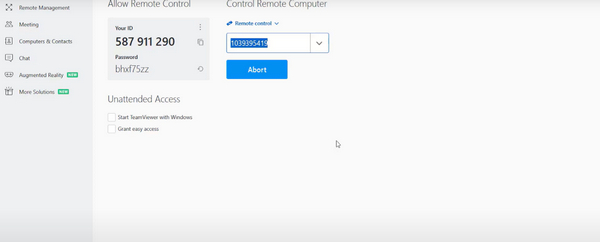
Vaihe 2.Kun istunto on auki, etsi "Files&Extra" -valikko kaukosäätimen työkalupalkista. Aloita tallennus napsauttamalla myöhemmin "Aloita istunnon tallennus" -painiketta.
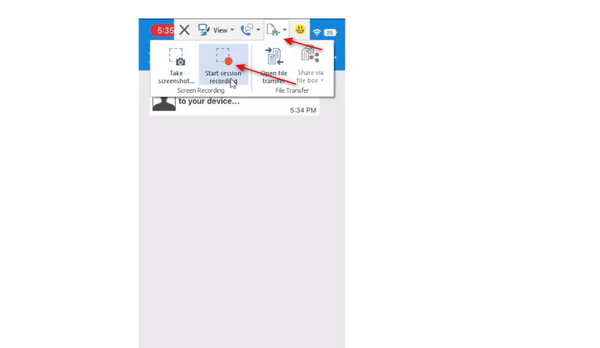
Vaihe 3.Napsauta "Stop"-painiketta, kun tallennus on valmis. Saat ponnahdusikkunan. Tallenna videotiedosto valittuun paikkaan. Muista, että tiedosto on tallennettu .tvs-muodossa.
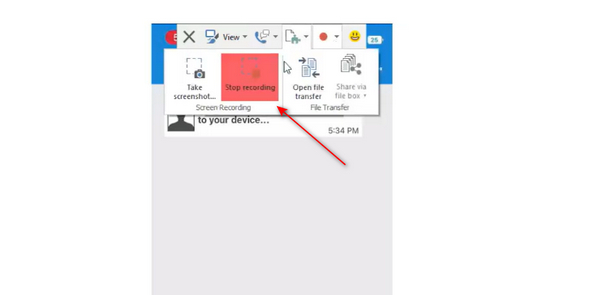
Vaihe 4.Siirry TeamViewer Classicin vasemmassa yläkulmassa olevaan kolmiriviseen valikkoon. Etsi "Extra" ja napsauta "Toista tai muunna tallennettu istunto...". Valitse tallennettu TeamViewer TVS -tiedosto. Napsauta "Muunna" -painiketta. Määritä video- ja ääniasetukset. Viimeinkin voit napsauttaa "Muunna" -painiketta suorittaaksesi TeamViewer TVS:n AVI-videomuunnoksen loppuun.
Vinkkejä
Jos haluat tehdä TeamViewer-kokousvideosta pienemmän tiedostokoon, voit tehdä sen Napsauta tätä muuntaaksesi AVI: n MP4:ksi ja muut häviöttömät muodot.
Bonus: Kuinka luoda etäistunto TeamViewerilla
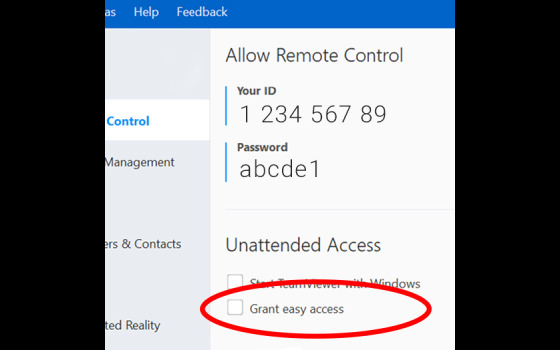
Vaihe 1.Etäistunnon aloittamiseksi sinun on ensin hankittava etäkoneen "Partner ID". Jos etäkoneeseen ei ole asennettu TeamViewerin täyttä versiota, sen on ensin käytettävä TeamViewerin tarjoamaa "Lataa QuickSupport" -ominaisuutta.
Vaihe 2.Kirjoita päänäytön kenttään "Kumppanin tunnus". Ota "Remote Control" -vaihtoehto käyttöön ja napsauta "Yhdistä"-painiketta. Syötä "Salasana" ja vahvista.
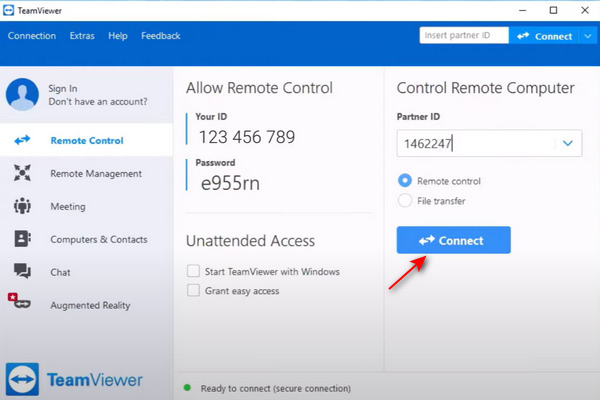
Vaihe 3.Kun olet muodostanut yhteyden, sinulle annetaan täysi käyttöoikeus etäkoneeseen.
Vinkkejä
Saattaa olla pieni mahdollisuus, että tarvitset UAC-käyttöoikeuden hyväksynnän, ennen kuin TeamViewer myöntää sinulle etätietokoneen järjestelmänvalvojan käyttöoikeudet. Tämä voidaan helposti kiertää pyytämällä toista henkilöä hyväksymään kutsu.
Tallenna TeamViewer tietokoneen näytöllä - TeamViewer-näytönauhurin lisäksi
Huolimatta TeamViewerin sisäänrakennetun näytön tallentimen tarjoamasta mukavuudesta, sillä on myös monia haittoja, kuten videon laadun ja formaattien rajoitukset, ei mahdollisuutta muokata videoita jälkikäteen, ei pysty tallentamaan tietokoneen näyttöä kauko-ohjatun tietokoneen kanssa jne. , parempi ratkaisu voisi olla ammattimaisen näytön tallennusohjelmiston käyttö. AnyRec Screen Recorder on paras vaihtoehtosi. Siinä on seuraavat tärkeät ominaisuudet, jotka voivat auttaa sinua:

Tallenna TeamViewerin ulkopuolella mukautetulla näyttökoolla.
Vie video-/äänitallenteet AVI-, MP4-, MP3- ja suosituimpiin muotoihin.
Lisää hiiren osoitin, näppäinpainallus, huomautus TeamViewer-nauhoituksen aikana.
Aseta mukautetut pikanäppäimet käynnistämään/pysäyttämään näytön tallennus välittömästi.
Leikkaa, yhdistä, pakkaa ja muokkaa tallennustiedostoja ohjelman sisällä
Suojattu lataus
Suojattu lataus
Vaihe 1.Lataa ja asenna TeamViewerin paras näytöntallenninohjelmisto. Avaa ohjelma. Napsauta päänäytössä näytön vasemmalla puolella olevaa "Video Recorder" -painiketta jatkaaksesi.

Vaihe 2.Toisessa vaiheessa sinun on valittava näytön alue tallennettavaksi. Napsauta "Full"-painiketta tallentaaksesi koko näytön videon. Jos haluat mieluummin ikkunallisen TeamViewer-istunnon, napsauta "Mukautettu" -painiketta tietyn istuntoikkunan kohdalla.

Vaihe 3.Riippuu tarpeistasi. Jos haluat äänittää äänikommenttisi videoon, napsauta "Mikrofoni" -painiketta. Jos haluat tallentaa etäääntä istunnosta, ota "Järjestelmän ääni" käyttöön napsauttamalla sitä.

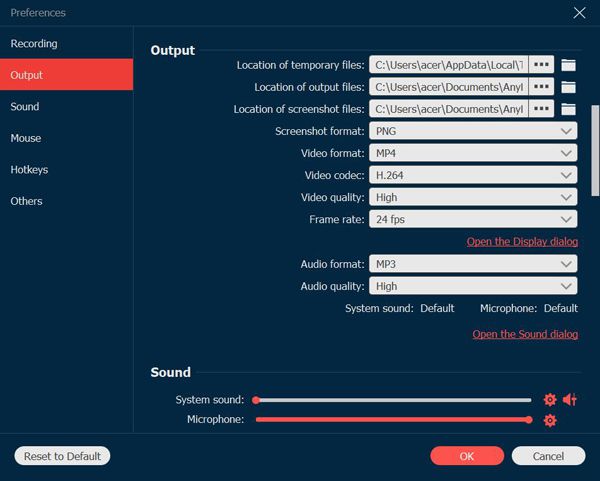
Vaihe 4.Jos haluat tallentaa tulostiedoston haluamaasi muotoon, napsauta "Setting"-painiketta. Siirry "Output"-välilehdelle napsauttamalla sitä. Tee tarvittavat säädöt ja napsauta "Tallenna" -painiketta.
Vaihe 5.Napsauta "REC"-painiketta aloittaaksesi tallennus.

Vaihe 6.Kun tallennus on valmis, napsauta "Stop"-painiketta. Esikatselunäytössä voit muokata, leikata, rajata, leikata videota ja lisätä erikoistehosteita vastaavasti. Viimeistele TeamViewer-istunnon tallennus napsauttamalla Valmis-painiketta.
TeamViewerin automaattisen tallennuksen ottaminen käyttöön ja pakottaminen
Itse asiassa TeamViewer tarjoaa käyttäjille vaihtoehtoja tallentaa kaikki yhteydet ja kaukosäätimet automaattisesti. TeamViewer-tallennustoimintoa ei tarvitse käynnistää toistuvasti. Noudata alla olevia ohjeita.
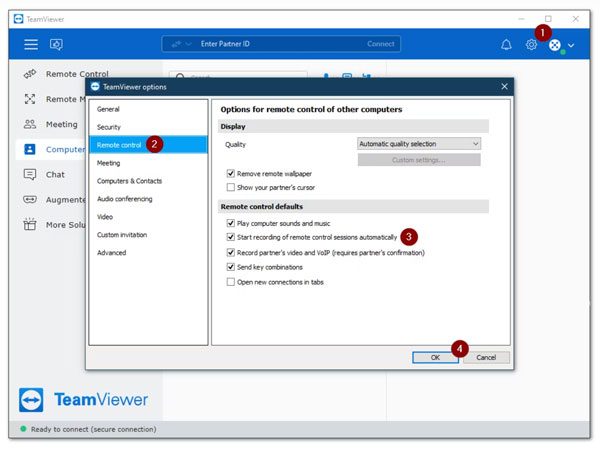
Vaihe 1.Etsi TeamViewer Classic -tilisi oikeasta yläkulmasta "Asetukset" -painike ja napsauta sitä.
Vaihe 2.Siirry "Kaukosäädin" -osioon. Rastita valintamerkki ennen "Aloita kaukosäätimen istuntojen tallennus automaattisesti".
Vaihe 3.Napsauta "OK"-painiketta tallentaaksesi muutokset.
Vaihe 4.Löydät TeamViewerin automaattisesti tallennetun tiedoston oletustiedoston nimellä "Laitteen nimi (laitetunnus)_[VVVV-KK-PP] [HH.MM]". Jos haluat muuttaa TeamViewer-istunnon tallennushakemistoa, siirry kohtaan "Asetukset" hallitaksesi sitä.
Usein kysytyt kysymykset TeamViewer-istunnon tallentamisesta
-
1. Onko TeamViewerissa keylogger-ominaisuus?
Ei. TeamViewer pystyy lähettämään tiettyjä näppäinyhdistelmiä, kuten Ctrl+Alt+Del, mutta se ei tallenna näppäinpainalluksiasi. Jos haluat tallentaa näppäinpainalluksia etätietokoneella TeamViewer-istunnon aikana, käytä sen sijaan kolmannen osapuolen sovellusta.
-
2. En löydä tallennettua TeamViewer-videota. Missä se sijaitsee?
TeamViewer-istunnot ja kokoukset tallennetaan eri kansioihin. Jos et voi tehdä TeamViewer-tallennusta, varmista, että tarkistat oikean kansion. Jos sinulla on edelleen ongelmia, käytä vaihtoehtoista näytön tallenninta välttääksesi ongelmat.
-
3. Onko TeamViewer parempi kuin AnyDesk?
Molemmilla osapuolilla on hyvät ja huonot puolensa. AnyDesk mahdollistaa nopeammat yhteydet ja paremman suorituskyvyn TeamVieweriin verrattuna jopa alhaisella kaistanleveydellä. TeamViewerilla on kuitenkin enemmän ominaisuuksia ja parempi tuki.
Johtopäätös
Kuten artikkelissa olemme keskustelleet, siihen on useita tapoja tallenna TeamViewer-istunto tai kokous tietokoneellasi. Joko käyttämällä sisäänrakennettua tallenninta tai ammattimaista kolmannen osapuolen näytön tallennusohjelmistoa. Jos haluat tallentaa paitsi TeamViewerin kauko-ohjattavan tietokoneen myös kasvosi/näyttösi, AnyRec Screen Recorder on parempi valinta. Lisäksi voit käyttää sitä tallentaa online-videokokouksia ilman, että tallennuspainike ei näy, tiedostoa ei tallenneta, ääntä ei ole tallennettu ja vastaavia TeamViewer ei tallenna kysymyksiä. Erityistarpeistasi riippuen saat tarpeeksi tietoa valitaksesi vakaimman työkalupaketin käyttötapauksiisi.
Suojattu lataus
Suojattu lataus


