コンテンツ
コンテンツ
指示
AnyRec スクリーン レコーダーは、使いやすく強力な Windows 用スクリーン レコーダーです。ビデオ レコーダー、オーディオ レコーダー、ゲーム レコーダー、ウィンドウ レコーダー、ウェブカメラ レコーダー、電話レコーダー、ラスト レコーダーなど、さまざまなシナリオに対応する 7 つの異なる録画モードを提供します。これにより、画面上のすべてのアクティビティ、ビデオ、オーディオ ファイル、ウェブカメラの映像、着信、スナップショットをキャプチャできます。また、最高の録画を実現するための出力パラメーターと編集ツールも多数あります。

登録
AnyRecスクリーンレコーダーは、録画時間が3分、ビデオクリッピングなし、マイク強化なしなど、機能が制限された無料試用版を提供しています。 メニュー ボタンをクリックしてクリックします 登録 ボタン。
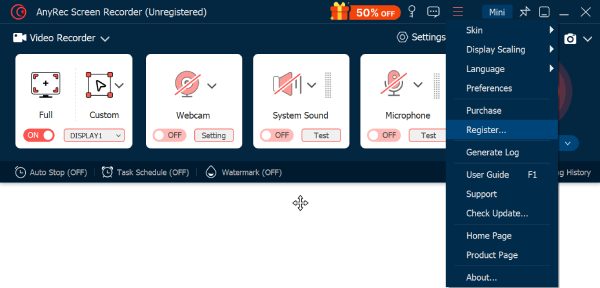
これで、登録ツールを取得するために必要な情報を入力できます。
電子メールアドレス: ソフトウェアの購入に使用したメールアドレスを入力してください。
登録コード: 注文確認書に記載されている登録コードを確認してください。

Update
AnyRec Screen Recorderに問題がある場合は、いつでも可能です。 無料アップデートを入手 バグを修正し、製品の機能を改善するために、よく使用される 2 つの方法を紹介します。
方法1:手動で更新する
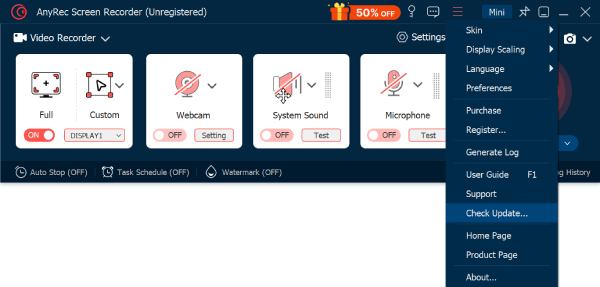
クリック メニュー 3本の線が入ったボタンをクリックし、 更新状況を確認して ボタンをクリックしてください。現在のバージョンを検出し、新しいアップデートを自動的に検索します。アップデートがある場合は、すぐにダウンロードしてインストールできます。
方法2:自動的に更新する
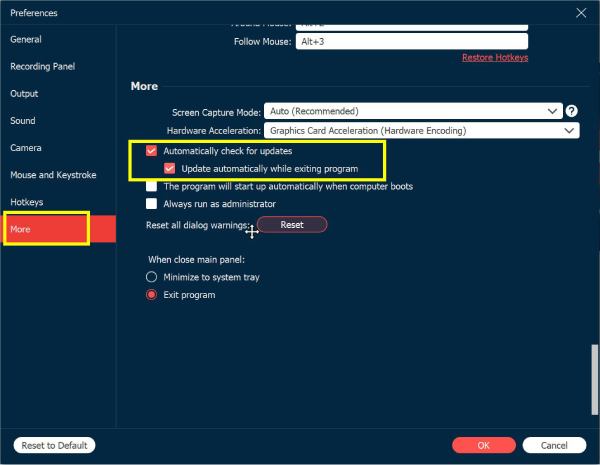
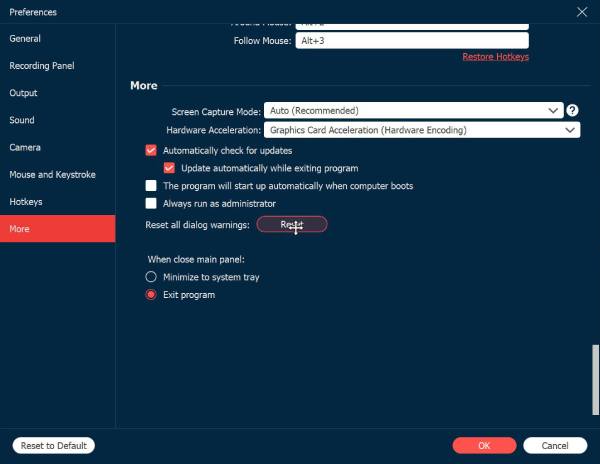
クリック 環境設定 からのボタン メニュー ドロップダウンリスト。 もっと タブ、あなたはチェックすることができます 更新を自動的に確認します チェックボックスをオンにします。こうすることで、アップデートがある場合に自動更新通知を受け取ることができます。また、ツールを終了するときにダウンロードするように選択することもできます。
環境設定
異なる出力、最高品質などで画面上のアクティビティをキャプチャする必要がある場合は、 好み 左側のサイドバーで、必要に応じて設定を微調整します。
全般的
の中に 全般的 オプションを使用すると、さまざまな設定を調整して、より良い録画体験を得ることができます。録画前にカウントダウンを表示する、録画開始時にビープ音を鳴らす、録画境界を表示する、録画中にフロートバーを非表示にする、録画中にデスクトップアイコンを非表示にする、録画中にデスクトップアイコンを自動的に非表示にするなどを選択できます。

記録パネル
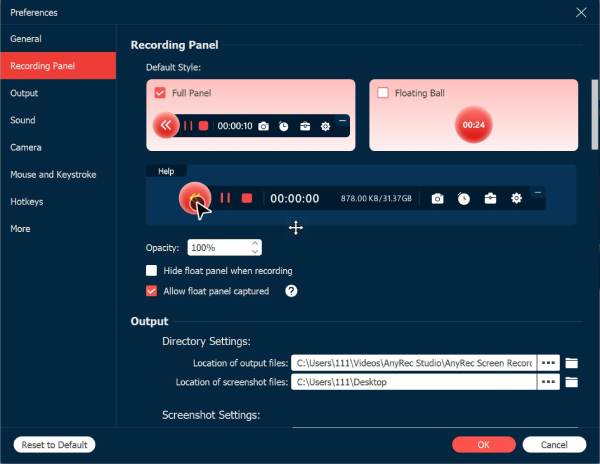
録画中は、注釈の追加や時間の設定など、より多くの機能を利用できるフローティング録画パネルが表示されます。パネル全体またはフローティングタイムボールのみをデフォルトとして設定できます。また、 記録パネル 設定。
出力
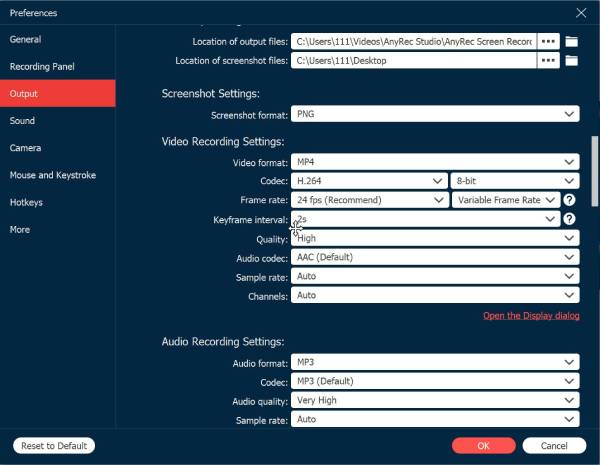
クリック 出力 タブでは、ビデオ、オーディオファイル、スナップショットの保存パスと出力形式をカスタマイズできます。さらに、出力品質を変更して、最高の録画をエクスポートすることもできます。このようにして、フォーマットの問題なしに録画を簡単に共有またはアップロードできます。
音
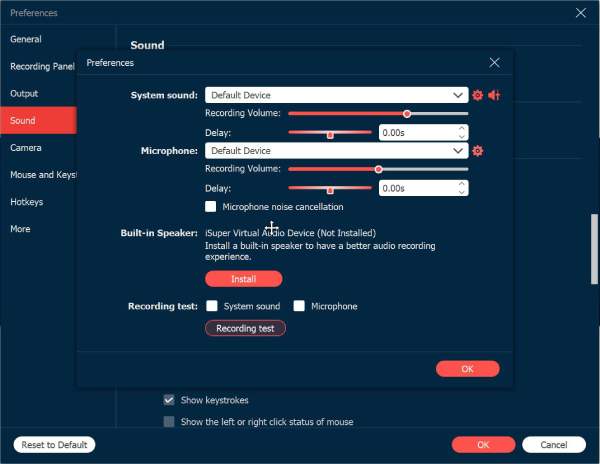
クリック 音 ボタンを押すと、システムサウンドとマイクの音量と遅延を個別に調整できます。 マイクのノイズキャンセル チェックボックスをオンにします。より良いオーディオ録音のために、内蔵スピーカーの使用も推奨されています。録音前にサウンドをテストできます。
カメラ
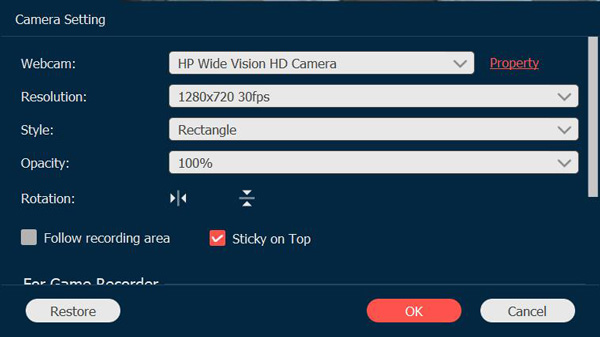
クリックした後 カメラ タブでは、AnyRec スクリーン レコーダーが最初にカメラを検出します。次に、解像度、スタイル、不透明度、回転を選択できます。カメラ画面を上部に固定するか、録画領域に追従するように設定することもできます。
マウスとキーストローク
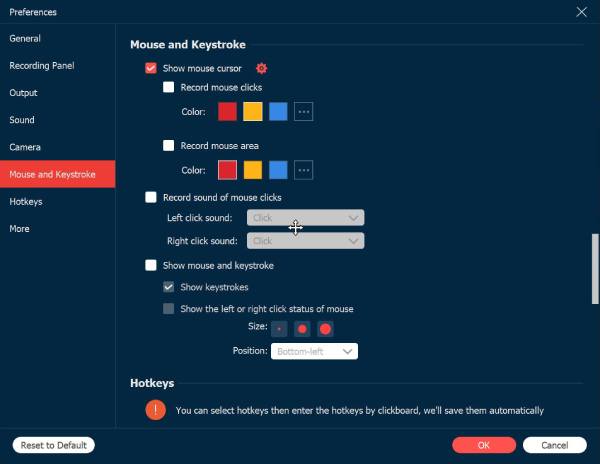
クリック ねずみ ボタンを使用すると、マウス カーソルを表示したり、マウス クリックの色や領域を柔軟に変更したりできます。さらに、さまざまなサイズでキーストロークをカスタマイズできるため、チュートリアルの記録に適しています。
ホットキー
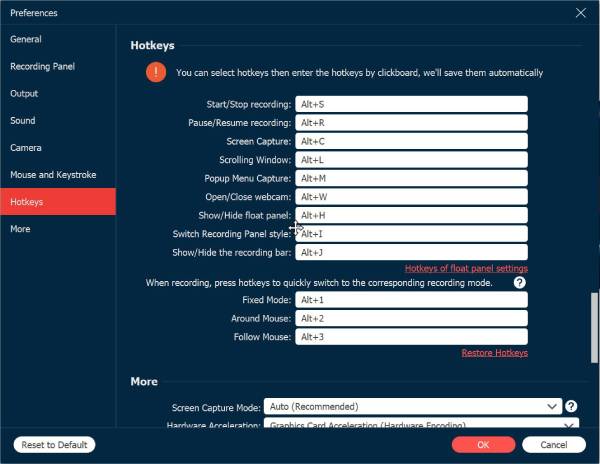
に移動します ホットキー オプションでは、録画の開始/停止/一時停止/再開、画面キャプチャ、フロートパネルの表示/非表示、ウィンドウのスクロール、録画モードの変更などのホットキーを変更できます。キーボードで新しいホットキーを入力して、ホットキーを自由に変更することもできます。その後、プログラムはそれらを自動的に保存します。より良いエクスペリエンスを得るために、Print Screen キーの代わりにカスタムホットキーを設定することもできます。
もっと
最後に、キャプチャ モードの変更、ハードウェア アクセラレーションの有効化、自動更新、コンピューターの起動時に自動的に起動、システム トレイの最小化、プログラムの終了などを行うための設定がさらにあります。
主な特徴
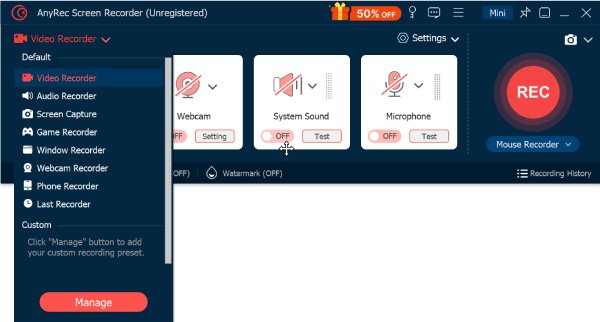
録画モードはデフォルトでビデオレコーダーに設定されています。 ビデオレコーダー 左上隅にあるボタンをクリックすると、ビデオ、オーディオ、ゲーム、ウェブカメラ、電話、特定のウィンドウを録画したり、スクリーンショットを撮ったりするための目的の機能を選択できます。
ビデオレコーダー
ビデオ レコーダーを使用すると、画面上のすべてのアクティビティを録画できます。オプションのオーディオとウェブカメラを使用して画面ビデオを録画する方法について詳しく学んでください。
ステップ1: デフォルトのレコーダーとして、直接選択することができます 満杯 画面を480Pから4Kまでの範囲でカスタマイズできます。音声とウェブカメラ付きのビデオを録画することもできます。
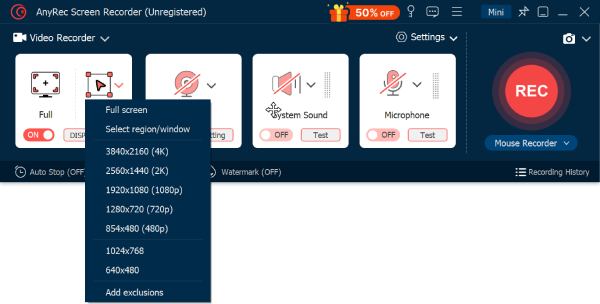
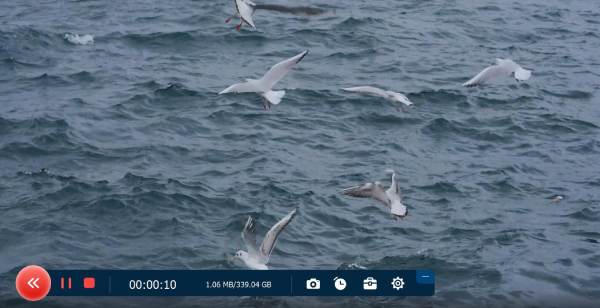
ステップ2: 希望するエリアを選択したら、 REC ボタンを押してキャプチャを開始します。録画プロセス中に、スナップショットを撮ったり、録画時間を設定したり、録画を編集したり、オーディオの音量を調整したりできます。
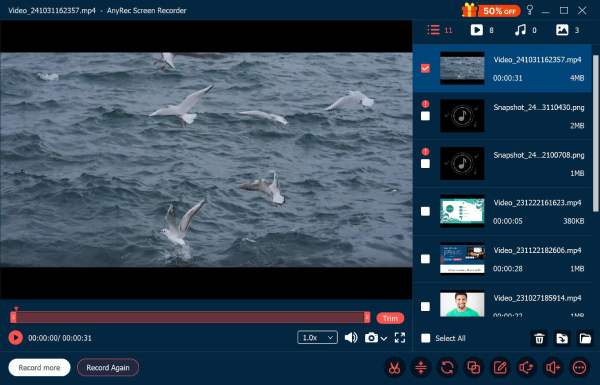
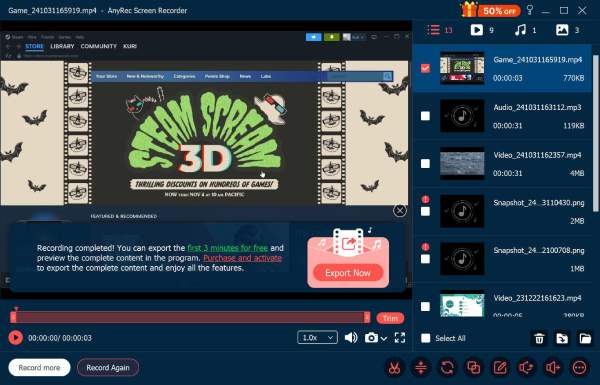
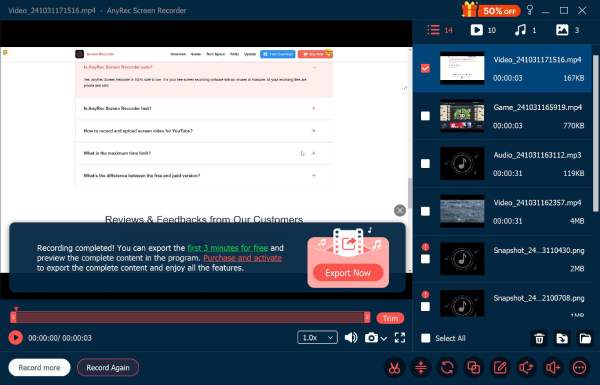
ステップ3: クリック やめる ボタンをクリックしてプロセスを終了し、プレビュー ウィンドウに移動します。ここでは、トリミング、スピード アップ、回転、圧縮など、ビデオを編集することもできます。
オーディオレコーダ
次のようなオーディオファイルを録音する必要がある場合 ズーム会議、ナレーション、 Skype通話、会話など、オーディオレコーダーは、さまざまなチャネルからオーディオファイルをキャプチャするための優れたオプションです。
ステップ1: の中に オーディオレコーダ 機能をオンにすると、 システムサウンド マイクオプションは個別に選択できます。また、希望の入力デバイスと音量を自由に選択できます。

ステップ2: すべての設定が完了したら、 REC ボタンをクリックして、マイクとシステムサウンドを録音します。録音中に音量を調整することもできます。最後に、 やめる ボタンをクリックして保存します。

画面キャプチャ
コンピュータ上で直接スナップショットを撮る必要がある場合や、ビデオから画面をキャプチャする必要がある場合は、スクリーン キャプチャ機能を使用できます。写真を磨き上げるための編集機能が他にもあります。
ステップ1: クリックしたら 画面キャプチャ ボタンをクリックすると、マウスを使ってドラッグして目的の領域を選択できます。移動時に、特定のウィンドウが自動的に検出されます。
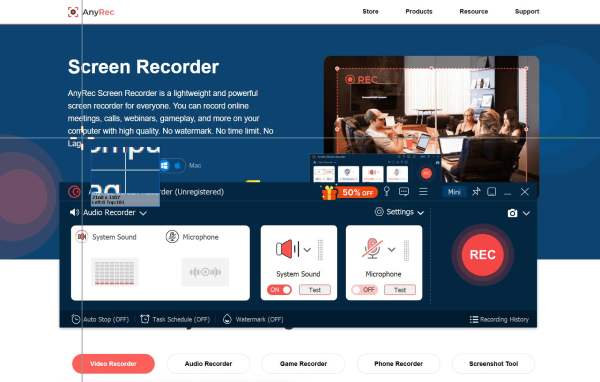
ステップ2: マウスを離すと、スクリーンショットに注釈や吹き出し、その他のマークを追加できます。次に、 保存する ボタンをクリックして目的のパスを選択します。
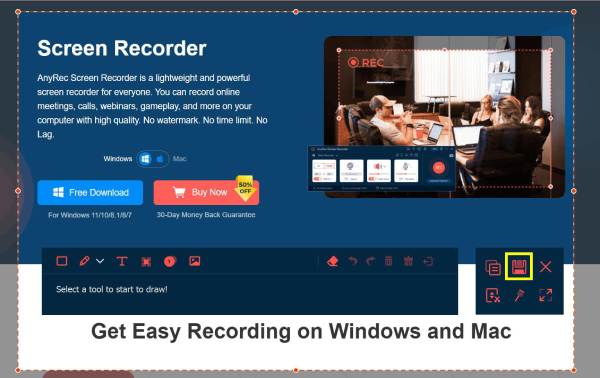
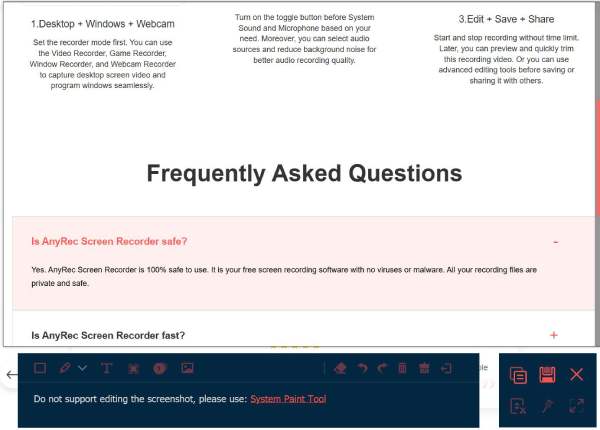
ステップ3: ページ全体をキャプチャするには、さらに スクロールウィンドウ 右側のバーにあるボタンをクリックします。ガイドに従ってマウスを下にスクロールし、いつでも長いスクリーンショットを完成させることができます。ただし、編集ツールはありません。
ゲームレコーダー
また、軽量のゲームプレイ レコーダーであり、オンライン サイトからゲームプレイ ビデオをキャプチャします (蒸気, マインクラフト, CSGO, Dota 2など)、ゲーム機(プレイステーション3, プレイステーション4, プレイステーション5, Xbox, スイッチ, Wii、およびその他) クリック内。
ステップ1: クリック ゲームレコーダー ボタンをクリックして管理者にソフトウェアの実行を許可します。次に、 ゲームを選択してください ボタンをクリックし、リストから希望のゲームプレイを選択します。
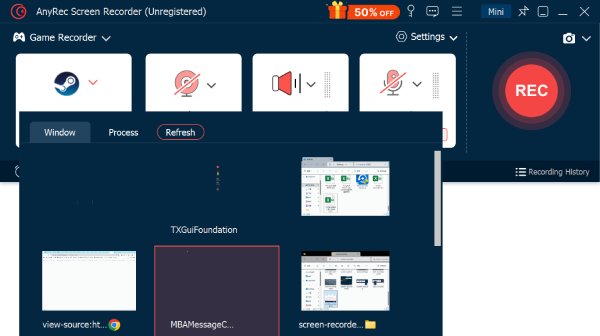
ステップ2: 良いゲームライブを行うには、ウェブカメラ、マイク、システムサウンド録音をオンにすることをお勧めします。

ステップ3: ビデオを録画するのと同じように、 REC そして やめる ボタンを押してゲームプレイをキャプチャします。最後に、録画したゲームビデオを編集し、ローカル フォルダーに保存します。
ウィンドウレコーダー
このウィンドウ レコーダーを使用すると、他のウィンドウがポップアップすることを心配する必要はありません。目的のウィンドウを選択すると、キャプチャ領域が干渉なしに固定されます。オンライン クラスや会議を録画するのに非常に役立ちます。
ステップ1: の中に ウィンドウレコーダー ツールをクリック ウィンドウを選択 起動したすべてのプログラムのリストから目的の Web サイトまたはソフトウェアを選択するためのボタン。
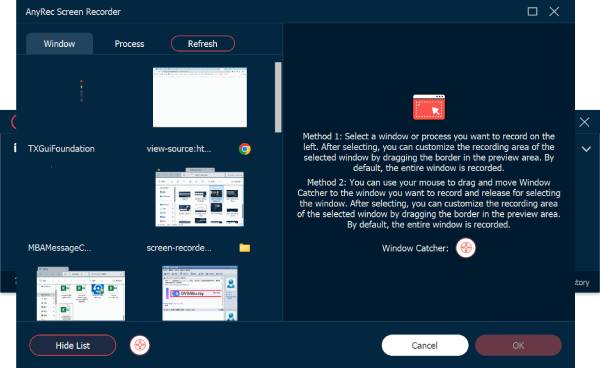
ステップ2: クリック わかった ボタンをクリックしてウィンドウを決定します。次に、 REC 開始ボタンを押して やめる ボタンを押して録音を終了します。これで、より多くの編集機能を利用できるようになります。
ウェブカメラレコーダー
ビジネスミーティングの記録については(ズーム, GoogleMeet, 会議に行く, Lync, Microsoft Teamsなど)、Skype 通話、ゲームプレイのナレーションなどを追加する場合は、Web カメラの映像も含める必要があります。内蔵カメラが利用できない場合は、外付け Web カメラをコンピューターに挿入できます。
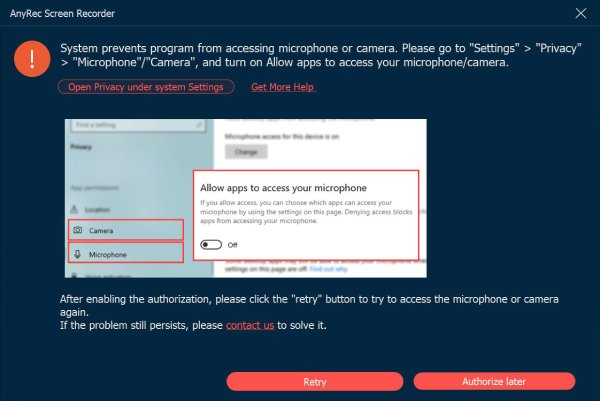
ステップ1: クリック ウェブカメラ からのボタン ビデオレコーダー.システムは内蔵カメラの許可を求めます。外部カメラについては、ドロップダウン リストから目的のカメラを選択できます。
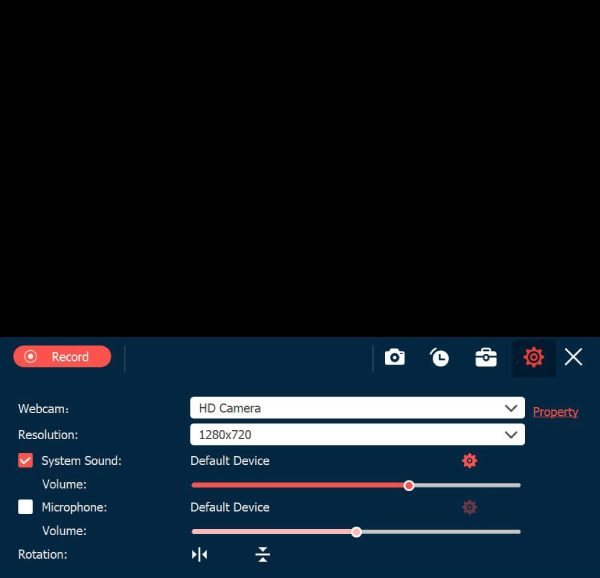
ステップ2: 解像度、システムサウンドやマイクの音量なども変更できます。ウェブカメラが正しい位置に設定されていない場合は、ウェブカメラを回転させることもできます。次に、 記録 ボタン。
ステップ3: クリック やめる 録画を保存および編集するには、ボタンをクリックします。ここでは、録画を自由にトリミング、切り取り、回転、圧縮することができます。
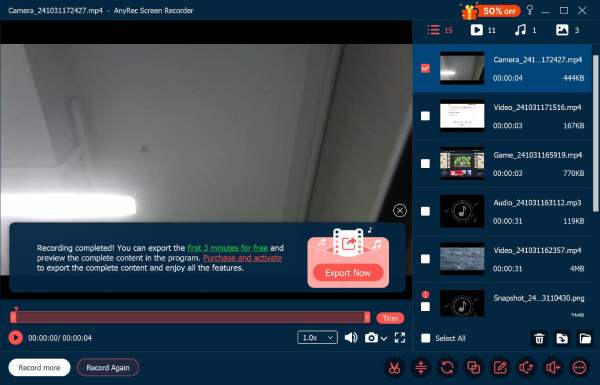
電話レコーダー
一部の電話ストリーマーは、ゲームをプレイするときに自分の電話を録画する必要があります。または、ビデオ授業やビデオ プレゼンテーションを作成するために電話を録画する必要がある人もいます。この機能を使用して、クリックするだけで目的を達成できます。
ステップ1: リストから「電話レコーダー」ボタンをクリックし、必要に応じて Android または iOS レコーダーを選択します。 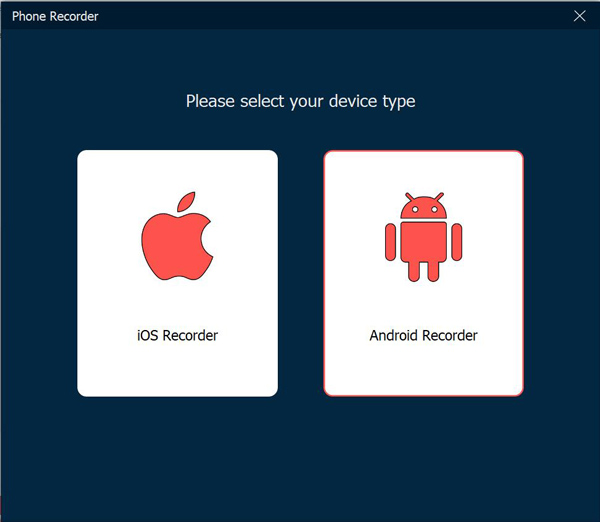
ステップ2: Android ユーザーの場合は、Wi-Fi または USB 接続を介してデバイスをコンピューターに接続できますが、iOS ユーザーは同じ Wi-Fi を使用してのみ接続できます。詳細なガイドに従ってください。 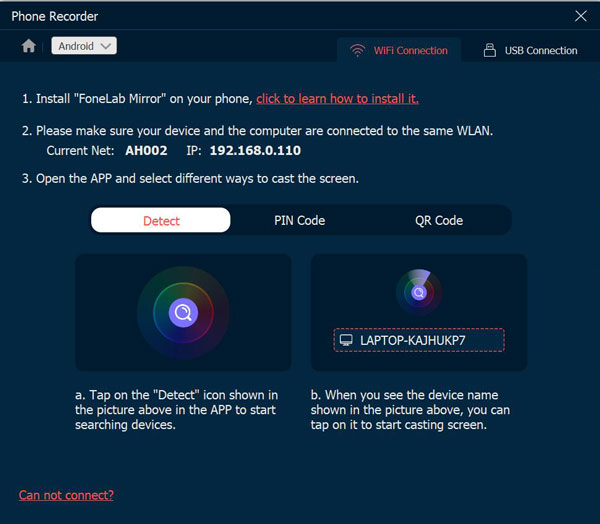
ステップ3: 接続したら、携帯電話のスクリーンミラーリングを許可する必要があります。最初に解像度と録画コンテンツを設定できます。次に、 記録 また スナップショット キャプチャを開始するボタン。 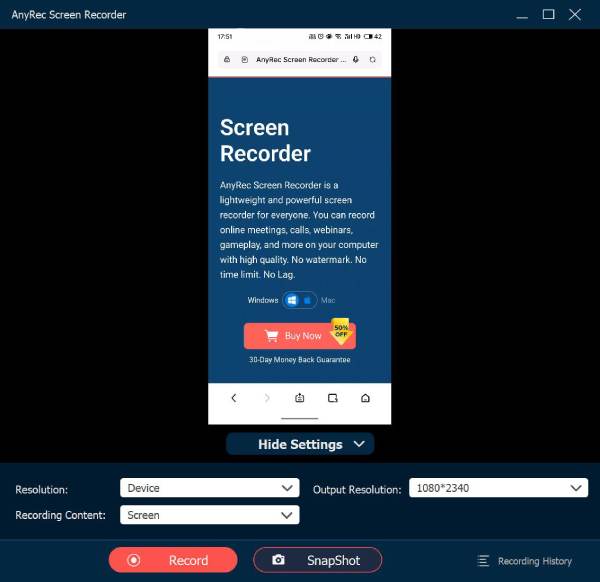
最後のレコーダー
前のタスクを続行する場合は、 最後のレコーダー ボタンをクリックして設定を復元します。その後、他の録画モードと同じように設定を微調整するだけです。
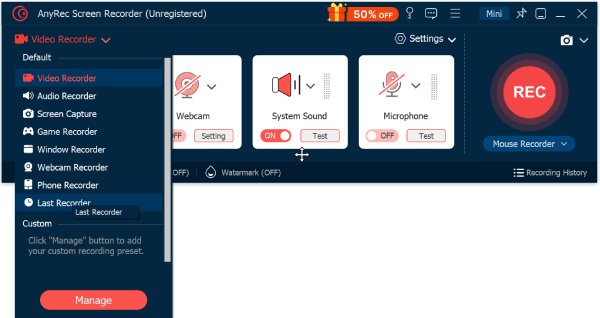
高度な編集
AnyRec スクリーン レコーダーのフル バージョンにアップグレードすると、より多くのビデオおよびオーディオ編集ツールのロックを解除できます。これらのツールはバージョン 1.0.30 以降で使用できます。したがって、プログラムを最新バージョンに更新していることを確認してください。すべての編集ツールにアクセスするには、[記録履歴] ボタンに移動するだけです。
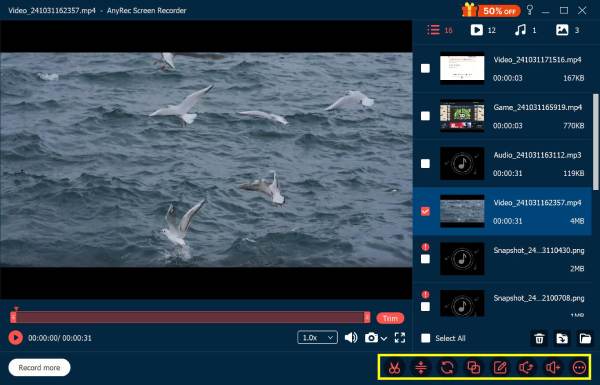
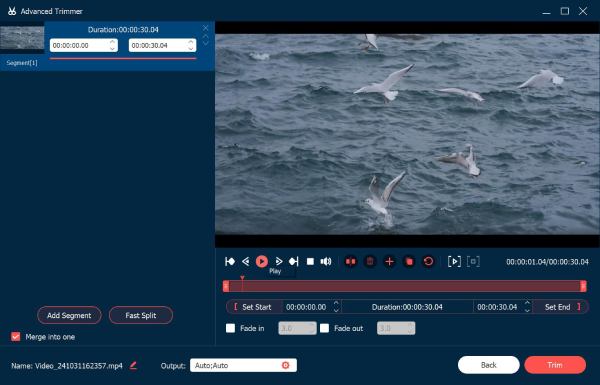
高度なトリマー
高度なトリマーツールを使用すると、不要な部分を簡単に切り取ることができます。 スタートを設定 と セットエンド ボタンをクリックしてビデオの長さをカスタマイズしたり、ポイントをドラッグしてビデオをトリミングしたりできます。 フェードイン と フェードアウト さらにビデオ効果を追加できます。さらにビデオセグメントを追加し、それらのビデオファイルを新しいものに結合することもできます。 高度なトリマー。クリック トリム 変更を保存するボタン。
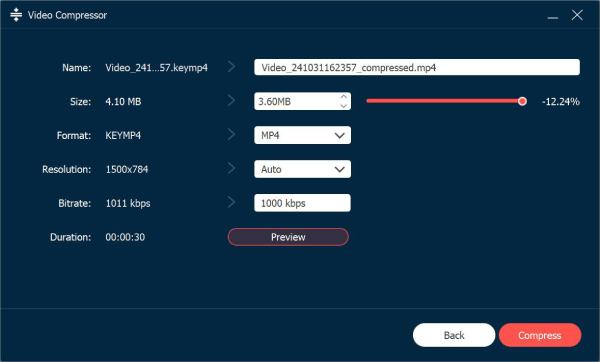
ビデオコンプレッサー
クリックした後 ビデオコンプレッサー ボタンをクリックすると 動画のサイズを小さくする パーセンテージまたは特定のファイルサイズで以前よりも。ビデオまたはオーディオ ファイルの GB、MB、または KB サイズを減らすために、ビデオ形式、解像度、およびビットレートを変更することも問題ありません。クリック プレビュー ボタンをクリックしてチェックを入れ、 圧縮 確認するボタン。
メディアコンバータ
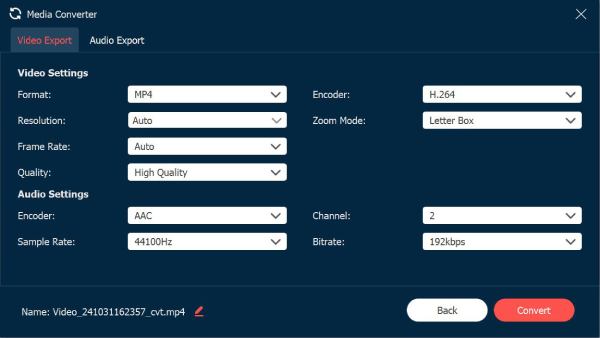
の中に メディアコンバータ 編集ツールでは、フォーマット、解像度、フレーム レート、品質、エンコーダー、ズーム モードなど、複数のオプションを使用してビデオ設定を調整できます。さらに、オーディオのエンコーダー、サンプル レート、チャンネルを調整することもできます。
ビデオ形式: 録画を MP4、MOV、WMV、AVI、MKV、GIF に変換します。
解像度: ビデオ解像度を 3840×2160、2560×1440、1920×1080、1280×720、640×360、1:1、9:16、4:3、21:9、5:4、16:10、3:2、2:1、またはカスタムに調整します。
フレームレート: ビデオ フレーム レートを 60fps、59.94fps、30fps、29.97fps、25fps、24fps、23.97fps、20fps、15fps、12fps に設定します。
品質: 録画ビデオを高品質、標準、またはカスタムに保存します。
ビデオエンコーダー: ビデオエンコーダーをH.264に調整し、 HEVC、または MPEG-4。
ズームモード: ビデオ ズーム モードをレター ボックス、パン & スキャン、フルに設定します。
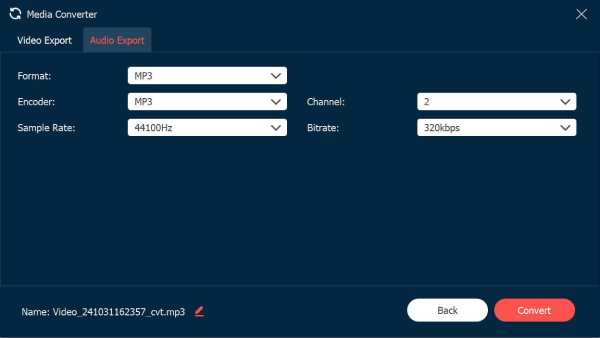
オーディオ形式: オーディオを保存し、MP3、AAC、AC3、WMA、WAV、AIFF、FLAC、MKA、OGG、AU、M4A、M4B、M4R、DTS、APE、AMR、MP2、ALAC に変換します。
オーディオエンコーダー: オーディオ エンコーダーを AAC または AC3 として設定します。 (小切手 AAC対AC3)
サンプルレート: オーディオ サンプル レートを 22050Hz、32000Hz、44100Hz、および 48000Hz に調整します。
チャネル: 音声チャンネルを 1 または 2 に調整します。
ファイルの合併
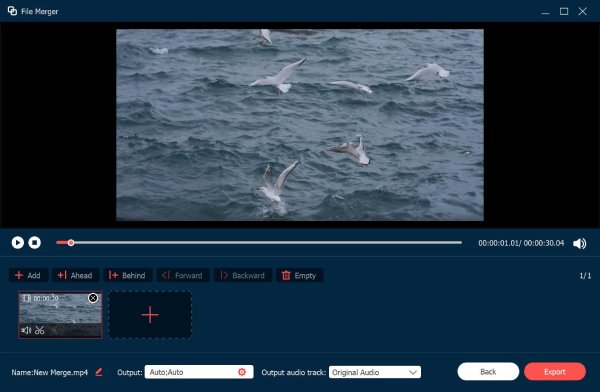
クリック 追加 ボタンをクリックして、さらにビデオ クリップを追加します。をクリックできます。 後ろに また 前方 ボタンをクリックして、ビデオ クリップを正しい順序で結合します。プレビュー ウィンドウでは、すべての変更をすぐに表示できます。さらに、下のオプションで出力ビデオとオーディオ トラックの設定を調整できます。最後にクリック 輸出 ビデオを1つにうまく結合する。
メディアメタデータエディタ
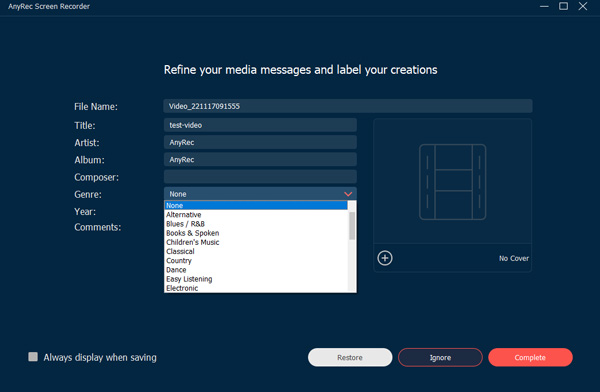
ここでは、ビデオ/オーディオ録音ファイルのファイル名、タイトル、アーティスト、アルバム、作曲者、ジャンル、年、およびコメントを変更できます。さらに、 追加 カバーを追加するには、プラス アイコンの付いたボタンをクリックします。前のボックスにチェックを入れます 保存時に常に表示 あなたの必要性に基づいて。最後にクリック 完了 メタデータの編集を終了します。
サウンド抽出器
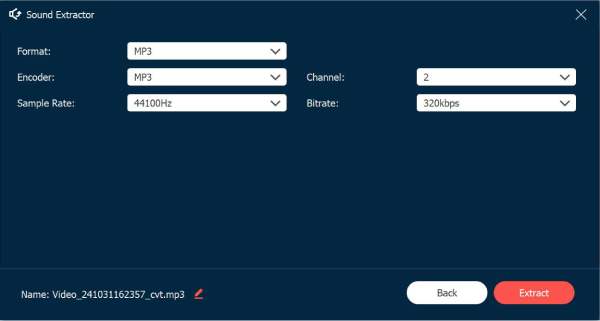
ビデオ録画からオーディオファイルのみを保存したい場合は、 サウンド抽出器 ボタンをクリックします。ここでは、MP3、WAV、FLAC、OGG、M4Aのオーディオフォーマットを設定したり、エンコーダー、サンプルレート、ビットレート、チャンネルを変更したりできます。次に、 エキス オーディオ トラックのみを保存するボタン。
サウンドブースター
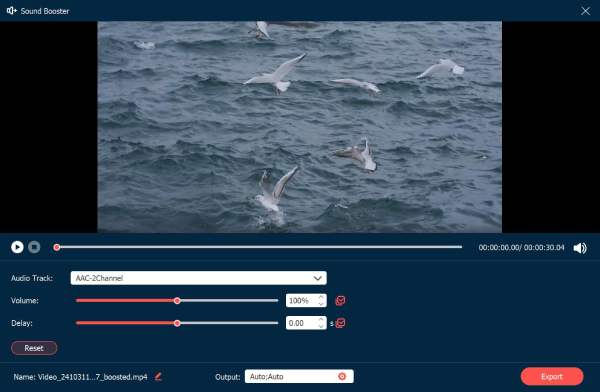
最初に音量をテストするのを忘れて、録音した音量が低すぎたり高すぎたりすることがあります。心配しないでください。サウンドブースターを使用して、音量やオーディオトラックの遅延を調整できます。プレビュー後に効果に満足したら、 輸出 保存するボタン。
録音コントロール
録音中に編集する
録音を編集するには、クリックするだけです。 編集 録画中にボタンをタップします。録画に長方形、楕円、矢印、線などを追加するためのさまざまなオプションがあります。また、必要に応じてこれらのオプションのサイズと色を調整することもできます。さらに、録画の長さを設定したり、録画中にスクリーンショットを撮ったりすることもできます。

プリセット録音
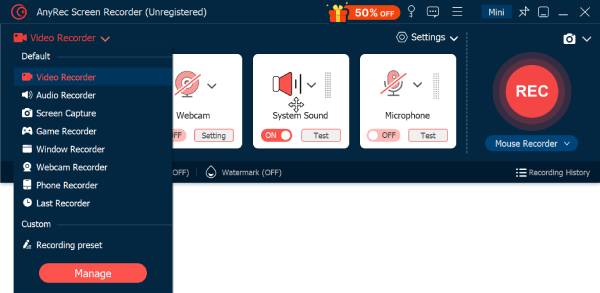
いくつかのビデオチュートリアルを頻繁に録画する必要がある場合は、からプリセット録画をカスタマイズできます。 もっと メニュー。プリセット録画を作成して、すべての録画タスクに適用できます。
ステップ1: クリック ビデオコンバーター ボタンをクリックしてクリックします 管理 下部のボタンをクリックすると、新しいカスタマイズされた録音プリセットが追加されます。
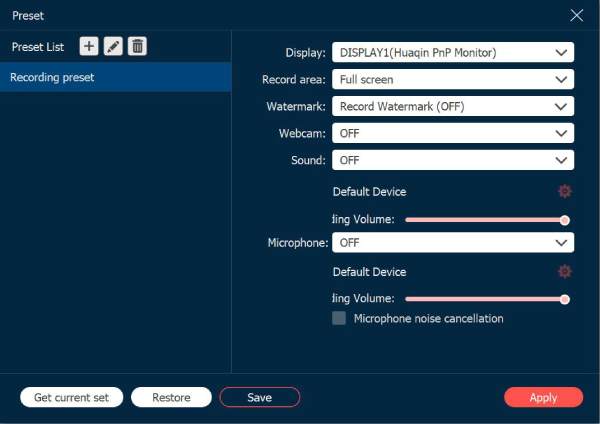
ステップ2: ポップアップ ウィンドウで、 追加 ボタンをクリックして新しいものを作成します。ディスプレイ、録画エリア、ウェブカメラなど、さまざまなパラメータを微調整して調整できます。その後、 保存する ボタンをクリックしてクリックします 申し込み ボタンをクリックして設定を適用します。
高度なマウスレコーダー
RECボタンの下には特別なマウスレコーダーがあり、記録中にマウスの動きをより細かく制御できます。このツールを使用すると、特別なチュートリアルを簡単にキャプチャできます。選択できるモードは2つあります。 マウス周辺 と マウスに従ってください.

マウスの周り: マウスの動きに応じて録画領域が変わり、常にマウスを中心に録画される録画モードです。マウスを画面表示の境界まで移動すると、画面表示を超えた領域が黒い画面に表示されます。
マウスをフォローします。 マウスモードと同じように、マウスを動かすと記録領域が変わります。ただし、以前のモードとは異なり、マウスが元の記録領域から外れると、記録領域が変更されます。
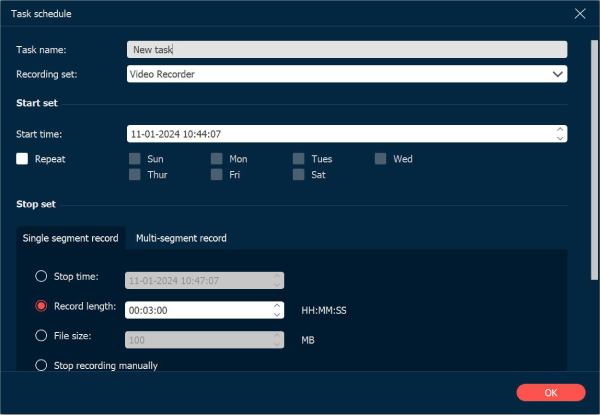
タスクスケジュール
一部の放送番組を自動的に録画する必要がある場合は、 タスクスケジュール 機能は、余分なクリックなしでビデオを録画するオプションです。
ステップ1: 下部のタスクスケジュールボタンをクリックし、 追加 新しいタスクを作成するためのボタン。

ステップ2: ポップアップウィンドウで、タスク名を入力し、開始時間、録音の長さ、およびプリセットからの録音セットを設定する必要があります。その後、クリックすることができます わかった 確認するボタン。
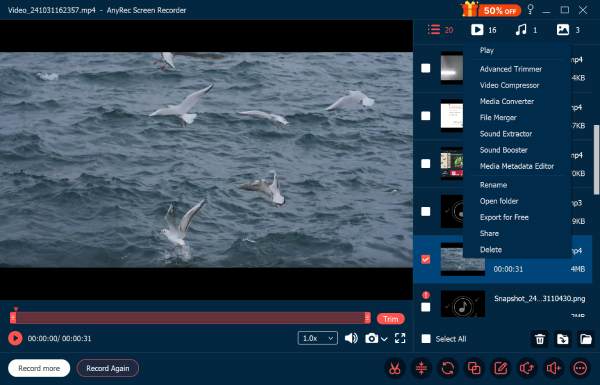
記録履歴の管理
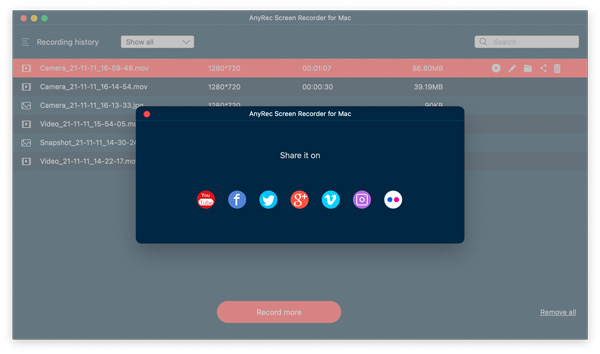
必要なビデオ、オーディオ ファイル、またはスナップショットをキャプチャしたら、録画履歴で利用可能な録画ファイルを検索できます。マウスを右クリックして録画ファイルの名前を変更したり、ビデオを直接再生したり、YouTube、Facebook などで共有したりすることもできます。
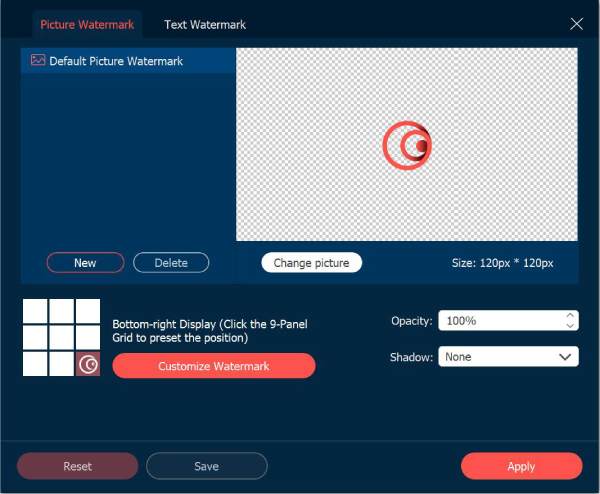
透かしを追加
[透かしを記録] ボタンをクリックすると、録画ビデオに透かしが添付されます。これにより、録画後に透かしを編集する時間を節約できます。また、デフォルトのテキストまたは画像の透かしを選択できます。
自動停止
画面の録画を自動停止する場合は、メイン画面の下部にある [自動停止] ボタンをクリックします。また、3 種類の録音停止方法を選択できます。
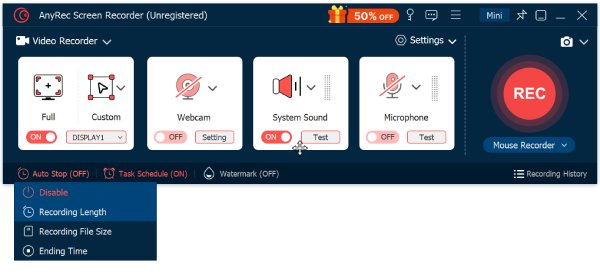
録音の長さ: 動画のファイル長を設定できます。動画がその長さに達すると、録画が停止します。
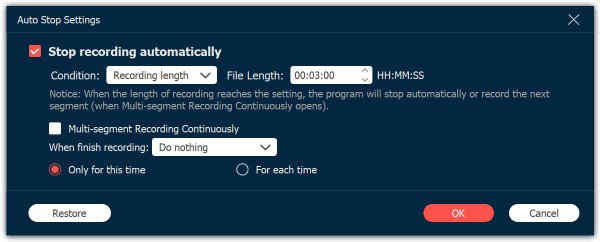
記録ファイルサイズ: 録画ファイルサイズの制限を設定できます。ファイルがそのポイントに達すると、記録が停止します。
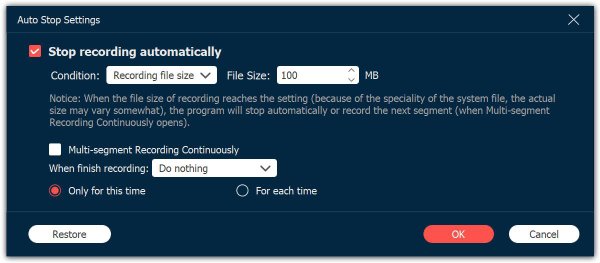
終了時間: タイマーを設定できます。コンピュータがその時間になると、記録が停止します。記録を停止した後にコンピュータをシャットダウンすることもできます。

命令
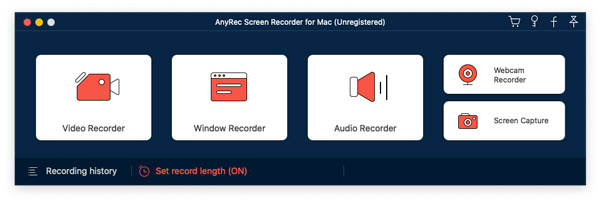
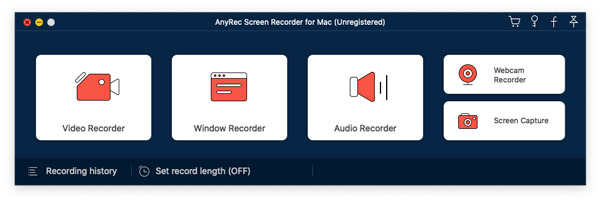
AnyRec Screen Recorder for Mac は、初心者向けの Mac スクリーン レコーダーです。必要に応じて、Mac 画面のビデオ、オーディオ、および Web カメラを同時に、または個別に記録できます。急な学習曲線はありません。組み込みのビデオ レコーダー、ウィンドウ レコーダー、オーディオ レコーダー、Web カメラ レコーダー、スクリーン キャプチャのすべてのオプションをすばやく見つけることができます。それでは、AnyRec Screen Recorder for Mac で何ができるか見てみましょう。
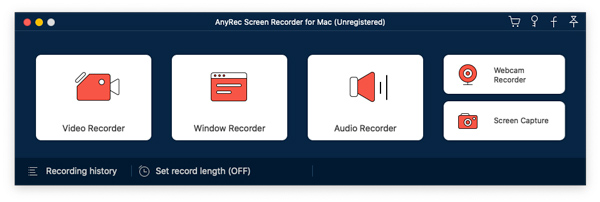
登録
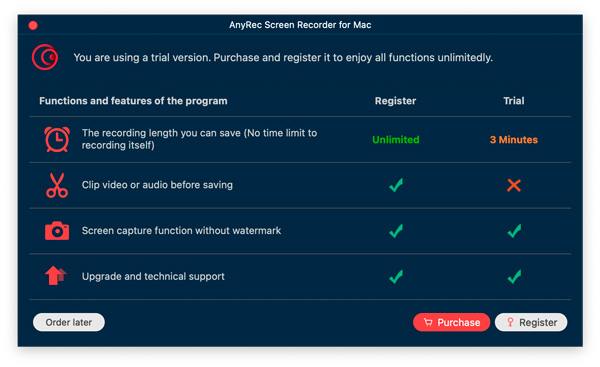
パッケージをインストールすると、ポップアップが表示されます。クリックできます 購入 また 登録 ユーザーアカウントにサインアップして、すべての機能のロックを解除します。または、をクリックすることもできます 後で注文する 無料トライアルを開始するには、まず試してみてください。ご覧のとおり、登録版と無料試用版の主な違いは最大録音時間です。さらに、アカウントを登録するまで、ビデオまたはオーディオのトリマーは使用できません。
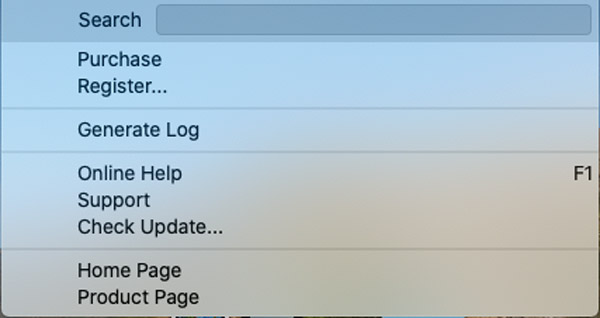
無料トライアル終了後、AnyRec Screen Recorder for Mac を登録していただいても構いません。クリックできます 購入 また 登録 上部の [ヘルプ] ドロップダウン リストから。
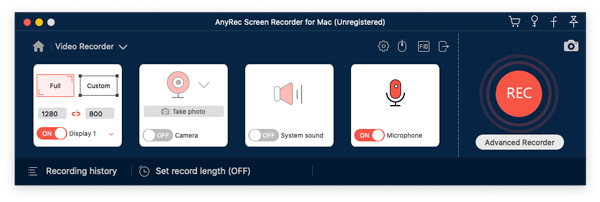
[購入] をクリックした場合: ポップアップする購入画面で、Mac スクリーン レコーダーの 1 か月または無期限のライセンスを購入します。画面の指示に従ってプロセスを完了します。または、 ショッピングカート プログラムの右上隅にあるアイコン。
Update
AnyRec Screen Recorder for Macは、プログラムを更新する2つの異なる方法を提供します。
方法1:手動で更新する
上部の [ヘルプ] ドロップダウン リストから、 更新状況を確認して.
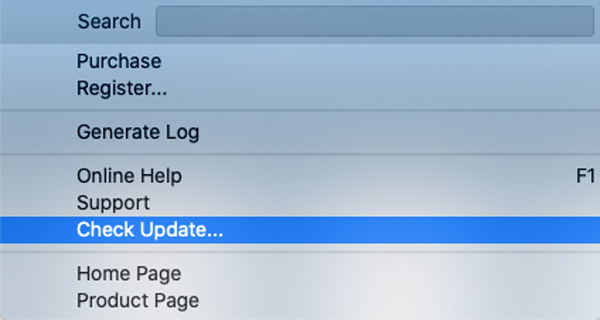
AnyRec Screen Recorder for Mac は、利用可能なすべてのアップデートをすぐにチェックします。最新バージョンにアップグレードすると、AnyRec Screen Recorder for Mac が最新の状態に更新されたことが通知されます。クリック わかった ウィンドウを閉じます。

方法2:自動的に更新する
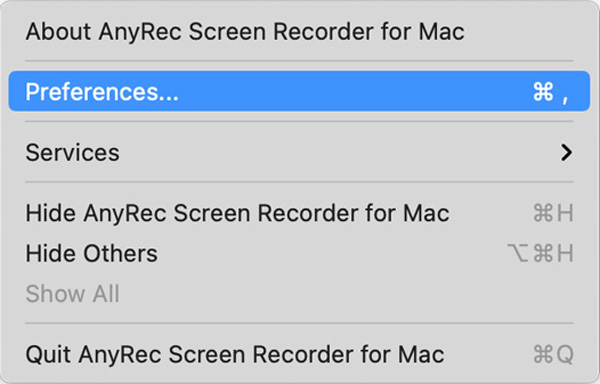
プログラムを常に最新バージョンに保ちたい場合は、自動更新機能を有効にすることができます。選ぶ 環境設定 AnyRec Screen Recorder for Mac ドロップダウン リストの一番上から。
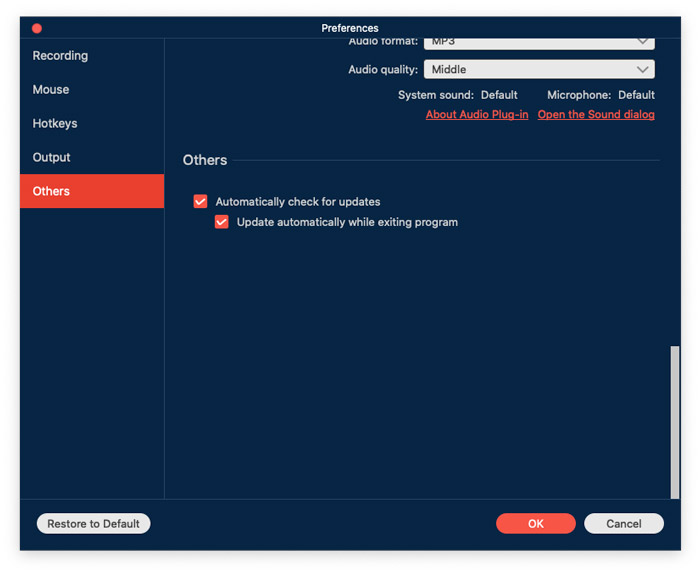
クリック その他 の中に 環境設定 左パネル。確認してください 更新を自動的に確認します オプションと 終了時に自動的に更新 プログラムオプションが有効になっています。後でクリック わかった 変更を保存します。
アクセシビリティアクセスを設定する
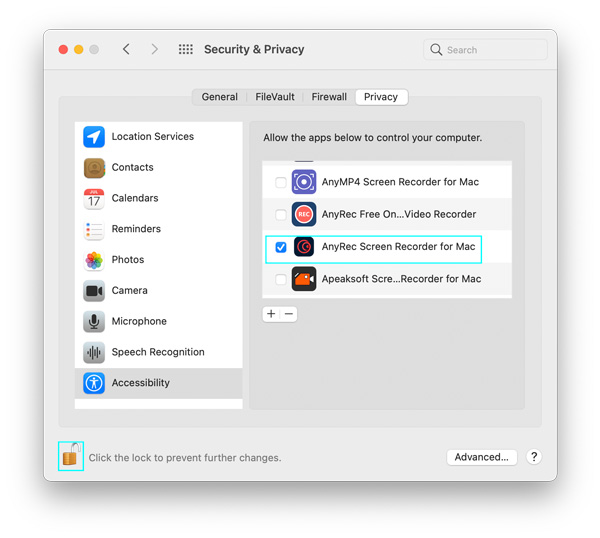
AnyRec Screen Recorder for Mac を初めて実行すると、アクセシビリティ アクセス (イベント) 通知が表示されます。クリック システム環境設定を開く.
デフォルトではアクセシビリティに入っています。クリック ロック 変更するには、ロックをクリックしますの横にある右下隅のボタンをクリックします。 AnyRec Screen Recorder for Mac の前にあるチェックマークを有効にします。後で、横の一番下のロック アイコンをクリックします。 それ以上の変更を防ぐには、ロックをクリックします
閉じます セキュリティとプライバシー 窓。これで、Mac用のAnyRec ScreenRecorderで録画できます。
環境設定
ビデオとオーディオの録音を開始する前に、 環境設定 窓。 AnyRec Screen Recorder for Mac リストを展開して、選択することができます。 環境設定 頂上で。または、特定のレコーダーに移動して、 設定 ボタン付き 装備 ナビゲートするアイコン 環境設定 同様に。
録音
デフォルトでは 録音 メニューでは、録音のカウントダウンを表示する、録音開始時にビープ音を鳴らす、録音境界を表示する、録音中にフロートバーを非表示にする、録音中に録音領域を移動できるようにする、録音中にドックを非表示にする、プレビューを自動的に開くなど、録音前に多くのオプションを有効または無効にすることができます録音終了時のウィンドウ、録音時のフロートバーを除外します。クリック わかった 変更を保存します。

ねずみ
に移動します ねずみ メニュー。ここでチェックマークを管理できます マウスカーソルを表示 と マウス領域をハイライト.また、3 つの異なるマウス クリック効果も提供します。さらに、ハイライト マウス領域のカスタム カラーを設定することもできます。変更を保存するには、 わかった 右下隅にあります。

ホットキー
ここでは、画面の記録とキャプチャのデフォルトのホットキーを確認できます。または、録画の開始/停止、録画の一時停止/再開、スクリーン キャプチャ、Web カメラの開閉、フロート パネルの表示/非表示の前に、新しいホットキーを変更して入力することもできます。プログラムはすぐに保存します。後で、ビデオ/オーディオを記録し、 Macでスクリーンショットを撮る ホットキー経由。

出力
出力で、記録したファイルとキャプチャしたスナップショットの出力パスを設定できます。さらに、これらのオプション内で出力設定を変更できます。
スクリーンショット形式: PNG、JPG / JPEG、BMP、GIF、TIFF
ビデオフォーマット: MOV、 MP4、M4V、Gif
ビデオコーデック: H.264、HEVC、Apple ProRes 422、Apple ProRes 4444
ビデオ品質: 最低、低、中、高、最高、ロスレス
フレームレート: 20 fps、24 fps、25 fps、30 fps、60 fps
オーディオフォーマット: MP3、M4A、WMA、CAF、FLAC、OGG、OPUS
オーディオ品質: 最低、低、中、高、最高、ロスレス

その他
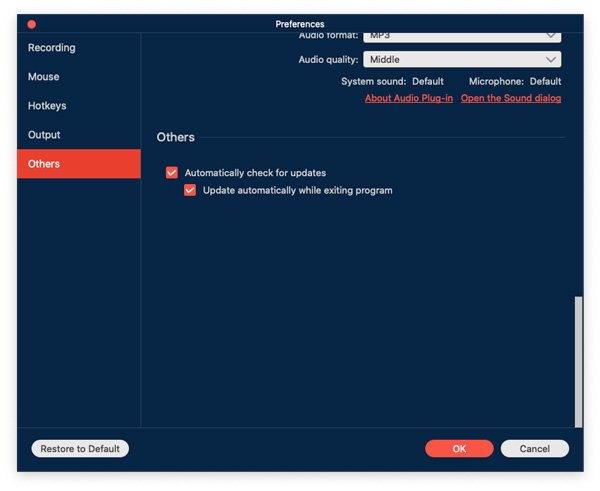
画面記録の設定とは別に、あなたは選択することができます 更新を自動的に確認します。したがって、Macスクリーンレコーダーソフトウェアは常に最新の状態に保つことができます。
ビデオレコーダー
デスクトップ アクティビティ、スクリーン ビデオ、 オンライン会議、および MP4 やその他の形式の他の多くのビデオ。クリックするだけ ビデオレコーダー メインインターフェイス上。

ステップ1: 画面キャプチャ領域を設定する
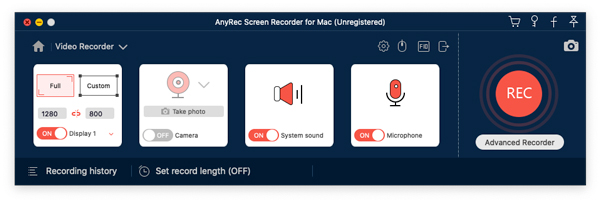
を有効にする ディスプレイ1 オプション。の中から選ぶ 満杯 と カスタム. Full を使用すると、Mac で全画面ビデオを録画できます。
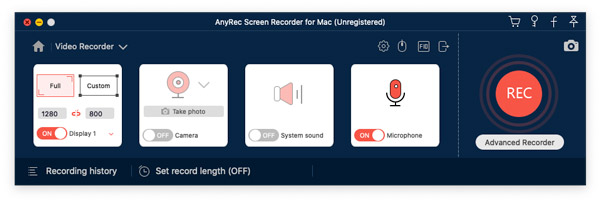
または、展開することができます カスタム リスト。 1920×1080、1280×720、854×480、1024×768、640×480、 地域/ウィンドウを選択.ここで、マウスの左クリックでドラッグして、特定のウィンドウまたはカスタムの長方形領域を選択できます。

ステップ2: ウェブカメラの記録を有効/無効にします(オプション)
あなたがしたい場合は 自分とコンピューターの画面を記録する 同時に、あなたはオンにすることができます カメラ。左クリックマウスを使用して、Webカメラの画面サイズと位置を調整します。
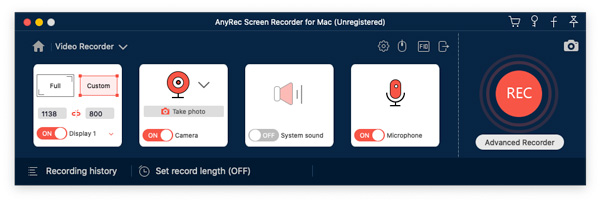
デフォルトの Mac カメラは Facetime HD カメラです。外部 Web カメラで画面を録画する場合は、接続されている外部カメラをドロップダウン リストから選択できます。

ステップ3: 音声付きの録音画面(オプション)
システムサウンドをオンにして システムオーディオでMac画面を記録する.
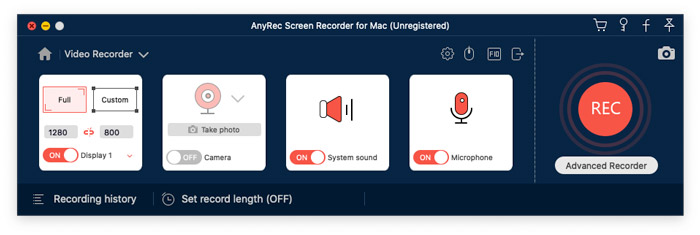
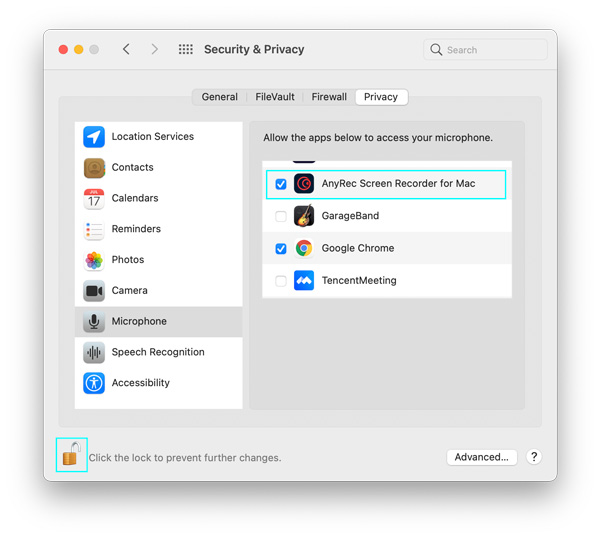
音声でスクリーンキャプチャしたい場合は、オンにすることができます マイクロフォン 同様に。 Macで音声を録音する前に、まずマイクの許可を有効にする必要があります。
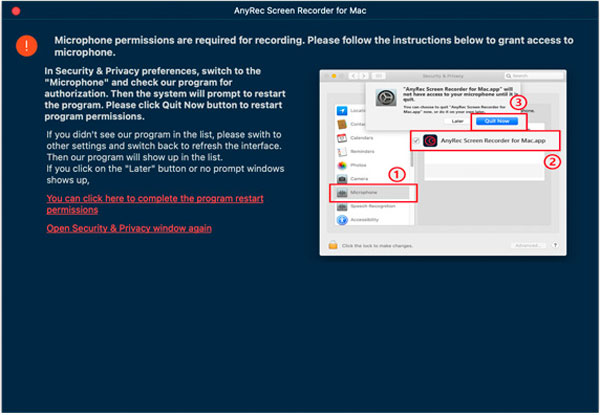
ポップアップで セキュリティとプライバシー ウィンドウで、左下隅にあるロック アイコンを見つけてクリックします。次に、コンピューターのパスワードを入力してロックを解除します。
![[ロック]をクリックします](/images/screen-recorder-for-mac/click-lock.jpg)
AnyRec Screen Recorder for Mac の横にあるチェックボックスをクリックします。新しいポップアップで、 終了して再開 確認するために。ちなみに、 ロック ボタンが閉じています。
ステップ 4: 録音を開始します
クリック REC に Macで音声付きの画面ビデオの録画を開始します.
3秒間のカウントダウンの後、Mac用のAnyRec ScreenRecorderは選択された画面を自動的に記録します。必要に応じて、Macでの記録を一時停止、再開、および停止できます。

クリック 編集 ボタンをクリックして、画面上のすべての描画ツールにアクセスします。長方形、楕円、線、矢印、カラー ペイント、テキスト、ステップ ツールなどを追加できます。さらに、特定のサイズと色を選択します。現在の描画ツールを自由に消去、やり直し、元に戻す、ゴミ箱、および終了できます。

スクリーンショットを撮りたい場合は、 カメラ ボタン。 Mac 用の AnyRec スクリーン レコーダーは、フルスクリーンのスナップショットをすぐに作成します。キャプチャした画像は、録画履歴で確認できます。今後のアップデートで、AnyRec は Mac のスクロール スクリーンショット 機能も。
ステップ 5: ビデオ録画をトリミングする
クリック やめる 画面の記録を終了します。の中に プレビュー ウィンドウで、録音ファイルを確認できます。不要なビデオクリップを削除したい場合は、 クリップ 右下隅にあります。
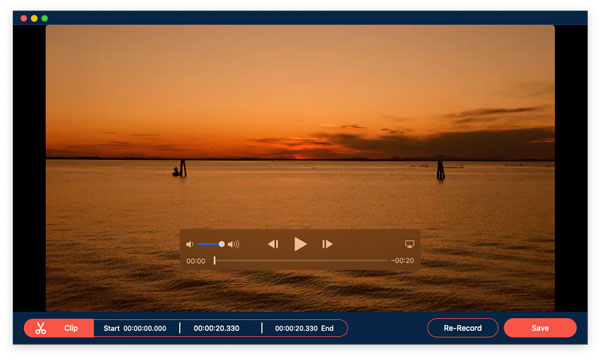
下部のビデオクリッパーで開始時間と終了時間を設定します。または、マウスの左クリックでドラッグして、録画ビデオをトリミングすることもできます。クリック トリム 変更を確認して保存します。

ステップ 6: 録音を保存する
その後、をクリックします 保存する Macの録画ビデオをダウンロードします。ですべての録音ファイルを取得できます 録音履歴.ここでは、再生、名前の変更、フォルダーのオープン、共有、および削除を行うことができます。
ウィンドウレコーダー
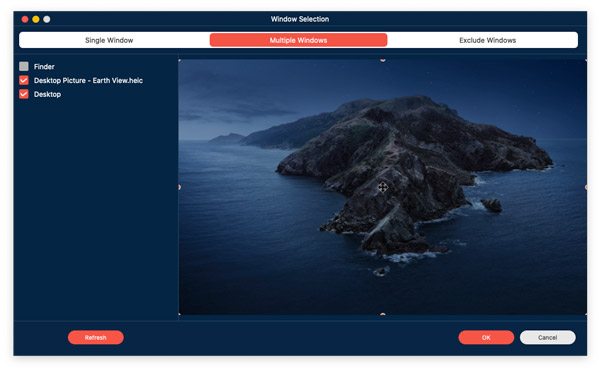
複数のパートナーとのゲームプレイ ビデオまたは Skype ビデオ チャットをキャプチャするには、 ウィンドウレコーダー 目的のビデオを取得します。単一ウィンドウ、複数ウィンドウ、および除外ウィンドウを提供して、必要なウィンドウをそれに応じて記録します。
ステップ1: 記録するウィンドウを選択
クリック ウィンドウレコーダー に向ける ウィンドウの選択. Macで実行中のすべてのアプリが表示されます。あなたはあなたのようにそれを使用することができます ゲームレコーダー もっと。
たとえば、ゲームプレイ ビデオを録画する必要がある場合は、 シングルウィンドウ.ウェブカメラで解説を追加するには、次を選択できます 複数のウィンドウ また Windows を除外 記録したいウィンドウを取得します。その後、クリックできます わかった 続ける。
ステップ2: 記録パラメータの設定
また、記録領域をカスタマイズしたり、Web カメラの記録を有効にしたり、システム サウンド/マイクの記録を微調整したりすることもできます。

ステップ3: ウィンドウ録画を開始する
すべての準備が整ったら、 REC ボタンをクリックして、Mac で選択したウィンドウの記録を開始します。

ウェブカメラレコーダー
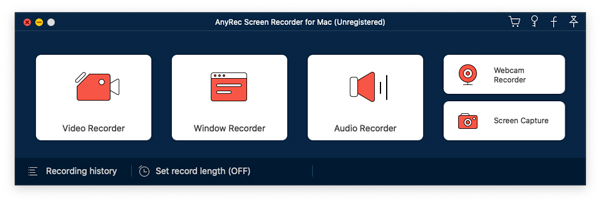
ステップ1: ウェブカメラレコーダーを選択してください
に あなたの顔を記録する のみ、選択できます ウェブカメラレコーダー メインインターフェイス上。
ステップ2: 入力カメラを設定する
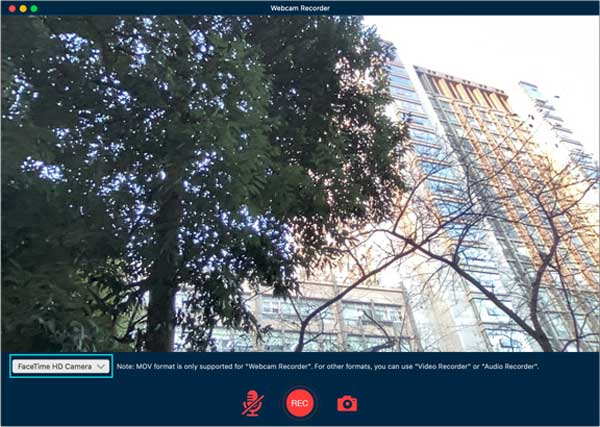
Macウェブカメラレコーダーがポップアップし、有効にします FaceTimeHDカメラ デフォルトのカメラとして。外部カメラを Mac コンピューターに接続する場合は、一番下のリストから変更できます。
ステップ3: マイクをオンにします
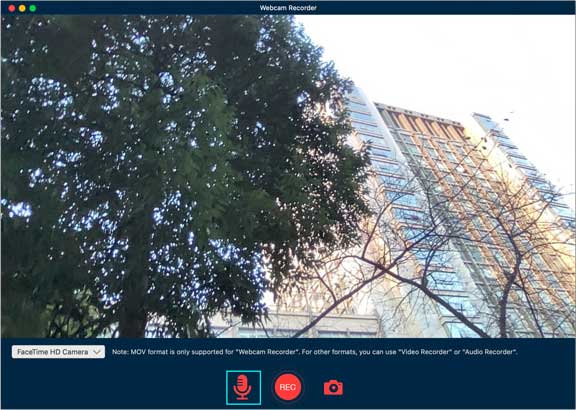
音声で自分を録音するには、電源を入れる必要があります マイクロフォン 下部にあります。
ステップ 4: ウェブカメラのビデオを録画する
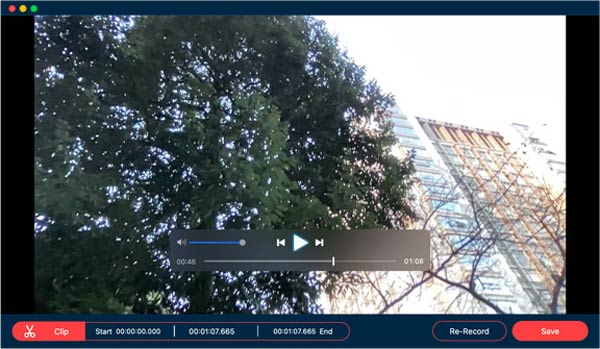
クリック REC Mac でウェブカメラのビデオを録画します。ウェブカメラの録画後、プレビュー ウィンドウが表示されます。 プレビュー 録音ファイルをトリミングします。
ステップ 5: ウェブカメラのビデオを共有する
に移動 録音履歴 MOV形式で録画ビデオを検索します。また、クリックすることができます シャーe 録画ビデオを YouTube、Facebook、Twitter などに共有します。
オーディオレコーダ
ステップ1: オーディオレコーダーを選択してください
Macでオーディオを録音するには、 オーディオレコーダ メインインターフェイス上。
ステップ2: 入力オーディオソースを設定する
Macコンピュータのオーディオのみを録音するには、システムサウンドをオンにします。もちろん、マイクをオンにしてにアクセスすることもできます Macボイスレコーダー 同様に。
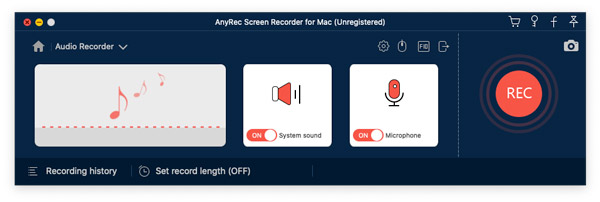
Macで初めて音声を録音するときは、Macでマイクの録音権限を手動で設定する必要があります。画面の指示に従ってプロセスを完了します。

ステップ3: Macオーディオを録音する
クリック REC Macでオーディオを録音します。音質を向上させるために、マイクの近くで話すことができます。 AnyRec Screen Recorder for Macを使用すると、ユーザーは時間制限なしでMacでのオーディオの録音を一時停止、再開、および停止できます。

ステップ 4: Macでの音声の録音を停止する
クリック やめる Macのオーディオ録音を終了します。の中に プレビュー ウィンドウ、あなたはクリックすることができます 演奏する 録音オーディオファイルを事前に聴きます。
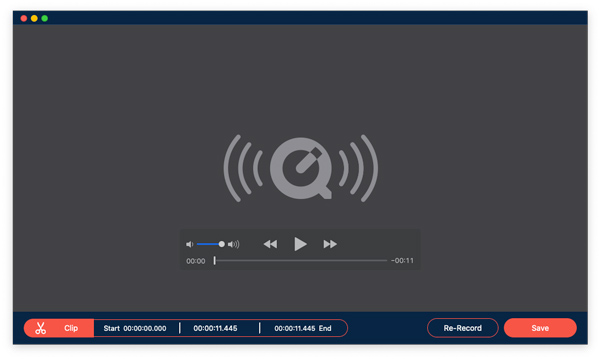
さらに、オーディオ クリッパーを使用して特定のオーディオ クリップを抽出することもできます。クリック クリップ 左下隅にあります。ドラッガを動かして開始時間と終了時間を設定します。クリック トリム 確認するために。
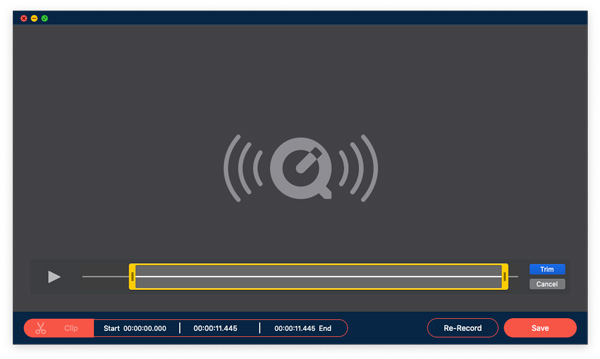
ステップ 5: Macのオーディオ録音を保存する
その後、をクリックします 保存する Mac オーディオ録音を MP3 形式にエクスポートします。必要に応じて、録画履歴で管理できます。
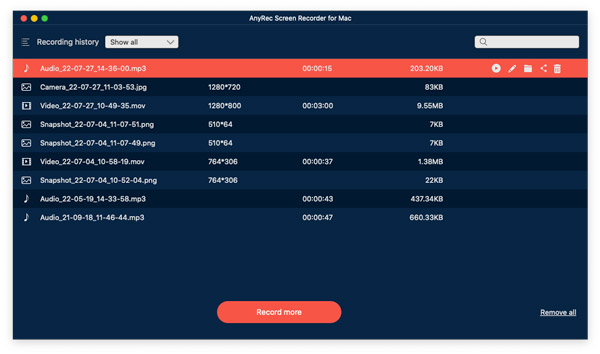
画面キャプチャ
ステップ1: スクリーンキャプチャを選択
アクセスできます 画面キャプチャ Macで直接スクリーンショットを撮る。

ステップ2: Macでスクリーンショットを撮る
AnyRec Screen Recorder for Mac は、すべてのウィンドウをスマートに検出します。ワンクリックで Mac 上のプログラムのスクリーンショットを作成できます。または、カーソルをドラッグして長方形のスクリーンショットをキャプチャすることもできます。マウスの左クリックを離すと、すぐにキャプチャされた画像を取得できます。
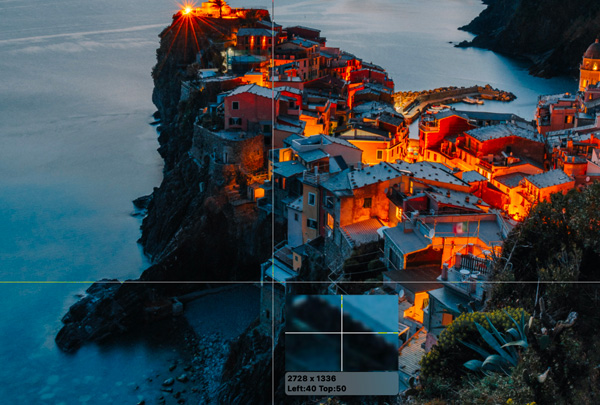
ステップ3: スクリーンショットを編集する
テキスト、シェイプ、ぼかし、ステップ ツールなどを含む、カスタムの色とサイズでスナップショットに注釈を追加できます。さらに、現在の Mac スクリーンショットを固定、コピー、保存、および削除できます。

ステップ 4: スクリーンショットを保存する
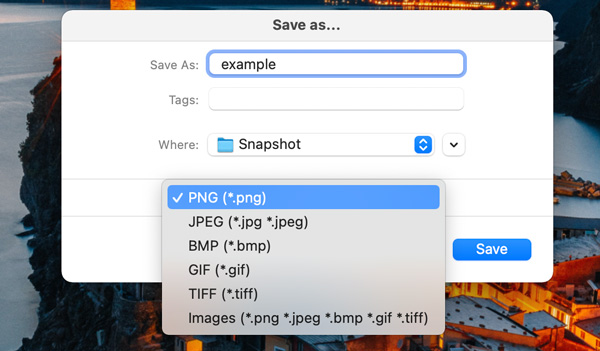
[保存] をクリックして、Mac のスナップショットを取得します。 [名前を付けて保存] ウィンドウで、ファイル名と出力フォルダーを設定します。デフォルトの出力スクリーンショット形式は PNG.リストを展開して、Mac のスクリーンショットを JPEG、BMP、GIF、TIFF、または画像として保存できます。
レコード長を設定する
ステップ1: レコード長を選択
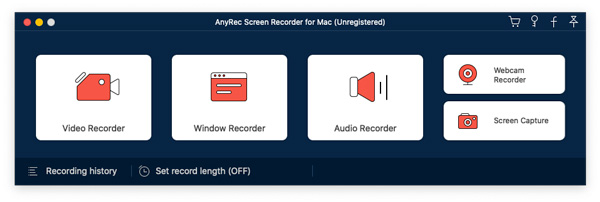
インターフェイスの下部にある[レコード長の設定(OFF)]をクリックします。
ステップ2: 詳細を指定する
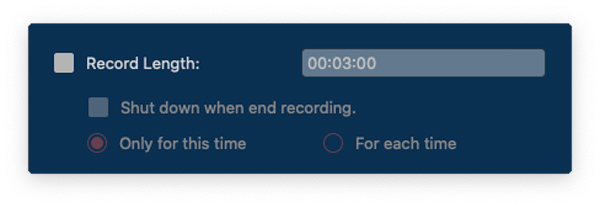
の横にあるチェックボックスにチェックを入れます レコード長.次に、ここでカスタム レコード長を設定できます。画面を自動録画して保存する場合は、録画終了時にシャットダウンする前にチェックボックスをオンにします。さらに、 今回だけ と 毎回 あなたの必要に基づいて。
ステップ3: レコード長をオンにする
空白部分をクリックしてウィンドウを終了します。あなたは見ることができます レコード長の設定(ON) オプションが赤に変わります。次回、Mac用のAnyRec ScreenRecorderは自動的に録画を停止できます。 (無効にすることを忘れないでください レコード長 時間制限なしで画面のビデオを録画したい場合。)
