QuickTime-skjermopptak med lydopplæring
Det er ingen funksjon for direkte systemlydopptak i QuickTime Player. Hvis du vil bruke QuickTime Player til å ta opp skjerm med intern lyd, må du installere virtuelle lyddrivere, som Soundflower, Black Hole, BackgroundMusic og mer. Du kan imidlertid fortsatt oppleve at QuickTime-lydopptak ikke fungerer. Ingen grunn til bekymring, du kan få detaljerte trinn, feilsøkingsløsninger og til og med alternativer for opptak av systemlyd på Mac. Bare les og følg.
Guideliste
Hvordan ta opp QuickTime-skjerm med intern lyd 4 måter å fikse QuickTime-opptak uten lyd Beste QuickTime Player-alternativ FAQsHvordan ta opp QuickTime-skjerm med intern lyd
Bare så du vet det, tar ikke QuickTime Player selv opp intern lyd som standard; i stedet kan du bruke gratis lydpluginverktøy, som Soundflower, BlackHole eller BackgroundMusic. Se en kort oversikt over disse verktøyene:
• Soundflower er et eldre lydverktøy som kan lage en virtuell utdataenhet. Selv om det ikke lenger støttes, anbefaler noen online guider det fortsatt.
• Svart hull er en perfekt Soundflower-alternativ. Det er en åpen kildekode, gratis virtuell lydenhet som gir bedre stabilitet.
• Bakgrunnsmusikk er et skjult alternativ i standard QuickTime Player. Den lar deg ta opp lyd som spilles av på Mac-skjermen mens du tar opp skjermen.
Nå, forutsatt at du har valgt "BlackHole" som ditt virtuelle lydverktøy, her er hvordan du setter opp systemutgangen til den samlede enheten og tar opp skjermen med lyd på QuickTime.
Trinn 1.Etter å ha lastet ned og installert BlackHole fra dets ledende nettsted, finn "Audio MIDI Setup" under "Utilities" fra "Applications".
Steg 2.Klikk på "Legg til"-knappen for å velge alternativet "Create Aggregate Device". Deretter gir du enhetens navn. Flytt til listen til venstre, sett en hake i "BlackHole 2ch"-boksene og mikrofonen din.
Trinn 3.Deretter klikker du på "Konfigurer" for å endre volumnivåene for lydplugin og mikrofon. Åpne nå "Systemvalg", gå til "Lyd", velg "Output"-fanen og velg navnet du satte tidligere for den samlede enheten.
Nå er det på tide å spille inn Mac-datamaskinlyd ved hjelp av QuickTime Player. Her er trinnene du kan følge.
Trinn 4.Åpne QuickTime Player. (Eller du kan trykke Shift, Kommando og 5 taster samtidig for å få Mac Screen Recorder. Det kreves på MacOS Mojave og høyere.) Klikk på "Fil"-fanen på toppmenyen. Klikk deretter på alternativet "Nytt skjermopptak".
Trinn 5.Under "Record"-knappen klikker du på pilen for å velge lydutgang; sørg for å velge den samlede enhetens navn; du kan for eksempel angi den som "QuickTime Audio".
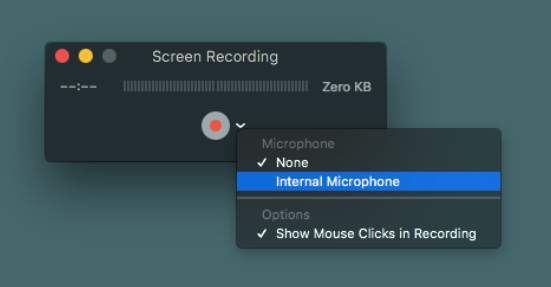
Trinn 6.Bestem opptaksområdet, for eksempel hele skjermen eller et tilpasset område. Klikk nå på "Record"-knappen for å starte QuickTime-skjermopptak med lyd.
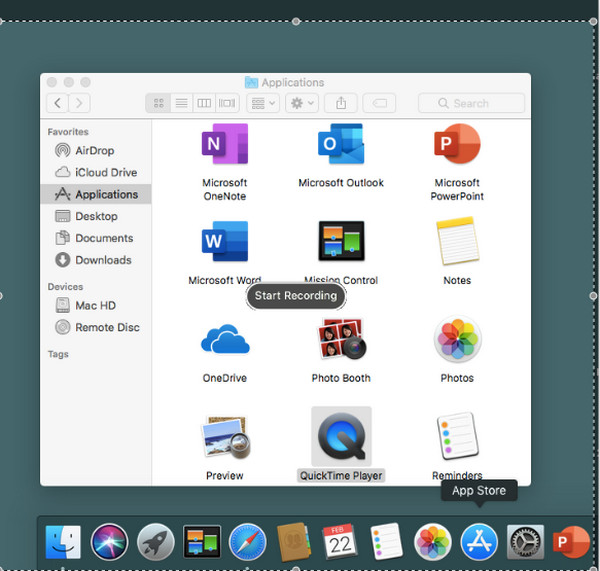
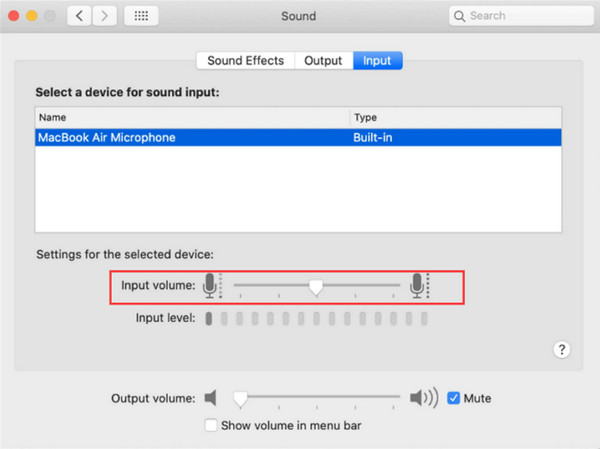
Noen DRM-beskyttede nettsteder kan oppdage eller blokkere lydopptak. Det er også mulig at de nylig nedlastede programmene endret innstillingene. For å ta opp QuickTime-skjermopptak med intern lyd, kan du avinstallere apper som er i konflikt. Den fungerer også for å sjekke om Soundflower/BlackHole/BackgroundMusic er satt som systemlydutgang. Gå til Systeminnstillinger og sjekk deretter Lyd.
4 enkle måter å fikse QuickTime-opptak uten lyd
Mesteparten av tiden møter Mac-brukere et QuickTime-opptak uten lydproblemer når de vil skjermopptak. Så for å fikse dette problemet, la denne delen veilede deg gjennom de fire enkle løsningene for å endelig ta opp QuickTime-skjermen med lyd.
Måte 1. Sørg for at alle tillatelser og inndata
Den skyldige for QuickTime-skjermopptak fungerer ikke er noen ganger et enkelt tillatelsesproblem. Den kan være dempet, eller innstillingen for merket for å bruke mikrofonen din er ikke merket.
Måte 2. Inspiser innstillingene for lydinngang
Hvis du har fått tillatelse til å bruke mikrofonen og fortsatt ikke får lyd, er det nødvendig å sjekke lydinngangsinnstillingene; sørg for at glidebryteren er satt opp for å maksimere volumet.
Måte 3. Velg riktig kilde
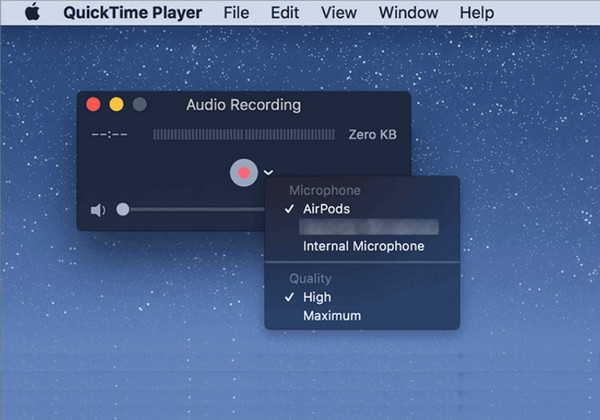
Kanskje du har satt den til å ta opp skjermen fra feil lydkilde eller mikrofon, eller kanskje den er satt til ingen. Derfor må du sørge for å bestemme den aktive interne mikrofonen for å garantere lyden for skjermopptak på QuickTime.
Måte 4. Bare oppdater QuickTime Player
Som du vet, kan et utdatert program forårsake feil eller mindre feil som påvirker ytelsen, noe som kan være det samme med QuickTime-spilleren på Mac. Dermed vil du ikke ha noe lyd mens du tar opp skjermen.
3 beste QuickTime Player-alternativer til å ta opp intern lyd på Mac
Selv etter alt det, hvis du fortsatt leter etter en enkel måte å ta opp en QuickTime-skjerm med lyd, enten det er systemlyd eller mikrofon, er den fin å bruke AnyRec Screen Recorder. Dette Windows- og Mac-programmet er et utmerket alternativ til QuickTime, først og fremst hvis du vil ha tilgang til flere funksjoner eller har problemer med å fange intern lyd i standard Mac-spiller. AnyRec har innebygd støtte for opptak av intern lyd, og krever ingen løsninger som virtuelle lydenheter, som QuickTime trenger. Det går også utover skjermopptak, da det dekker redigeringsfunksjoner etter opptak av skjerm og lyd uten QuickTime.

Ingen ekstra oppsett! Den fanger opp både intern og mikrofon direkte;
Justerbare opptaksinnstillinger, som oppløsning, kvalitet, lydvolum, etc.
Nyt å trimme unødvendige deler i forhåndsvisningsvinduet før du lagrer.
Gi støyreduksjon og stemmeforbedring for å holde høy kvalitet.
100% Sikker
100% Sikker
Trinn 1.Start AnyRec Screen Recorder. Velg videoopptaker i hovedvinduet for å ta opp skjerm og lyd.

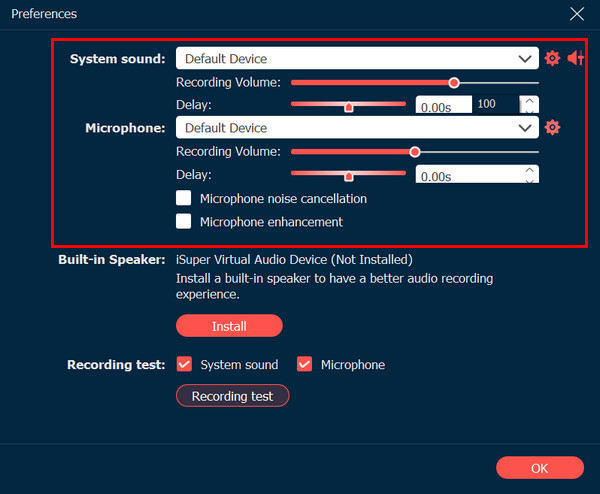
Steg 2.Aktiver begge bryterne for "System Sound" og "Microphone". Gå deretter til "Record Settings" fra "Tannhjul"-ikonet, finn alternativene for "System Sound" og "Microphone", og velg de ønskede lydkildene; justere kvaliteten om nødvendig.
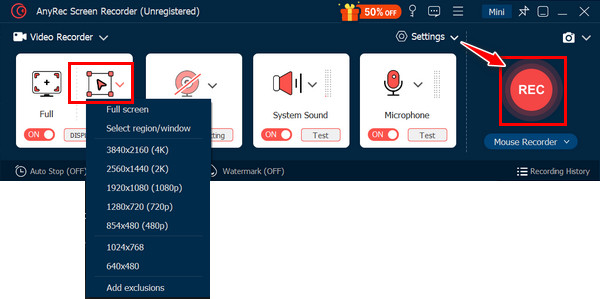
Trinn 3.Etter det, hvis du bare vil ta opp et spesifikt vindu eller område, velg alternativet "Egendefinert". Klikk på "Record"-knappen for å ta opp skjerm- og lydaktivitet.
Når det er gjort, avslutter du opptaket for å åpne "Forhåndsvisning"-vinduet for å se og redigere opptaket før du lagrer det. I stedet for å gjøre et QuickTime-skjermopptak med lyd, er det slik du tar opp lyd uten standardspilleren.
100% Sikker
100% Sikker
Før du avslutter ting om QuickTime-skjermopptak med lyd, her er to andre alternativer som gir skjerm- og lydopptaksfunksjoner uten problemer med QuickTime.
1. OBS Studio
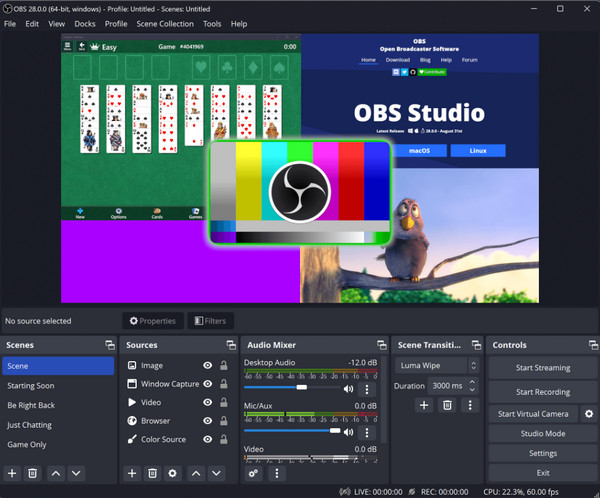
OBS er et kraftig og kjent skjermopptaksverktøy som kommer med omfattende tilpasningsmuligheter. Dette QuickTime-alternativet er ideelt for direktestrømming og komplekse skjermopptaksoppsett, og støtter flere kilder, inkludert webkamera, mikrofon, skjermområder og mer. På grunn av sin kraft er den blant favorittene til erfarne brukere, selv om den kommer med litt kompleksitet til å begynne med.
- Fordeler
- Veldig tilpassbar for avanserte brukere.
- Dekker flere lyd- og videokilder.
- Egnet for profesjonelle opptak.
- Ulemper
- Det funksjonsrike grensesnittet kan være overveldende.
- Krever forskning og justeringer.
- Har begrensede redigeringsverktøy.
2. Screencast-O-Matic
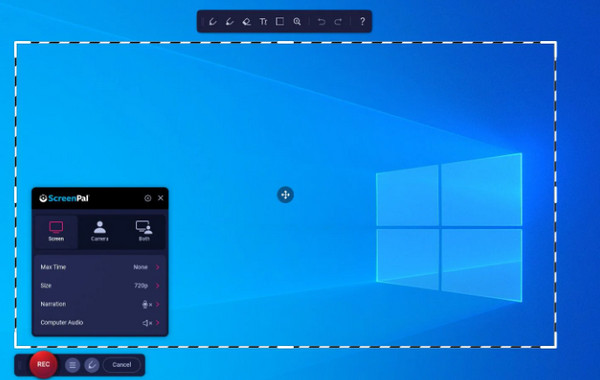
Et annet gratis QuickTime-alternativ er Screencast-O-Matic. Dette programmet er et kjent opptak for Windows og Mac som støtter både gratis og betalte versjoner. Den har et brukervennlig grensesnitt som imøtekommer ulike krav, noe som gjør det til et ideelt valg for nybegynnere og uformelle brukere. Gå hit umiddelbart hvis du vil ha et raskt bilde, veiledninger, en primær skjermdemonstrasjon.
- Fordeler
- Kostnadsfritt program som lar deg gjøre rask fangst.
- Del opptak direkte på vertsplattformen.
- Ha et grensesnitt som er lett å navigere og er bra for nybegynnere.
- Ulemper
- Opptak har en grense og vannmerke i gratisversjonen.
- Mangler omfattende tilpasning og funksjoner.
- Begrensede redigeringsfunksjoner, selv i den betalte versjonen.
FAQs
-
Hvordan bruke QuickTime til å skjermopptak med mikrofonlyd?
Etter å ha åpnet QuickTime, gå til Fil-fanen og velg Ny skjermopptak. Under nedoverpilen ved siden av opptaksknappen velger du alternativet Intern mikrofon. Deretter kan du definere opptaksområdet selv, og når du er klar, klikker du på "Record"-knappen.
-
Kan du ta opp en iPhone-skjerm med lyd gjennom QuickTime?
Dessverre, nei. Du kan ikke ta opp iPhone-skjermen direkte sammen med lyd ved å bruke standard QuickTime Player på Mac. Spilleren er bare i stand til å ta opp skjermen og lyden til enhetene den kjører på din Mac.
-
Hva kan jeg bruke til å spille inn iPhone-skjermen med lyd?
Hvis det er umulig å gjøre dette på QuickTime Player, vil den enkleste metoden gis av den innebygde skjermopptakeren på iOS-enheten din, som er tilgjengelig i kontrollsenteret. Hvis den ikke er der, finn den i Innstillinger og legg til funksjonen.
-
Hvor lagres alle opptakene fra QuickTime?
Som standard lagres alle opptak som er gjort i QuickTime i Filmer-mappen på Mac-en. Du kan imidlertid velge en annen plassering for filen før du lagrer opptaket.
-
Hva er det utmerkede formatet for å lagre QuickTime-opptak?
Det er ikke et utmerket format for å lagre opptak gjort i QuickTime siden det avhenger av dine behov. Imidlertid er spillerens standardformat MOV, som tilbyr god kvalitet og kompatibilitet med de fleste plattformer og enheter. Hvis du finner den større i størrelse, kan du vurdere MP4 for enkel deling og sparing av lagringsplass.
Konklusjon
Du skjønner, gjør en QuickTime-skjermopptak med datalyd er mulig hvis den har en lydplugin. Men hvis du har det, men fortsatt ikke får lyd, er det bedre å holde deg til et alternativ som er nevnt i dag. Blant alt er det beste du kan ha AnyRec Screen Recorder. Ikke bare gir den en sømløs måte å ta opp på, den kan også ta opp både intern og ekstern lyd med skjermen din i den kvaliteten du ønsker. Senere kan du legge til dine detaljer med redigeringsverktøyene.
100% Sikker
100% Sikker
