3 Ways to Take a Partial Screenshot on Windows 11/10/8/7
Get the best tool to take screenshots on Windows 11/10/8/7 quickly with high quality:
- Launch "AnyRec Screen Recorder" > Click "Snapshot" > drag your mouse to choose the desired partial area > "Edit" and "Save".
100% Secure
100% Secure

When capturing screen, you may not need to capture everything but rather just a specific section without unnecessary parts. So, why not take a partial screenshot on Windows directly? Whether you're working on a project, troubleshooting a technical issue, or sharing something interesting with friends or colleagues, capturing an image with the important thing only is better. No need to crop or edit a full screenshot, just follow this article to learn 3 ways to take partial screenshots on Windows 11/10/8/7.
Guide List
Part 1: How to Take a Partial Screenshot on Windows 11/10/8/7 Part 2: Use Windows Screenshot Shortcuts to Take a Partial Screenshot Part 3: FAQs about Windows Partial ScreenshotsPart 1: How to Take a Partial Screenshot on Windows 11/10/8/7
For a quick partial screenshot capture on Windows/Mac, there is no tool better than AnyRec Screen Recorder. It provides customized hotkeys to capture your screen, record video, and more. It is the ideal recorder for various activities like gameplay, online meeting, and so on. You can flexibly change the screenshot area when capturing. Moreover, it will guarantee high-quality output in any image format.

Take screenshots on Windows 11/10/8/7 with partial area or full screen.
Save screenshots in different file types like PNG, JPEG, GIF, BMP, and TIFF.
Provide photo editings such as a pin to screen, scrolling windows, and drawing.
Outstanding screenshot for phone, webcam, gameplay, video, and media content.
100% Secure
100% Secure
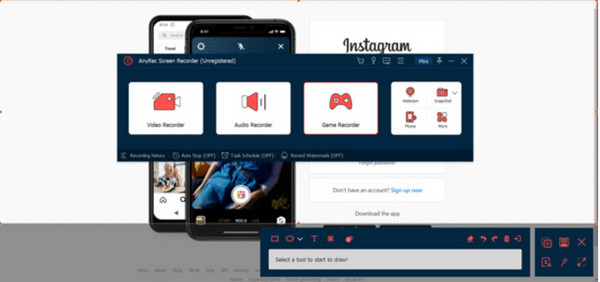
Step 1.Download and launch AnyRec Screen Recorder on your Windows/Mac. After that, click the "SnapShot" button from the main menu.
100% Secure
100% Secure

Step 2.Your cursor will turn to a cross-grid, which you can glide all over the screen to do a partial screenshot. You can also use the center to click and select an opened window.

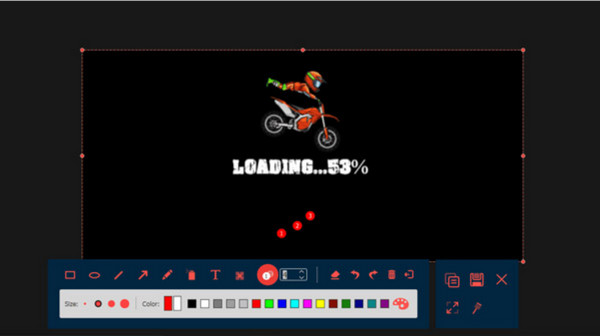
Step 3.Edit the picture with the drawing tools. Save the output by clicking the "Save" button. Capture another partial screenshot on Windows by repeating the steps.

100% Secure
100% Secure
Part 2: Use Windows Screenshot Shortcuts to Take a Partial Screenshot
Windows also provides different screenshot shortcuts for different system versions, so you should find the right one to take screenshots on your Windows. And sometimes, the shortcuts may not work because of blocked page, privacy protect, and more. Moreover, there is no editing features for you. Now, see how to take a screenshot partially on Windows 7/8/10/11 with shortcut keys.
1. Shortcut on Windows 7
Step 1.Pressing the PrintScreen button on your keyboard will capture the whole screen. Press "Alt + PrintScreen" simultaneously to capture the only active window.
Step 2.Alternatively, press "Windows" on your keyboard and type Snipping Tool on the Start window. Once the app is launched, click the "New" button and choose the area to capture.
2. Shortcut on Windows 8/10/11
Step 1.Simultaneously press the "Windows" and "PrintScreen" keys on your keyboard. You will see a shutter on your screen. The captured photo will be saved by default.
Step 2.Use the Paint app to edit the picture and remove the unwanted parts. Press "Windows" and "E" keys to open File Explorer and select the screenshot.
Part 3: FAQs about Windows Partial Screenshots
-
1. How to use Game Bar on Windows for screenshot partial?
If you want to capture your gameplay on your computer, use Game Bar on Windows 10 and 11. Go to Settings and search Xbox Game Bar. Toggle on the switch to activate it. Once done, press the Windows key and G at the same time. Click the Camera button to take a screenshot on your screen.
-
2. How to edit a screenshot to crop on Windows?
If you have a screenshot with excess parts, you can edit it on the Paint app. Open the photo editor and go to the File menu. Select open and browse for the screenshot from the folder. After uploading, use the Select option from the top toolbar. Choose the part you want to keep, then click the Crop button to remove the unwanted parts.
-
3. How to screenshot partially on Mac?
3. By default, you can screenshot a portion of your screen on Mac by pressing Command+Shift+4. Your cursor will turn to a crosshair, which you can drag to select the portion you want to capture. Once you release the mouse button, the screenshot will be captured and saved as a PNG file.
Conclusion
To conclude, capturing the content from your screens gives you an easier way to copy or share information with others. After learning how to take screenshots partially on Windows, you can capture photos without restrictions and edit them with built-in features such as Paint and Snipping Tool on Windows 11/10/8/9. AnyRec Screen Recorder is also a helpful tool that allows you to capture onscreen activities in the best quality. With the robust alternative, taking a screenshot, capturing gameplay, and online meetings have never been easier and more fun.
100% Secure
100% Secure
