Premiere Pro Playback Choppy? Fix It to Get Smooth Preview
When editing in Adobe Premiere Pro, you might not mind the choppiness during the process; however, it becomes an extra headache once you preview it. This Premiere Pro playback choppy problem could be due to outdated software, incorrect settings, inadequate resources, and more. To get a smooth preview without stuck, this post will provide you with the 8 best fixes to work on the Premiere Pro lagging playback. So, read on now!
Guide List
Solution 1: Turn on GPU Acceleration Solution 2: Reduce the Playback Resolution Solution 3: Consolidate the Project Solution 4: Clear the Media Cache Solution 5: Disable the FX Effects Solution 6: Optimize the Rendering and Playback Settings Solution 7: Disable Unused Clips Solution 8: Fix Choppy Issue from Original Videos FAQsSolution 1: Turn on GPU Acceleration
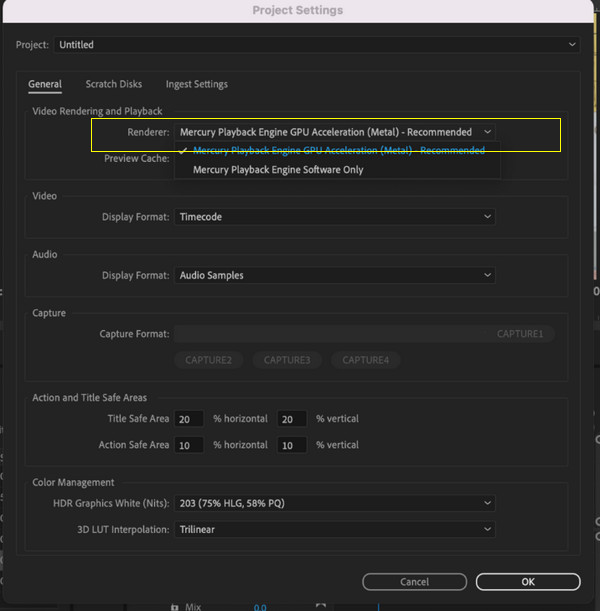
Ensure the GPU Acceleration is enabled to guarantee smooth video playback in Premiere Pro. This technology lets the graphic card process from the CPU, giving you a faster visual rendering. Here’s how to enable it to fix Premiere Pro layback keeps stopping:
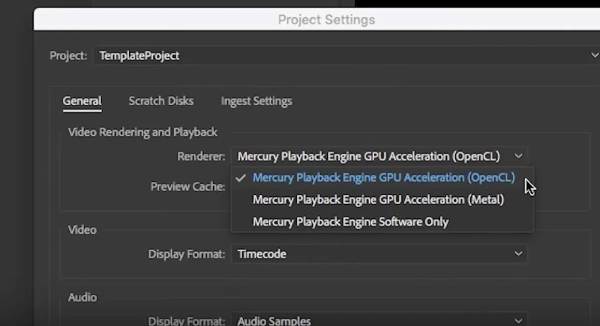
Step 1.Inside Premiere Pro, click the "File" tab, select "Project Settings", then head to the "General" section to view the project settings box.
Step 2.Under the "Renderer" menu, choose "Mercury Playback Engine GPU Acceleration". Then, click the "OK" button to lay out the new settings.
Solution 2: Reduce the Playback Resolution
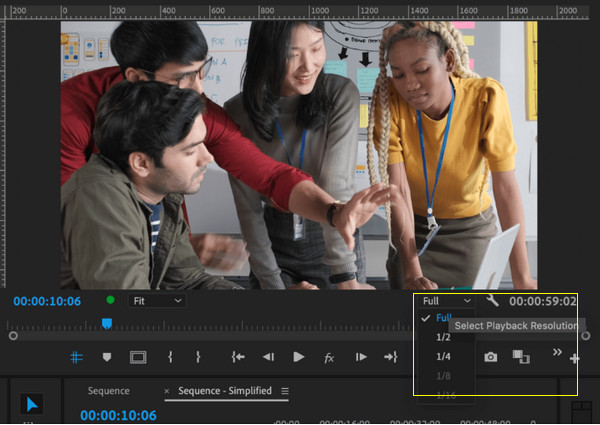
By default, Premiere Pro will play your edit depending on the sequence settings, which will be 1080p or beyond. Thus, if your computer lacks resources to deal with high-resolution videos, you will surely face a Premiere Pro playback choppy problem.
By dropping the playback resolution, the software will only be required to display less information per frame, which can be done in the drop-down menu at the lower right corner of the "Media Viewer".
Solution 3: Consolidate the Project
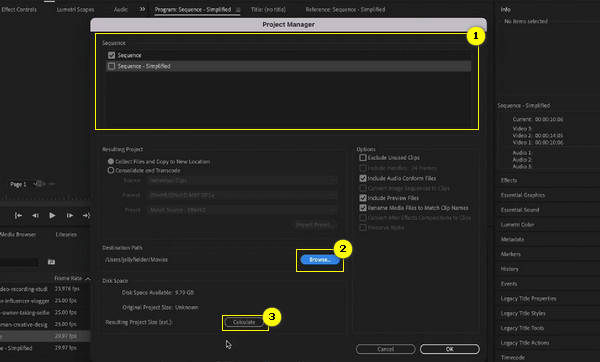
It’s recommended to consider file structure for your video projects since Premiere Pro can stumble to follow if they are a bit complicated, which leads to Premiere Pro playback lagging. Therefore, using the Consolidation tool, all your media will be in the same location, avoiding the need for the software to search for all files when playback.
Step 1.Click the "File" tab, then head to the "Project Manager" option. Pick the sequences you intend to copy by clicking the checkbox.
Step 2.Click the "Browse" button to specify a new path and click the "Choose" button. Then, click the "Calculate" button to see how big the project copy will be. Finally, click "OK".
Solution 4: Clear the Media Cache
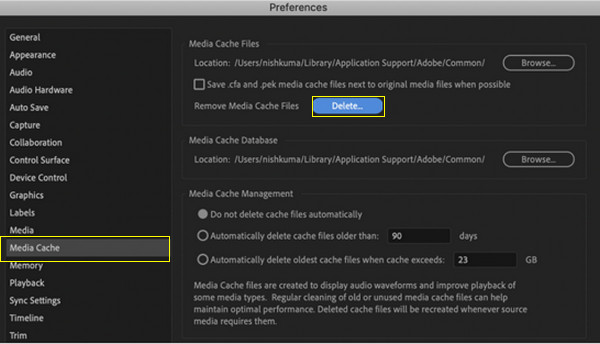
Premiere Pro will add files every time you play back in your video project, and these are saved in Media Cache. Once the cache gets filled, it will eat up a lot of space, which will significantly impact the Premiere Pro’s performance, thus giving you the Premiere Pro playback choppy problem.
Step 1.Exit your video project first, then head to the "Edit" tab, select "Preferences", click on "Media Cache", and click the "Delete" button beside the "Remove Media Cache Files".
Step 2.Choose the "Delete unused media cache files" option and click the "OK" button to verify the action.
Solution 5: Disable the FX Effects
Suppose your Premiere Pro project contains many effects or layers. It is possible that you have a stutter or choppy problem due to this complexity as effects increase the working size of the video. Thus, you can mute the visual and audio effects to fix Premiere Pro glitchy video playback and check if the video plays well. Here’s how to do it:
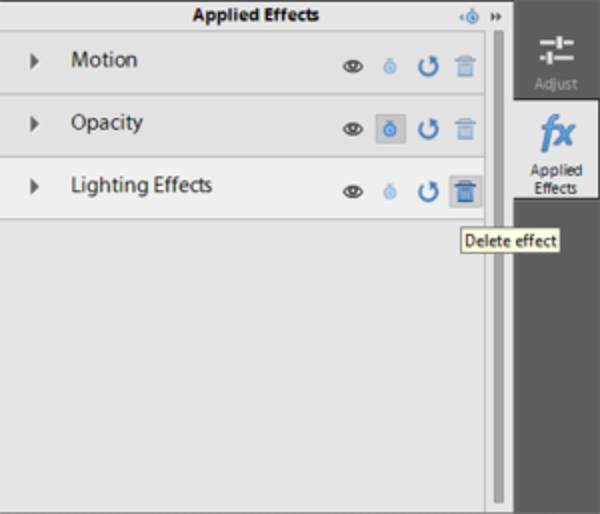
Step 1.See the toolbar below of the "Media Viewer" and search for the fx button. If there’s nothing, click the "Add" button instead.
Step 2.Locate the "fx" button and you can see all the applied effects on your video. Just click the "Delete" button to remove all the effects and fix Premiere playback choppy issue.
Solution 6: Optimize the Rendering and Playback Settings
Video editing software always plays sequences in real time and uses a full frame rate. However, it is not always happening, especially in complex sections, giving you a Premiere Pro playback not working issue. Hence, rendering preview videos per section will help you fix playback errors in Premiere Pro.
Step 1.Move the play head to the beginning point, press "I" on your keyboard to set it, then proceed to place the play head at the endpoint, and press "O" to set it.
Step 2.Go to "Sequence", and select "Render In to Out". Once it is done, you should edit your video without stuttering issues.
Solution 7: Disable Unused Clips
One easy way to get out of the Premiere Pro choppy playback problem is to turn off unused clips to minimize the load of the software on your systems, especially if you’re editing a long project. Though this method will require you to re-enable clips, you can consider it specifically if you use a low-end computer.
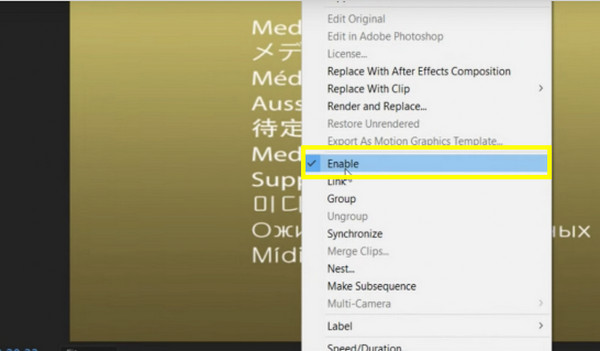
Step 1.Determine the clips you’re not using, then highlight them by sliding your cursor from one point to another.
Step 2.Right-click and select the "Enable" option from the list; ensure it is unchecked.
Solution 8: Fix Choppy Issue from Original Videos
Do none of those above solutions fix Premiere Pro playback choppy issues? If so, don’t fret; you still have software that will be your great companion throughout the repair process. Learn about the AnyRec Video Repair. The repairing tools can fix choppy, damaged, unplayable, and broken video files in many formats, like MP4, AVI, MOV, etc. Whether they come from cameras, phones, computers, recorders, or whatever devices, the tool can fix videos with high quality and promise no choppy on Premiere playback!
An AI-supported repair software to fix choppy, broken, unplayable videos.
Cover repairing videos from famous camera brands and storage devices.
Able to adjust the output video, including the format, quality, and more.
The preview window lets you check the repaired video if it turns out well.
100% Secure
100% Secure
Step 1.Start by opening the AnyRec Video Repair. Then, you’ll see the "Add" button on both sides; click the left one to import your choppy video, while the right one is for the sample video.
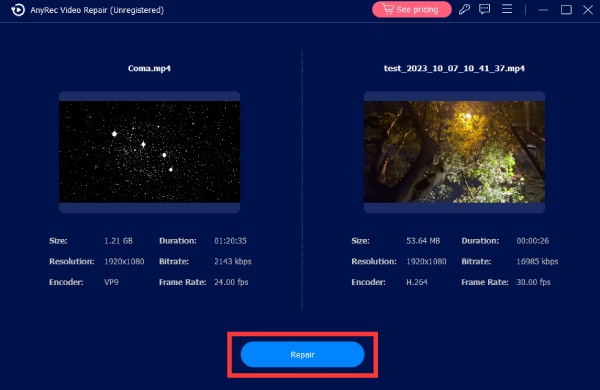
Step 2.Click the "Repair" button to fix Premiere playback choppy issue. Once it’s complete, check the video to see if there’s no choppiness at all by clicking the "Preview" button.

Step 3.Afterward, confirm the parameters like resolution, duration, bitrate, etc., if they’re well set. Click the "Save" button to conclude the fixing Premiere Pro playback lag process.

Further Reading
FAQs
-
What factors should I check if I have a Premiere Pro playback choppy problem?
You should check for updates since Premiere Pro and your system needs regular updates, as the older version can cause issues. Also, check the clip settings if the stutter only happens to particular clips.
-
Can closing unnecessary apps can help me fix Premiere Pro lagging playback?
Yes. If your computer runs many apps, it affects the Premiere Pro since it takes much processing power to run smoothly. Consider closing active apps you won’t use in the meantime and run only those you need for editing.
-
How much RAM is needed to use Premiere Pro smoothly?
Premiere Pro will require 16 GB or more for HD editing and multitasking to avoid glitches and stutter. If you’re into 4K editing and much more demanding projects, you should have 32 GB RAM or higher.
-
How do you create proxy videos to resolve Premiere Pro lagging playback?
In your project panel, select your videos and right-click. Choose Proxy, select Create Proxies, and then pick the low-resolution proxy as Preset; click the OK button. The proxy videos are low-resolution versions of your original videos.
-
What alternatives can I use if the Premiere Pro lagging continues?
If you choose not to use Premiere Pro, you can use alternatives such as FIlmora, iMovie, Final Cut Pro, Lightworks, PowerDirector, Vegas Pro, CapCut, Canva, and more.
Conclusion
You see that Premiere Pro playback choppy issue is frustrating, but the good news is that it is fixable. With the bunch of solutions mentioned, you can fix the stutter or lag happening in the video preview of Premiere Pro. Among them, repair video playback issues with confidence with AnyRec Video Repair. The software can fix choppy, stutter, or lag in your video in just one click without sacrificing quality. Check out the program today and repair all your problematic videos with it!
100% Secure
100% Secure
 Fix Pixelated or Grainy Videos with 4 Working Ways