[Recommended] How to: Export QuickTime MOV to Mp4 with Ease
QuickTime has been one of the most legendary entry-level video recorders and player tools. Created by Apple in 1991, QuickTime's fan base has populated across the spectrum for both PC and Mac users. However, it is commonly reported that people would encounter issues when they try to export a QuickTime MOV file to MP4 format. As one of the Reddit users have stated:
I made a screen recording with QuickTime and came across the following problem. I noticed that in the original movie all the menu options are greyed out. Can’t export QuickTime to MP4 anymore. This is a problem that many have encountered and reported over the past decade and to which I could not find a solution!
- Reddit UserFor many people, it is definitely a terrible experience after spending hours recording a video with QuickTime and try to convert the QuickTime file to a MP4 format, only to find out the Export feature has been greyed out. We collected the solutions in different parts:
Guide List
How to Use QuickTime Export MOV to MP4 How to Create MP4 Recordings without QuickTime How to Create MP4 Recordings with Online Tools FAQs about Exporting QuickTime to Mp4How to Use QuickTime Export MOV to MP4
Step 1.Create a New Recording with QuickTime
Open up your QuickTime, and click the "File" button. You would be able to click the "New Screen Recording" button to capture your screen into a MOV file. Alternatively, if you wish to create a short video from your webcam, choose the "New Video Recording" instead.
Step 2.Upgrade your QuickTime version to QuickTime Pro
Since Apple has limited the export functionality of QuickTime, you need to upgrade your software copy first. Purchase a valid QuickTime Pro license from Apple to proceed.
Step 3.Export MOV files to MP4
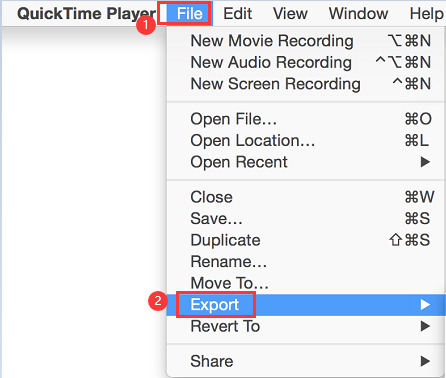
Locate the QuickTime MOV file you wish to convert to MP4, open it up with QuickTime. Click the "File" button on the menu bar, and navigate to the "Export" option. Choose the export format to MP4, and click the "Save" button to confirm the process.

How to Create MP4 Recordings without QuickTime
Since using QuickTime to convert MOV recordings to MP4 isn't easy and you might spend unexpected time on format converting. So, why not take the shortcut and choose another screen recorder which could record videos directly to MP4? AnyRec Screen Recorder is a piece of software designed as an equivalent to your QuickTime Player in mind. It supports features such as:

Record gameplay footage easily without lagging
Create Video Conferences recordings with ease
Record your online classes as local videos
Record your favorite live stream without losing quality
Create your own video with a webcam and screen recorder!
Variety of supported video formats.
100% Secure
100% Secure
The following steps will demonstrate to you how to make a video recording and export your MOV file to MP4 without using QuickTime.
Step 1.Download and install AnyRec Screen Recorder. On the main screen, click on the Video Recorder option on the left side of the panel.

Step 2.On the left side of the panel, you are given options to either record a portion of the screen or record the full screen. You would be able to enter the exact resolution of your recording area or directly manipulate the size with cropping tools.
Step 3.If you wish to record from your webcam, click the "Webcam" button to enable it. Don't forget to turn on the "Microphone" option to enable recording your voice.
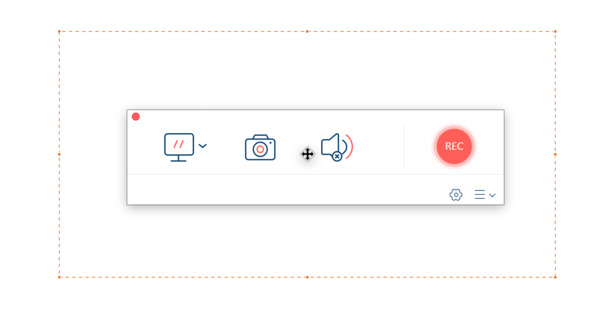
Step 4.Click on the "REC" button on the right hand of the screen to start recording.

Step 5.After the recording is finished, click the "REC" button again. You would be able to access your files in your Documents folder.
How to Create MP4 Recordings with Online Tools
Alternatively, you could also use a free online screen recorder as a QuickTime replacement. AnyRec Free Online Recorder is a 100% free tool to quickly create screen recordings without any watermarks or time limitations. Most importantly, you could easily choose the desired export format and save it as an MP4 file directly.
Step 1.Open up your web browser and visit AnyRec Free Online Recorder website. Click on the "Record for Free" button to download the plugin.

Step 2.After launching the program, you would be able to choose a recording area as you wish. Click on the "REC" button to start recording.

Step 3.Click on the "REC" button once again to stop recording. You would be able to save your files to MP4 directly without using QuickTime to convert MOV to MP4.
FAQs about QuickTime Export to MP4
-
1.Which format has the better Video quality, QuickTime MOV or MP4?
In theory, MP4 vs MOV doesn't make any difference to output quality - only the codec settings matter, not the container. But again, in practice, things that only output MOV might not be using the best encoder.
-
2.Why QuickTime doesn't save MP4 anymore?
Since the upgrade to High Sierra, QuickTime has disabled the "export to iPad/iPhone/etc" option to save your files in M4V format instead of MP4. Try another app instead.
-
3.How to solve the 'Can't open the movie, the file isn't compatible with QuickTime' issue?
Try to use another video player such as VLC to open your file. If it still does not open, it means that your file has been corrupted.
Conclusion
Using QuickTime to create video and screen recordings has been a common practice. If you are having trouble, use QuickTime to export MOV files to MP4, try the listed methods and hope your problem could be tackled with ease!
