Record Rust Gameplay: 6 Quick and Easy Ways to Achieve It!
Surely, you’re into the Rust gameplay, where you need to survive in the wilderness through stolen materials. This intense survival game cannot miss that chance to be replayed over again and shared with others; thus, knowing how to record Rust gameplay is essential. You may think it’s a challenging process at first, so to address this right away, this post got you four complete tutorials on how to record Rust gameplay on computer and game consoles. Choose what is best for yourself.
Guide List
The Best Way to Record Rust Gameplay on All Devices How to Use OBS to Record Rust Gameplay on PC/Mac Steps to Record Rust Gameplay on PS4 and Xbox FAQsThe Best Way to Record Rust Gameplay on All Devices
The first recommended solution to record Rust gameplay is through the help of AnyRec Screen Recorder. It has powerful recording functionalities, including recording the entire screen and freely customizing part of your screen. Moreover, it provides a Game Recorder, which can record gameplay with no lag, thanks to its hardware acceleration. In addition to that is its easy-to-operate interface; from selecting a recording area to the recording process, you will have no steep learning curve. Even adding the webcam and microphone audio to the game recording session won’t cause any quality loss. Explore more by learning how it works to record Rust gameplay below.
Record Rust gameplay with webcam and microphone audio with high quality.
Able to fix the game recording window to prevent the disturb of pop-ups.
Provide no time limit and watermarks embedded once the video is exported.
Adjustable video and audio settings to acquire your desired recording quality.
100% Secure
100% Secure
Step 1.Upon running AnyRec Screen Recorder on your desktop screen, click the "Game Recorder" button to record Rust gameplay.

Step 2.Then, proceed to click the "Select the game" button and choose the Rust gameplay window on the list. Click the "OK" button to verify the selection.
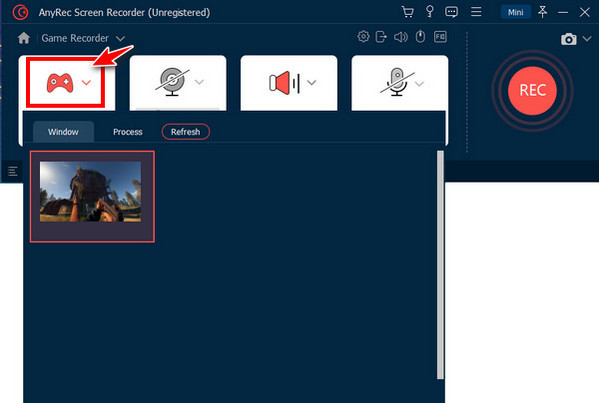
Step 3.Optionally, activate the "Webcam" switch to capture yourself while recording Rust. Also, don’t forget to turn on the "System Sound" to record in-game sounds and the "Microphone" to record your voice. Once settled, click the "REC" button.

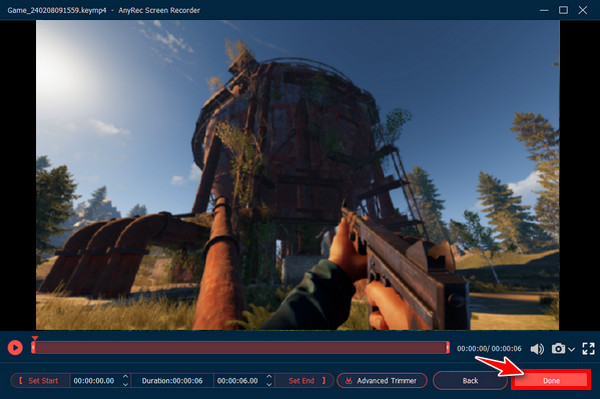
Step 4.Now that you’re finished, click the "Stop" button to go straight to the "Preview" window. You can cut out parts using the trimmer, then click the "Done" button to save your recorded file.
How to Use OBS to Record Rust Gameplay on PC/Mac
The second method that provides a straightforward way to record Rust gameplay is through OBS Studio. Using OBS, you can record your screen and livestream without worrying about time limits and watermarks. However, it may not be recommended for beginners to record Rust gameplay and others because it comes with a complicated interface with overwhelming features.
Step 1.After you install OBS Studio, launch it on your desktop to start. Then, left-click the side of the OBS screen to create a scene.
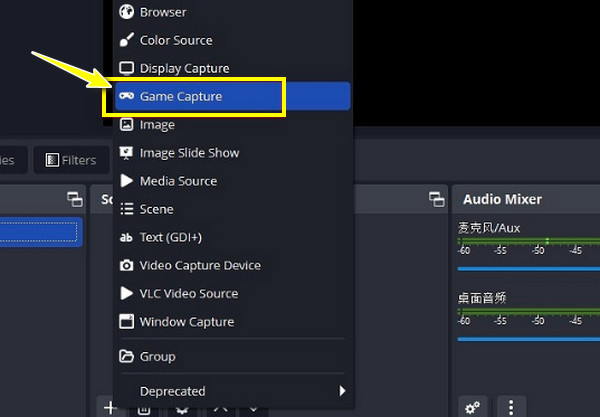
Step 2.Next, click the "Add" button under "Sources", then pick the "Game Capture" option among others on the list. Click the "OK" button.
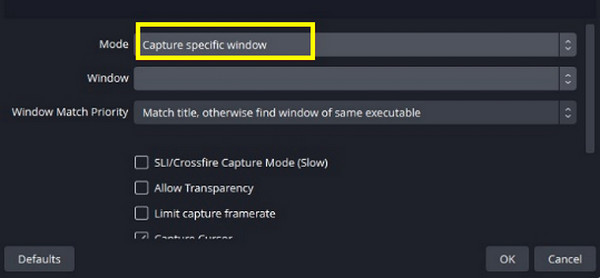
Step 3.In the "Mode" menu, click its "spin control" button, select "Capture specific window" and click the "OK" button. Soon after it’s done, click the "Start Recording" button to capture Rust gameplay.
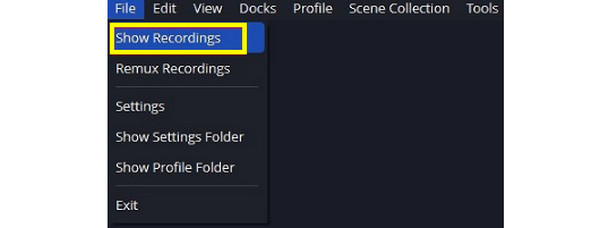
Step 4.When all is done, click the "Stop Recording" button. To conclude the recorded gameplay, click the "File" from the upper tab, then select "Show Recordings".
Steps to Record Rust Gameplay on PS4 and Xbox
Suppose you prefer a no-installation solution for recording Rust gameplay on computers, then you will be happy to know that Xbox and PS4 offer a default way to record. The two game consoles offer two different methods, but slightly the same. To get to know more about each, see the following comprehensive steps to record Rust gameplay on PS4 and Xbox.
How to record Rust gameplay on PS4:
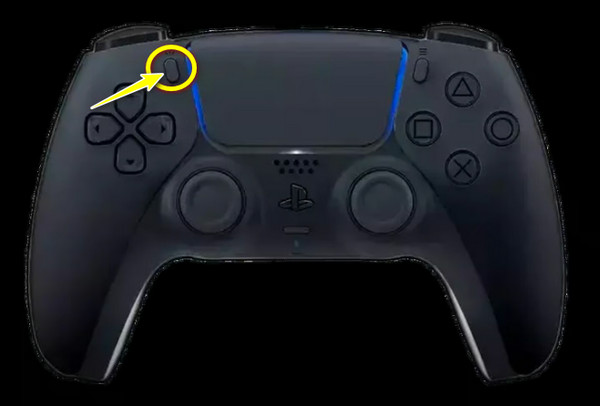
If you wish to record using the default recorder on PS4, do so by simply pressing the "Share" button above the arrow controllers twice. Do it again twice to stop the recording.
How to record Rust gameplay on Xbox:
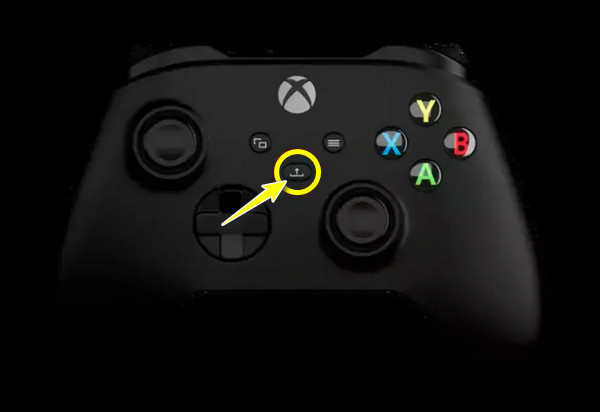
The process is as straightforward as PS4; with the controller, press and hold down the "Share" button (in the middle) to start recording. Do the same again to stop recording the gameplay.
FAQs
-
How do you record Rust gameplay using the Xbox Game Bar?
Launch the Rust gameplay window, then access the Xbox Game Bar by pressing the "Windows + G" keys. Then, inside the Capture mini window, click the Record button.
-
Do I need a capture card to be able to record Rust gameplay?
No. Besides being console gameplay, Rust is available on Windows, Mac, and Linux operating systems, so a capture card is not required to record the console gameplay.
-
Is the Rust gameplay a single-player or multiplayer?
It is a multiplayer-only survival game where you encounter wolves, bears, and other players. Although wild animals may be a threat, other players are the main threat. Other challenges can be experienced as well, like wildlife attacks, drowning, and hypothermia.
-
How long can PS4 record Rust gameplay?
If you desire to record gameplay on PlayStation, you can set the time recording length from 30 seconds to 60 minutes. Open the Settings up, then locate the Broadcast and Video Clip settings where you determine the time length you want to record.
-
How to record Rust gameplay in the last 30 seconds?
Using the Xbox Game Bar, you can record the 30 seconds of Rust gameplay. To do it, press the "Windows + Alt + G" keys after opening the built-in recorder. It will instantly record the last 30 seconds of your gameplay activity.
Conclusion
To sum up everything, you see here the ways to record Rust gameplay with OBS, the default ways on PS4 and Xbox, and others. Now, it is believed that you’ve finally understood how to record your Rust gameplay on all devices. Out of all the solutions mentioned, going for AnyRec Screen Recorder – a good screen recorder for low-end PC is highly advisable. It is best for assisting you in recording all on-screen moments, including webcam and microphone audio, without quality loss. It also comes with no lag and watermarks in the recording, giving you a clean and smooth video. Give it a try today!
100% Secure
100% Secure
