A Guide to Reduce Background Noise While Recording [2025]
In the journey of your clear recordings, the background noise is the villain. Whether you’re a podcaster, a musician, or simply want to capture precious moments, you really have to reduce background noise while recording. Those hums, chatters, and more can make your audio frustrating to listen to. Thus, today, tips such as using mic noise cancellation and more details will help you tame the noise and have professional-sounding recordings. Scroll down now!
Guide List
Types of Background Noise That Occurs in Recording How to Record Audio without Microphone Background Noise Tips to Reduce Background Noise When RecordingTypes of Background Noise That Occurs in Recording
Before getting into ways to reduce background noise while recording, know that there are different types of background noises you must get rid of from your recordings. Here’s a breakdown:
1. Broadband or Wideband Noise
This type of background noise includes a wide range of sounds like hiss or statics. It usually resembles the fan sound running, hums, or the noises of a busy environment. Since it spreads across a broad range, it can be challenging to remove this entirely without affecting the desired sound.
2. Narrowband
Narrowband, on the other hand, occurs at a specific frequency, such as hum or buzz from lights, power supplies, or wirings. Unlike broadband noise, this type of noise is easier to remove with simple noise reduction software.
3. Impulse Noise
Next, Impulse Noise is often short bursts of sound, including clicks, crackles, pops, or sound bumping the microphone. It is usually brief but can be distracting. With this noise, it can be hard for you to remove it in real time, though it can be reduced while editing.
4. Irregular Noise
This one is unpredictable and does have a specific pattern. Irregular Noise can be background chatter, wind, rain, and other sounds that change over time. Reducing this type of background noise may require noise reduction techniques to effectively lean up the recording without affecting the quality.
How to Record Audio without Microphone Background Noise
Are you having fun learning all the stuff about the different types of background noises? Before doing anything else, such as investing in expensive equipment to reduce background noise while recording, try using the professional AnyRec Screen Recorder. This tool records your screen, audio, and webcam with built-in noise reduction technology and mic enhancements, minimizing unwanted sounds. It effectively eliminates hums, static, and other sound distractions, ensuring your audio recordings are cleaner and more polished. In addition to reducing background noise while recording, the program lets you fine-tune audio settings to meet your specific needs for optimal quality.
Built-in noise reduction technology to reduce background noise while recording.
Capture clear and professional-quality audio from mic without interference.
Export audio in any formats like MP3, AAC, AC3, FLAC, and more.
Trim unnecessary portions of your audio and video before saving.
100% Secure
100% Secure
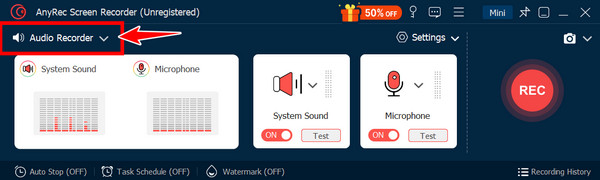
Step 1.Open AnyRec Screen Recorder first, then go to the "Audio Recorder" to record audio from a computer or microphone with different volume settings.
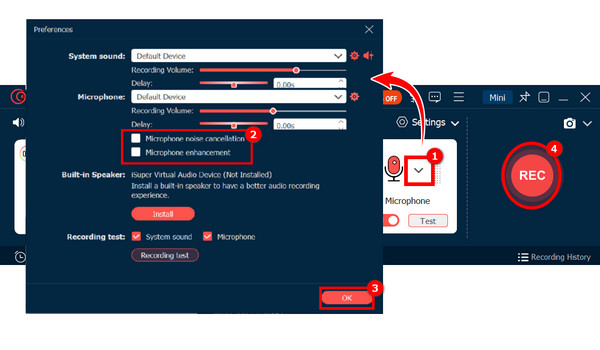
Step 2.After setting the input audio, you should click the "Preferences" and "Sound" button to enable the "Microphone noise cancellation" and "Microphone enhancement" to reduce background noise while recording.
Step 3.You can have the system sound and mic test first. Once you’re ready, click the "REC" button. You can keep an eye on the audio level to ensure no unwanted noises are being picked up; adjust the audio level if needed.

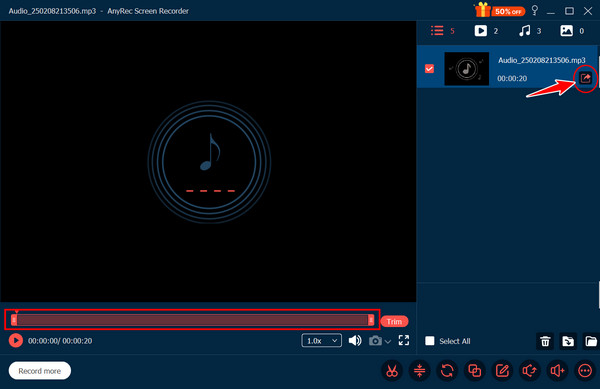
Step 4.Later, click the "Stop" button to end the audio recording. You can then listen to your audio and trim it if there are any extra parts; save the file in the format you like afterward.
Tips to Reduce Background Noise When Recording
Now that you know how to record audio without facing any background noises, it’s nice if you know some tips on how your look will sound professional. Besides the best recording software, here are some tips to help you achieve more precise and high-quality recordings:
1. Choose a Quiet Recording Environment.
Playing a crucial role in reducing background noise when recording is the environment you choose. You should find a room or area that is as quiet as possible, away from any appliances, loud neighbors, and traffic. You must avoid empty rooms with hard surfaces as this will cause echo.
2. Use a Directional Mic.
Not just a simple mic, but a directional microphone is what you need to capture sound primarily from the front and lessen noise from the sides and back areas. With this, you can isolate your voice and the primary sound source, reducing background noises in microphone recording.
3. Position the Mic Properly.
After getting your microphone ready, it should be placed correctly, capturing clear audio only and reducing background noise. Ensure the mic is close to your mouth but not too close to avoid breath noises and plosives. You should aim for a position that reduces noise from your environment; you could experiment with different angles first to find the best position.
4. Use a Pop Filter or Windscreen.
You can purchase a pop filter, too, to eliminate popping sounds and prevent breath noise. Using this, you can lessen the impact of air movement and wind on your microphone.
5. Turn Off Extra Electronics.
Usually, electronics like air conditioners and fans can create unwanted hums and buzzing sounds. Thus, before recordings, turn off any devices that are not essential to your recording session.
6. Soundproof Your Recording Space.
Aside from recording in a quiet space, you can soundproof it, too, to reduce background noise when recording. You can add thick curtains or carpets to your room, absorbing sound waves and ensuring your mic only picks up the primary audio source.
7. Use Noise Cancelling Headphones.
Noise-cancelling headphones will help significantly to have clear audio. It also makes it easy to monitor recordings in real time and adjust if the noise becomes noticeable. Plus, you can make more accurate adjustments to your mic settings and surroundings.
8. Record at the Right Time.
After everything is set, timing your session for quieter times. You can record early mornings or late evenings when external noises are at their lowest. Recording at the right time guarantees a cleaner sound capture.
9. Adjust Mic Gain and Levels.
You must not forget about setting the gain to a level where it picks up your voice without the surrounding noises. A too high will increase sensitivity while too low will capture less detail, so ensure that the right balance is found to reduce background noise from a microphone while recording.
10. Use Post-Production Noise Reduction Software.
Even with all the above preparation before recording, some noise may still slip. Therefore, it’s nice to have noise reduction tools by your side to eliminate all unwanted noises. Post-production editing is a decisive final step in producing professional sound quality.
Conclusion
That’s all for today! Now, reducing background noise while recording audio is easier than ever! By understanding the different types of noise, you can better equip yourself to manage those unwanted distractions. Also, with techniques and tips for lessening noises, you can hugely improve the quality of your recordings. However, if you want a seamless solution that combines friendliness with noise reduction features, AnyRec Screen Recorder is the ideal audio recording software. This program ensures that you get your audio clear and crisp without worrying about background noise, giving you a high-quality recording experience every time.
100% Secure
100% Secure