Snipping Tool Chromebook – 6 Best Tools to Capture the Screen on Chromebook
Different from the snipping tool on Windows or Mac computers, many of you may not know where the snipping tool on Chromebook is or how to use it to capture the screen. This post will elaborate on how to use the default snipping tool for Chromebook to take a screenshot and what are the useful shortcuts to activate the tool. After learning this quick method, it will be easier for you to share anything you see online with friends. Moreover, here you will also learn the other best alternative snipping tools for Chromebook that can make your screenshot more efficient.
Guide List
Default Snipping Tool on Chromebook Best Alternative Snipping Tool for Chromebook FAQs about Snipping Tool on ChromebookDefault Snipping Tool on Chromebook
Do Chromebooks have a snipping tool by default? Sure, they do. Although the snipping tool is not that as obvious as on Windows computers. But you can activate the snipping tool on Chromebook using key combination shortcuts to capture the screen without hassle. Check what are these shortcuts and how to use the snipping tool on Chromebook below.
How to Use the Snipping Tool on Chromebook Quickly
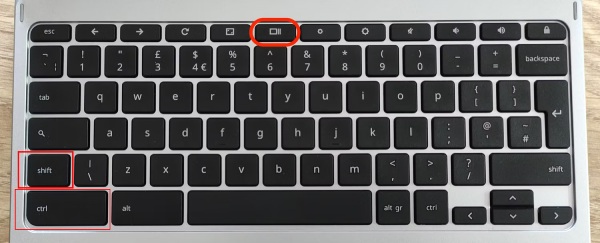
There are two ways to find the snipping tool on Chromebook. You can find it from the "Launcher" menu. Simply click the "Launcher" button and type snip, you will see the snipping tool. However, if you want to catch a moment in a movie that would soon slip away, you’d better try the shortcut follow the steps below.
Step 1.Press "Ctrl, Shift, and Show Windows" keys on your keyboard shown in the above pic.
Step 2.Your screen will get a little darker, and you can randomly capture part of your screen
Step 3.Click and drag with your mouse to take a screenshot of the part you want.
Note: If you are wondering where the screenshots go, you can check your clipboard and the "Downloads" file folder. After taking a screenshot, you can always paste it to a document or chat window.
Snipping Tool Shortcuts on Chromebook
The shortcut above allows you to capture a specific area of your screen. There are more snipping modes in the default snipping tool on Chromebook. Check the key combinations and their usage one by one.
| Key Combination | Usage |
| Shift + Ctrl + Show Windows | Capture screen partially |
| Ctrl + Show Windows | Capture whole screen |
| Ctrl + Alt + Show Windows | Take screenshots in a certain window |
Best Alternative Snipping Tool for Chromebook
The built-in snipping tool on Chromebook may not meet your needs fully, and you can try other third-party snipping tools for Chromebook anytime to have more efficient features. Here are the other best alternatives for you to take a screenshot on Chromebook.
Top 1: AnyRec Screen Recorder
AnyRec Screen Recorder is a multi-function recorder that can record anything playing on your Chromebook and capture the screen on it. When taking a screenshot on Chromebook, you can enjoy more snipping modes than in the default snipping tool on Chromebook. For example, you can take a scrolling screenshot easily and quickly.

Capture your Chromebook screen with a few clicks.
Customize hotkeys for a more convenient snipping style.
Edit the screenshot on Chromebook with multiple tools.
Switch between several snipping modes for different screenshots.
100% Secure
100% Secure
How to Take a Screenshot on Chromebook with Screen Recorder
Step 1.Free download and install this snipping tool on Chromebook. Launch it and click the "Snapshot" button on the main interface. You can also select a desirable snipping mode: "Screen Capture, Scrolling Window, and Popup Menu Capture".

Step 2.A window will pop, use your mouse as the cursor to draw up and circle the part you want to capture on the screen. Then, left-click the mouse to confirm your capture area. If you choose the "Scrolling Window" mode, remember to scroll your mouse to capture more.
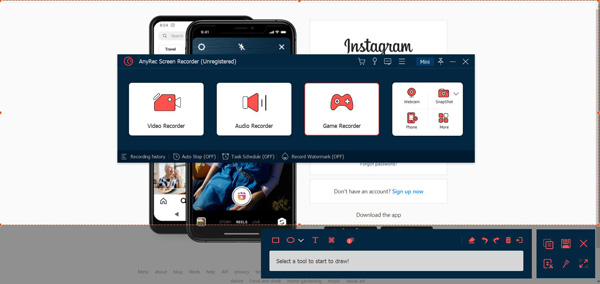
Step 3.After that, many editing tools will appear under your screenshot, you can draw a mark on the screenshot, blur the text on the screenshot, etc. Once you’ve done it, you can click the "Save" button to store it on your "Chromebook" or click the "Copy" button and paste.

Top 2: LightShot
LightShot is a free snipping tool for Chromebook that you can obtain as a web extension on Google Chrome or download as software to take screenshots on Chromebook. You can capture your screen, edit the screenshot, copy, and paste it, and upload it to the server.
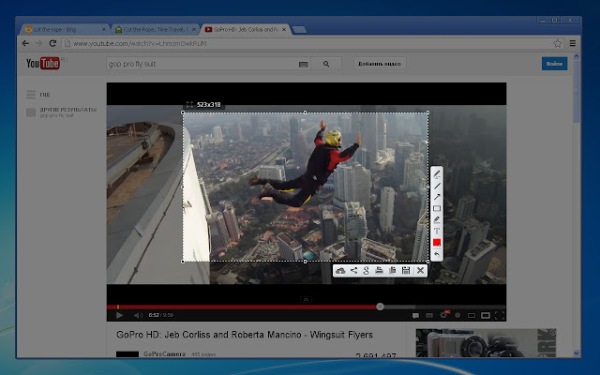
◆ Share with friends after capturing the screen.
◆ Customize the way you take the screenshots.
◆ Find similar screenshots for you on Chromebook.
Top 3: ShareX
ShareX is a lightweight and convenient snipping tool on Chromebook. You can download it as a program to run on your Chromebook or add the extension from Google Chrome. Compared to other snipping tools for Chromebook, this one has more capturing styles and you can even get an animated screenshot in GIF format. You can even record a video on Chromebook.
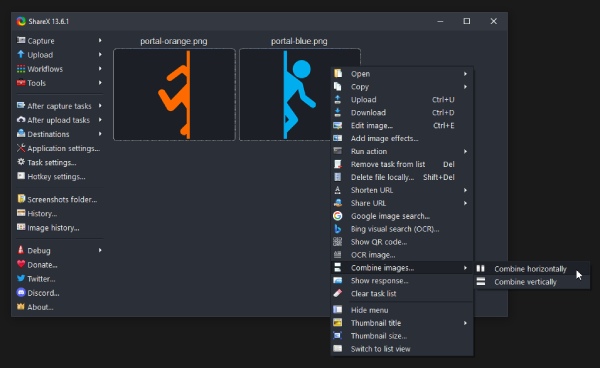
◆ Add image effects for your screenshots.
◆ View the image history on the Chromebook.
◆ Capture and scan the QR code on the screen.
◆ Maintain all your screenshots in a well-organized way.
Top 4: FireShot
FireShot is a web snipping tool on Chromebook. It only has the extension version, and you can get it from the Google Chrome web store. Although you can only capture the screen in the Chrome browser, you can capture the whole web page in your browser and save it as a PDF with links.
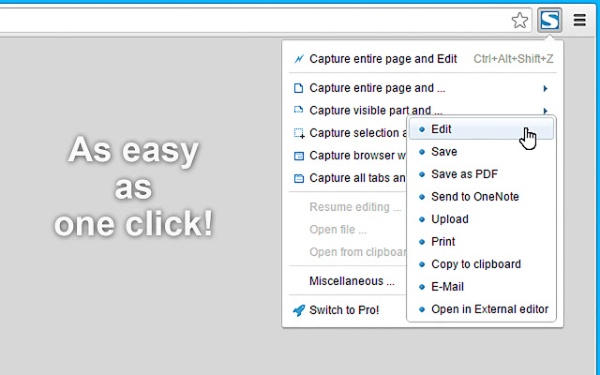
◆ Capture the web screen in different image formats.
◆ Edit screenshots and send them to OneNote afterward.
◆ Upload screenshots to social media and online servers.
Top 5: Awesome Screenshots
Awesome Screenshots is not just a snipping tool on Chromebook. Although it is only an extension, you can use it as your screen recorder. Except for capturing the important message on the screen, you can also record the online meeting with your face in it.
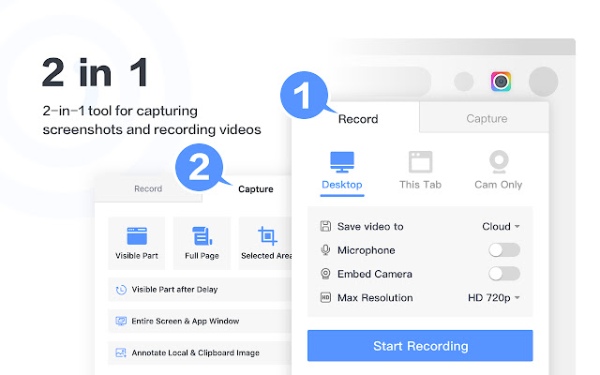
◆ Support multiple sharing platforms for your screenshots.
◆ Offer instant customer support anytime you need it.
◆ Annotate your screenshot with images from the clipboard.
FAQs about Snipping Tool on Chromebook
-
How to take a Chromebook screenshot without the snipping tool?
You can use a more advanced method to capture the screen if your Chromebook is two-in-one with a 360-degree hinge. Turn on the tablet mode and press the power and volume down buttons simultaneously. You will get a screenshot of the entire screen.
-
How to take scrolling screenshots with the snipping tool on Chromebook?
The default snipping tool on Chromebook does not have such a feature to take screenshots while you scroll on the screen. If you want a scrolling snapshot, you can use a third-party application or web extensions to help.
-
How to fix the Chromebook snipping tool not working?
Under such circumstances, you can check if your Chromebook is updated to the latest version of Chrome. Meanwhile, if you do not reboot the Chromebook properly, the update will fail. If there is no new version, try to restart your Chromebook, normally, this fixes lots of issues.
Conclusion
Through this post, you have known how to use the default snipping tool on Chromebook to take a screenshot. Moreover, if the default settings cannot meet your demands, you can also try the best alternative snipping tools for Chromebook.
