[Giải pháp] Cách dễ dàng ghi lại phiên họp và phiên làm việc từ xa của TeamViewer
TeamViewer là phần mềm truy cập từ xa toàn cầu với chức năng ghi màn hình tích hợp. Bạn có thể ghi lại các điều khiển từ xa và phiên họp trực tuyến trên TeamViewer Classic, bao gồm video, âm thanh, giọng nói qua IP, hình ảnh webcam, v.v. Tóm lại, bạn có thể ghi lại các phiên TeamViewer và các cuộc họp trên máy tính Windows và Mac. Khi bạn điều khiển ảo trên máy tính của ai đó từ xa, bạn có thể ghi lại và lưu tất cả các hoạt động trên màn hình theo thời gian thực. Bạn cần biết cách thực hiện như thế nào? Hãy tiếp tục đọc.
Danh sách Hướng dẫn
Ghi lại phiên làm việc từ xa đang diễn ra trên TeamViewer Ghi lại TeamViewer đi/đến bằng màn hình máy tính của bạn Bật và thực thi ghi âm tự động TeamViewer FAQsCách ghi lại phiên họp hoặc cuộc họp từ xa đi/đến trên TeamViewer
Khi bạn bắt đầu kết nối với thiết bị từ xa, bạn có thể ghi lại cùng lúc. Tất cả các hoạt động video và âm thanh trên màn hình đều có thể được ghi lại. Vì vậy, bạn có thể tận dụng tối đa các phiên đã ghi để theo dõi và đào tạo.
Bước 1.Khởi động chương trình TeamViewer của bạn. Bắt đầu một phiên và đăng nhập vào một máy tính từ xa.
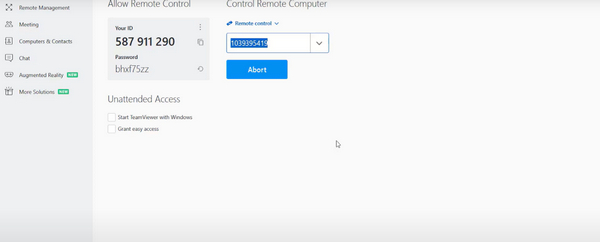
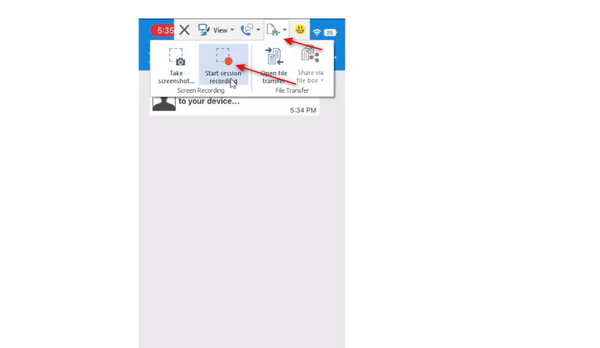
Bước 2.Khi phiên mở, hãy tìm menu "Files&Extra" trong thanh công cụ điều khiển từ xa. Sau đó, nhấp vào nút "Start session recording" để bắt đầu ghi.
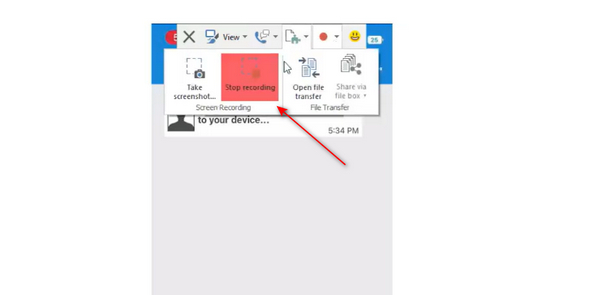
Bước 3.Nhấp vào nút "Dừng" sau khi ghi âm hoàn tất. Bạn sẽ nhận được một lời nhắc bật lên. Lưu tệp video vào vị trí đã chọn. Hãy nhớ rằng tệp được lưu ở định dạng .tvs.
Bước 4.Vào menu ba dòng ở góc trên bên trái của TeamViewer Classic. Tìm "Extra" và nhấp vào "Play or convert recorded session...". Chọn tệp TeamViewer TVS đã ghi của bạn. Nhấp vào nút "Convert". Chỉ định cài đặt video và âm thanh. Cuối cùng, bạn có thể nhấp vào nút "Convert" để hoàn tất chuyển đổi video TeamViewer TVS sang AVI.
Lời khuyên
Nếu bạn muốn tạo video cuộc họp TeamViewer của mình ở kích thước tệp nhỏ hơn, bạn có thể nhấp vào đây để chuyển đổi AVI sang MP4 và các định dạng không mất dữ liệu khác.
Phần thưởng: Cách tạo phiên từ xa với TeamViewer
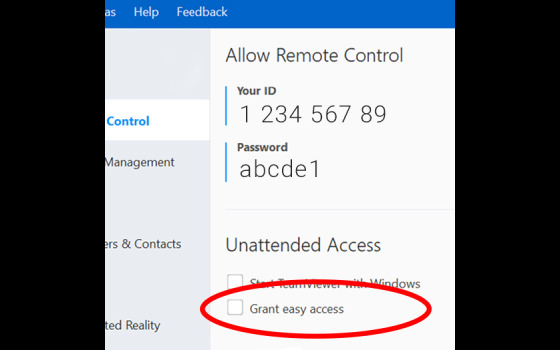
Bước 1.Để bắt đầu phiên từ xa, trước tiên bạn cần lấy "ID đối tác" của máy từ xa. Nếu máy từ xa chưa cài đặt phiên bản TeamViewer đầy đủ thì trước tiên nó cần sử dụng tính năng "Tải xuống QuickSupport" do TeamViewer cung cấp.
Bước 2.Trên màn hình chính, nhập “Partner ID” vào ô. Kích hoạt tùy chọn "Điều khiển từ xa" và nhấp vào nút "Kết nối". Nhập "Mật khẩu" và xác nhận.
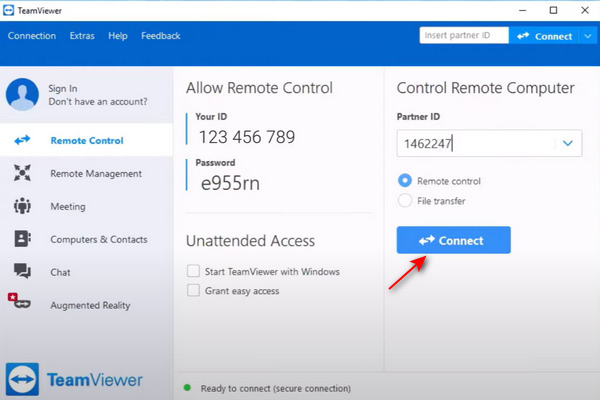
Bước 3.Khi bạn đã kết nối, bạn sẽ có toàn quyền truy cập vào máy từ xa.
Lời khuyên
Có thể có một chút cơ hội là bạn cần phê duyệt quyền truy cập UAC trước khi TeamViewer cấp cho bạn quyền truy cập quản trị vào máy tính từ xa. Điều này có thể dễ dàng vượt qua bằng cách yêu cầu người kia chấp nhận lời mời.
Ghi lại TeamViewer bằng Màn hình máy tính của bạn - Beyond TeamViewer Screen Recorder
Mặc dù phần mềm ghi màn hình tích hợp TeamViewer rất tiện lợi, nhưng nó cũng có nhiều nhược điểm như hạn chế về chất lượng và định dạng video, không có cách nào để chỉnh sửa video sau đó, không thể ghi lại màn hình máy tính cùng với máy tính điều khiển từ xa, v.v. Do đó, giải pháp tốt hơn có thể là sử dụng phần mềm ghi màn hình chuyên nghiệp. AnyRec Screen Recorder là lựa chọn thay thế tốt nhất của bạn. Nó có các tính năng quan trọng sau đây có thể giúp bạn:

Ghi hình bên ngoài TeamViewer với kích thước màn hình tùy chỉnh.
Xuất bản video/âm thanh sang các định dạng AVI, MP4, MP3 và nhiều định dạng phổ biến khác.
Thêm con trỏ chuột, phím tắt, chú thích trong quá trình ghi TeamViewer.
Thiết lập phím tắt tùy chỉnh để bắt đầu/dừng ghi màn hình ngay lập tức.
Cắt, ghép, nén và chỉnh sửa các tệp ghi âm trong chương trình
An toàn tải
An toàn tải
Bước 1.Tải và cài đặt phần mềm ghi màn hình tốt nhất cho TeamViewer. Mở chương trình lên. Trên màn hình chính, nhấp vào nút "Video Recorder" ở bên trái màn hình để tiếp tục.

Bước 2.Ở bước thứ hai, bạn cần chọn vùng màn hình để ghi. Nhấp vào nút "Đầy đủ" để quay video toàn màn hình. Nếu bạn muốn có phiên TeamViewer có cửa sổ, hãy nhấp vào nút "Tùy chỉnh" cho cửa sổ phiên cụ thể.

Bước 3.Phụ thuộc vào nhu cầu của bạn. Nếu bạn muốn ghi lại lời bình luận bằng giọng nói của mình vào video, hãy nhấp vào nút "Micrô". Nếu bạn muốn ghi lại âm thanh từ xa trong phiên, hãy bật "Âm thanh hệ thống" bằng cách nhấp vào nó.

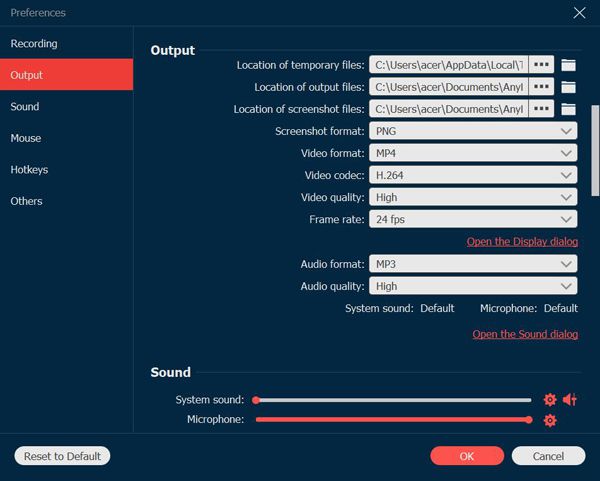
Bước 4.Nếu bạn muốn lưu tệp đầu ra sang định dạng mong muốn, hãy nhấp vào nút "Cài đặt". Di chuyển đến tab "Đầu ra" bằng cách nhấp vào nó. Thực hiện các điều chỉnh cần thiết và nhấp vào nút "Lưu".
Bước 5.Nhấp vào nút "REC" để bắt đầu ghi.

Bước 6.Sau khi ghi xong, nhấp vào nút "Dừng". Trên màn hình xem trước, bạn có thể chỉnh sửa, cắt, cắt, cắt video của mình và thêm các hiệu ứng đặc biệt tương ứng. Nhấp vào nút "Xong" để hoàn tất ghi phiên TeamViewer.
Cách bật và thực thi ghi âm tự động của TeamViewer
Trên thực tế, TeamViewer cung cấp tùy chọn cho người dùng để tự động ghi lại tất cả các kết nối và điều khiển từ xa. Không cần phải kích hoạt chức năng ghi TeamViewer nhiều lần. Thực hiện theo các bước dưới đây.
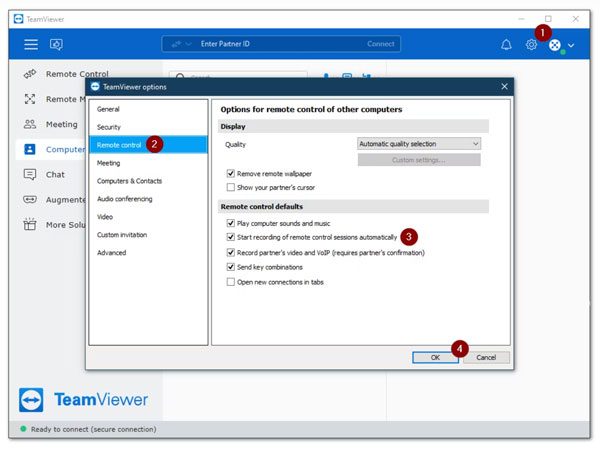
Bước 1.Trong tài khoản TeamViewer Classic của bạn, hãy tìm và nhấp vào nút "Cài đặt" ở góc trên bên phải.
Bước 2.Đi đến phần "Điều khiển từ xa". Đánh dấu vào ô trước "Bắt đầu ghi phiên điều khiển từ xa tự động".
Bước 3.Nhấp vào nút "OK" để lưu thay đổi.
Bước 4.Bạn có thể tìm thấy tệp ghi tự động của TeamViewer với tên tệp mặc định là "Tên thiết bị (ID thiết bị)_[YYYY-MM-DD] [HH.MM]". Nếu bạn muốn thay đổi thư mục ghi phiên TeamViewer, hãy vào "Tùy chọn" để quản lý.
Câu hỏi thường gặp về Ghi phiên TeamViewer
-
1. TeamViewer có tính năng keylogger không?
Không. TeamViewer có khả năng gửi các tổ hợp phím nhất định như Ctrl + Alt + Del, tuy nhiên, nó không ghi lại các lần gõ phím của bạn. Nếu bạn muốn ghi lại các lần gõ phím trên máy tính từ xa trong phiên TeamViewer, hãy sử dụng ứng dụng của bên thứ ba.
-
2. Tôi không thể tìm thấy video TeamViewer đã quay. Nó được định vị ở đâu?
Các phiên họp và cuộc họp của TeamViewer được lưu trong các thư mục khác nhau. Nếu bạn không thể ghi lại TeamViewer của mình, hãy đảm bảo rằng bạn đang kiểm tra trong đúng thư mục. Nếu bạn vẫn gặp sự cố, hãy sử dụng trình ghi màn hình thay thế để tránh mọi rắc rối.
-
3. TeamViewer có tốt hơn AnyDesk không?
Cả hai bên đều có lợi thế và bất lợi của họ. AnyDesk cho phép kết nối nhanh hơn và cho hiệu suất tốt hơn so với TeamViewer ngay cả ở băng thông thấp. Tuy nhiên, TeamViewer có nhiều tính năng hơn và hỗ trợ tốt hơn.
Phần kết luận
Như chúng ta đã thảo luận trong bài viết, có nhiều cách để ghi lại phiên hoặc cuộc họp TeamViewer trên máy tính của bạn. Sử dụng trình ghi tích hợp sẵn hoặc phần mềm ghi màn hình chuyên nghiệp của bên thứ ba. Nếu bạn muốn ghi lại không chỉ máy tính điều khiển từ xa TeamViewer mà còn cả khuôn mặt/màn hình của mình, AnyRec Screen Recorder là lựa chọn tốt hơn. Hơn nữa, bạn có thể sử dụng nó để ghi lại các cuộc họp video trực tuyến không có nút ghi âm không hiển thị, tệp không lưu, âm thanh không được ghi lại và các câu hỏi tương tự TeamViewer không ghi âm. Tùy thuộc vào nhu cầu cụ thể của bạn, bạn sẽ được thông báo đủ tốt để chọn bộ công cụ ổn định nhất cho trường hợp sử dụng của mình.
An toàn tải
An toàn tải


