5 Cách Ghi Màn Hình Trên iPad Air/Pro/Mini [Nhanh chóng & Dễ dàng]
Với việc phát hành iOS 11, việc ghi lại các hoạt động trên màn hình trên iPad Air/Pro/Mini trở nên khả thi. Nhờ tính năng ghi màn hình được tích hợp sẵn của phiên bản. Ghi màn hình trên iPad rất dễ dàng nhưng mọi thứ sẽ khá khó hiểu nếu bạn là người dùng iPad mới của Apple. Do đó, bài đăng này có một hướng dẫn đơn giản nhưng hiệu quả sẽ chỉ cho bạn cách mặc định cách sàng lọc bản ghi iPad Air/Pro/Mini, ngay cả trên máy Mac. Ngoài ra, còn có ba lựa chọn thay thế khác! Làm quen với từng người trong số họ bây giờ.
Danh sách Hướng dẫn
Các bước chi tiết để quay màn hình trên iPad Air/Pro/Mini Ghi lại màn hình iPad bằng QuickTime trên máy Mac của bạn 3 công cụ tốt nhất để ghi lại iPad với màn hình mong muốn FAQsCác bước chi tiết để quay màn hình trên iPad Air/Pro/Mini
Như đã đề cập trước đó, iPad chạy iOS 11 được trang bị tính năng cho phép bạn ghi lại màn hình trên iPad. Tuy nhiên, trước khi sử dụng tính năng đó, trước tiên bạn phải thêm nó vào Trung tâm điều khiển của iPad để truy cập dễ dàng. Điều đó có nghĩa là tính năng ghi màn hình iPad của bạn không được thêm vào Trung tâm điều khiển theo mặc định. Bây giờ, để hướng dẫn bạn cách thêm trình ghi màn hình trên Trung tâm điều khiển và cách sàng lọc bản ghi trên iPadOS 18/17/16/15 trở về trước, đây là các bước dành cho bạn:
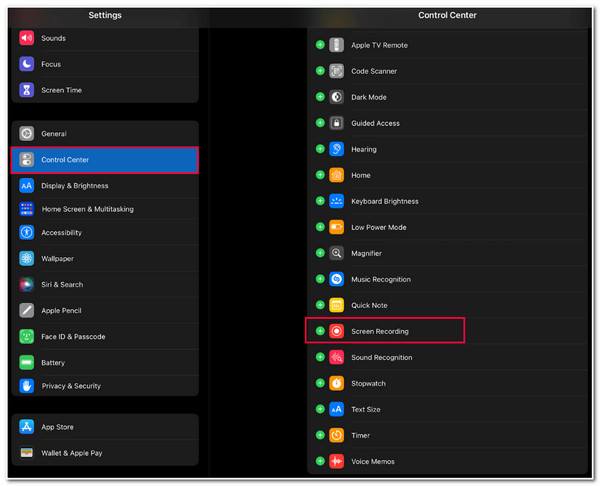
Bước 1.Để thêm bản ghi màn hình vào Trung tâm điều khiển, hãy chạy ứng dụng "Cài đặt" và nhấn nút "Trung tâm điều khiển". Sau đó, chạm vào nút "Thêm" của tùy chọn "Ghi màn hình".
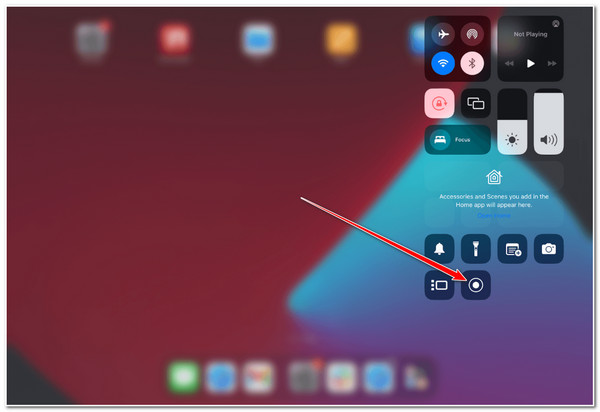
Bước 2.Tiếp theo, truy cập Trung tâm điều khiển bằng cách vuốt màn hình xuống ở góc trên bên phải. Sau đó, tìm nút "Trình ghi/ghi màn hình" để ghi trên iPad.
Bước 3.Sau đó, chạm và giữ nút "Ghi". Nếu bạn muốn ghi lại giọng nói của mình trong phiên ghi âm, hãy nhấn vào nút "Micrô". Khi nó chuyển sang màu đỏ, có nghĩa là nó đang hoạt động.
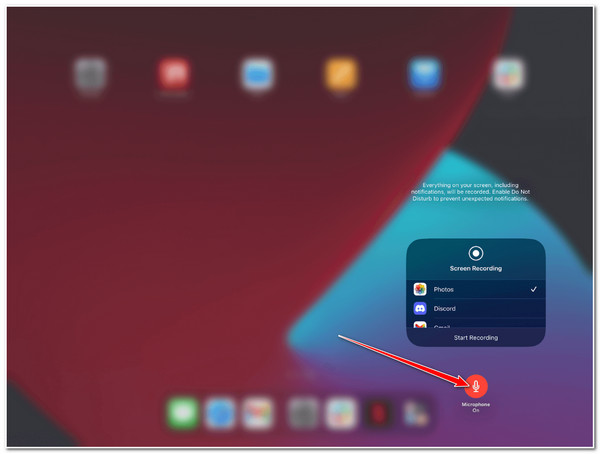
Bước 4.Khi bạn đã hoàn tất quá trình thiết lập ở trên, hãy nhấn vào nút "Bắt đầu ghi". Khi bạn hoàn tất, hãy nhấn vào nút "Đỏ" ở góc trên bên phải màn hình. Sau đó, nhấn "Dừng"
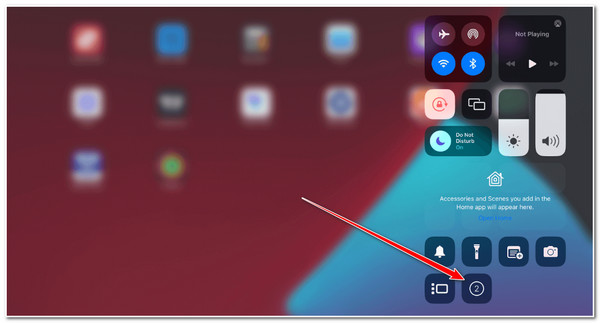
Chủ đề được ghi trên màn hình sẽ tự động được lưu trên ứng dụng Ảnh trong phần "Video". Và thế là xong! Đó là những bước đơn giản về cách ghi lại màn hình trên iPad có âm thanh. Hãy nhớ rằng, phương pháp này sẽ chỉ hoạt động nếu bạn sử dụng iPad chạy iOS 11 trở lên.
Ghi lại màn hình iPad bằng QuickTime trên máy Mac của bạn
Nếu iPad của bạn đang chạy phiên bản iOS cũ hơn khiến bạn không thể ghi trực tiếp màn hình trên iPad, bạn có thể sử dụng QuickTime trên Mac để thay thế. QuickTime cung cấp tùy chọn ghi lại mọi hoạt động trên màn hình trên iPad của bạn. Tuy nhiên, các bản ghi bạn đã thực hiện bằng QuickTime sẽ tự động được lưu vào MOV, tính năng này không được các thiết bị khác hỗ trợ rộng rãi. Hạn chế này có thể là một vấn đề nếu bạn muốn chia sẻ hoặc phát bản ghi iPad của mình trên các thiết bị khác nhau.
Bước 1.Liên kết iPad của bạn với máy Mac bằng cáp USB. Sau đó, chạm vào nút "Tin cậy" trên màn hình iPad và nhập mật mã nếu cần.
Bước 2.Sau đó, chạy hoặc truy cập "QuickTime" từ thư mục Ứng dụng hoặc Dock của máy Mac. Sau đó, nhấp vào nút "Tệp" trên "Menu" và chọn tùy chọn "Ghi phim mới".
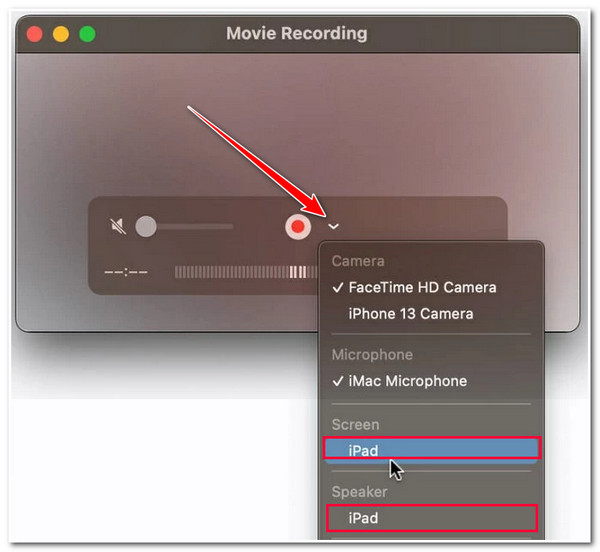
Bước 3.Tiếp theo, nhấp vào nút "thả xuống" ngay sau nút "Đỏ" và chọn tùy chọn "iPad" trong danh mục "Màn hình".
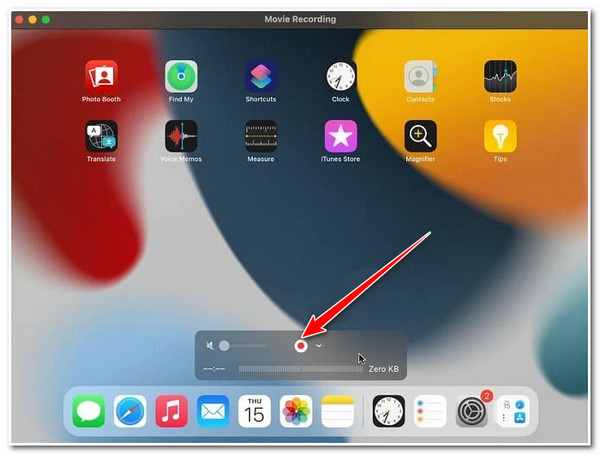
Bước 4.Khi màn hình iPad của bạn xuất hiện trên máy Mac, hãy nhấp vào nút "Ghi" để kích hoạt thao tác ghi màn hình iPad. Sau khi hoàn tất, hãy nhấp vào nút "Ghi" để dừng.
3 công cụ tốt nhất để ghi lại iPad với màn hình mong muốn
Nếu không có tùy chọn nào ở trên để ghi màn hình trên iPad Pro/Air/Mini hoạt động (bạn không có máy Mac hoặc iPad của bạn không chạy iOS 11 trở lên), bạn có thể cân nhắc sử dụng ba công cụ thay thế tốt nhất này ! Không giống như trình ghi màn hình mặc định và QuickTime, những công cụ dưới đây cung cấp nhiều tính năng khác nhau. Bạn có thể chọn phần màn hình iPad mà bạn muốn chụp, độ phân giải và nhiều quyền kiểm soát hơn đối với các tùy chọn ghi âm. Vì vậy, không cần chần chừ gì nữa, hãy khám phá thêm về họ ngay bây giờ!
1. AnyRec Screen Recorder
Tùy chọn đầu tiên có thể chỉ cho bạn các bước đơn giản nhưng hiệu quả để chụp ảnh màn hình trên iPad Air/Pro/Mini là AnyRec Screen Recorder. Phần mềm này hỗ trợ tính năng ghi âm điện thoại cho phép bạn ghi lại nhiều hoạt động khác nhau trên màn hình trên iPad thông qua phản chiếu màn hình. Giờ đây, so với trình ghi màn hình mặc định của iPad và QuickTime của Mac, công cụ này cho phép bạn nâng cao chất lượng bản ghi của mình. Bạn có thể đặt độ phân giải thành 1080p, 2K và 4K. Hơn nữa, nó cũng cho phép bạn chọn nguồn âm thanh (âm thanh iPad hoặc PC) và điều chỉnh âm lượng của chúng. Chỉ với những tính năng này, bạn có thể nói rằng công cụ này là một trong những lựa chọn thay thế tốt nhất để ghi lại màn hình trên iPad!
Hỗ trợ ghi lại màn hình iPad bất kể model và phiên bản iOS.
Ghi lại màn hình trên iPad không có giới hạn thời gian hoặc hình mờ tối đa.
Ghi lại các hoạt động trên màn hình iPad của bạn với độ phân giải 4K, 60 khung hình / giây và không bị lag.
Cho phép bạn chụp ảnh màn hình trong khi ghi lại màn hình iPad của bạn.
100% Bảo mật
100% Bảo mật
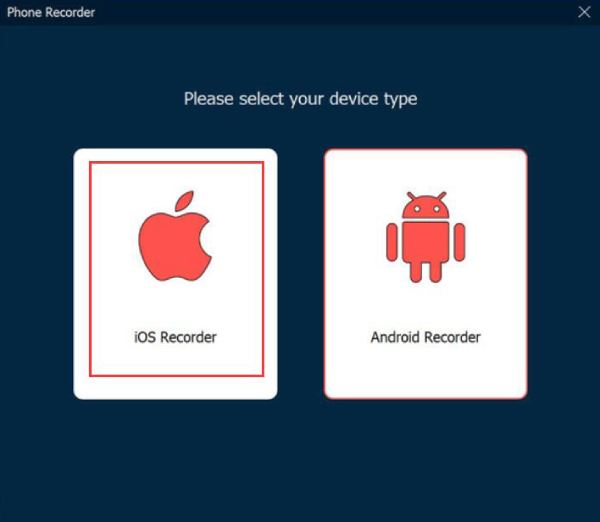
Bước 1. Cài đặt AnyRec Screen Recorder trên máy tính Windows hoặc Mac của bạn. Sau đó, chạy công cụ, nhấp vào nút "Trình ghi điện thoại" và chọn tùy chọn "Trình ghi iOS".
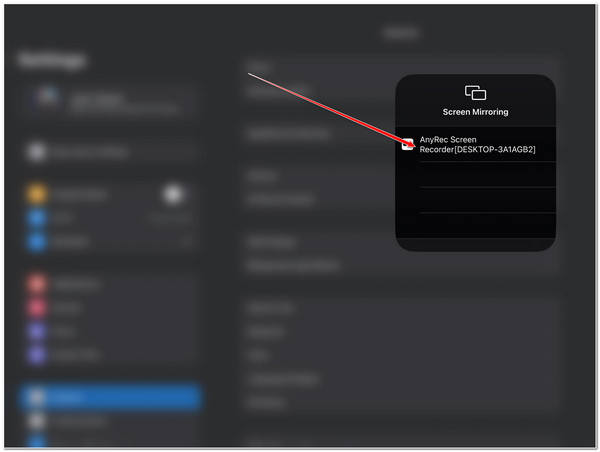
Bước 2.Tiếp theo, hãy tới iPad của bạn, truy cập "Trung tâm điều khiển" và nhấn nút "Phản chiếu màn hình". Sau đó, chọn tùy chọn "Trình ghi màn hình AnyRec (tên máy tính của bạn)".
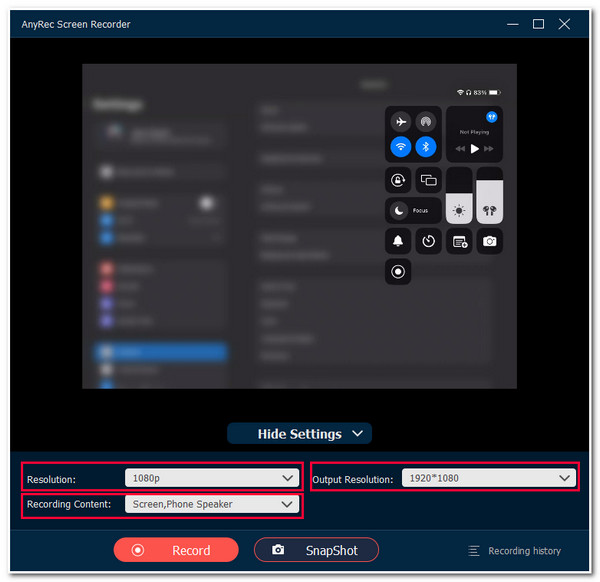
Bước 3.Sau đó, đặt Độ phân giải thành tùy chọn "4K" và Xuất ra tùy chọn "500*1080" để ghi trên iPad với chất lượng cao. Sau đó, chọn nguồn âm thanh từ "Nội dung ghi".
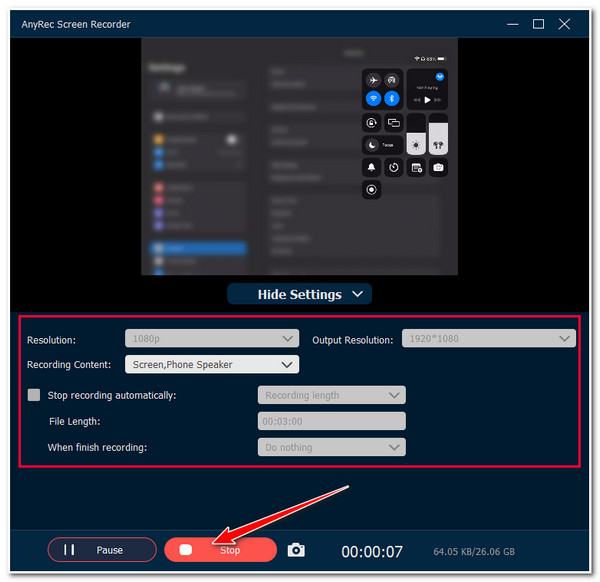
Bước 4.Khi bạn hoàn tất các thiết lập ở trên, hãy nhấp vào nút "Ghi" để bắt đầu ghi màn hình trên iPad. Cuối cùng, nhấp vào nút "Dừng" và lưu bản ghi bằng nút "Xong/Lưu".
100% Bảo mật
100% Bảo mật
2. Hãy ghi lại nó!
Nếu bạn đang xem xét một ứng dụng ghi lại màn hình trên iPad, một trong những ứng dụng tốt nhất bạn có thể thử là Record It! Ứng dụng này cho phép bạn ghi lại các bản ghi màn hình bằng micrô của mình để bình luận bằng âm thanh và ghi lại khuôn mặt. Nó cũng được trang bị các tính năng chỉnh sửa cơ bản như thêm các hiệu ứng và bộ lọc đặc biệt cũng như sửa đổi tốc độ phát lại của bản ghi. Tuy nhiên, phiên bản miễn phí của ứng dụng này có giới hạn ghi 3 phút. Bây giờ, nếu bạn cho rằng bản ghi của mình sẽ không quá 3 phút, đây là các bước về cách ghi màn hình trên iPad Pro/Air/Mini bằng cách sử dụng Record it! ứng dụng:
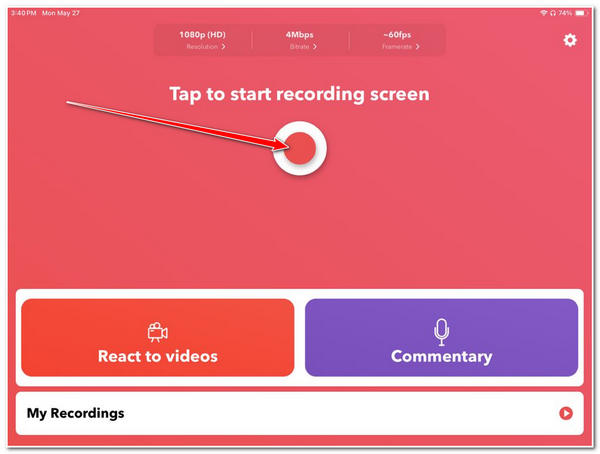
Bước 1.Cài đặt "Ghi lại!" ứng dụng trên iPad của bạn. Sau đó, chạy ứng dụng và nhấp vào nút "Ghi" bên dưới dòng chữ "Nhấn để bắt đầu ghi màn hình".
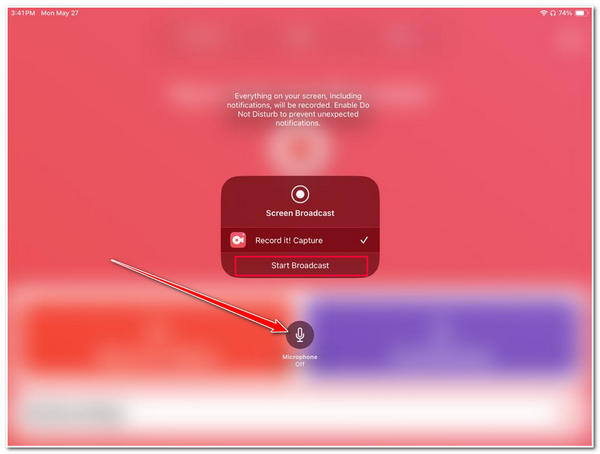
Bước 2.Ở cạnh ghi âm thư thoại bằng giọng nói của bạn, hãy nhấn vào nút "Micrô" để bật. Sau đó, nhấp vào nút "Bắt đầu phát sóng" để bắt đầu ghi iPad.
Lời khuyên
Khi quá trình đếm ngược 3 giây bắt đầu, bạn có thể điều hướng ngay đến hoạt động trên màn hình mà bạn muốn ghi lại.
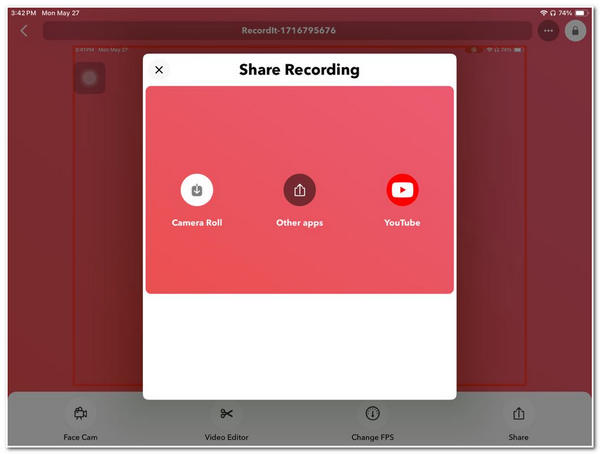
Bước 3.Sau khi ghi xong, hãy khởi chạy lại ứng dụng và nhấn vào nút "Dừng ghi". Sau đó, bạn có thể chỉnh sửa bản ghi trong phần xem trước và lưu nó vào "Camera Roll" của mình.
3. Đi ghi âm
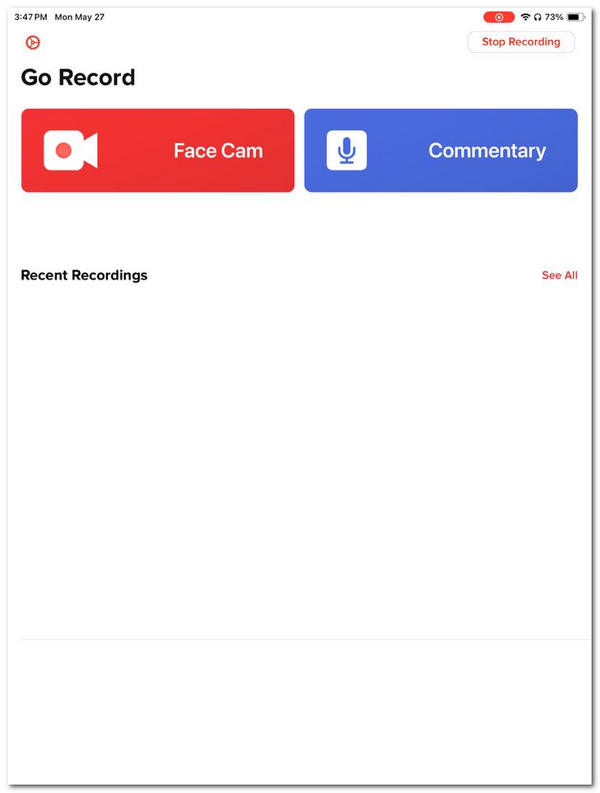
Một ứng dụng khác bạn có thể sử dụng để ghi lại màn hình trên iPad là Go Record. Ứng dụng này cũng cho phép bạn ghi lại webcam, âm thanh và thậm chí ghi lại trò chơi trên iPad. Nó cũng cung cấp các tính năng chỉnh sửa cho phép bạn tinh chỉnh các bản ghi trên màn hình. Nhược điểm của ứng dụng này là phiên bản miễn phí có rất nhiều quảng cáo! Chà, việc sàng lọc bản ghi trên iPad sẽ không thành vấn đề nếu bạn có nhiều kiên nhẫn.
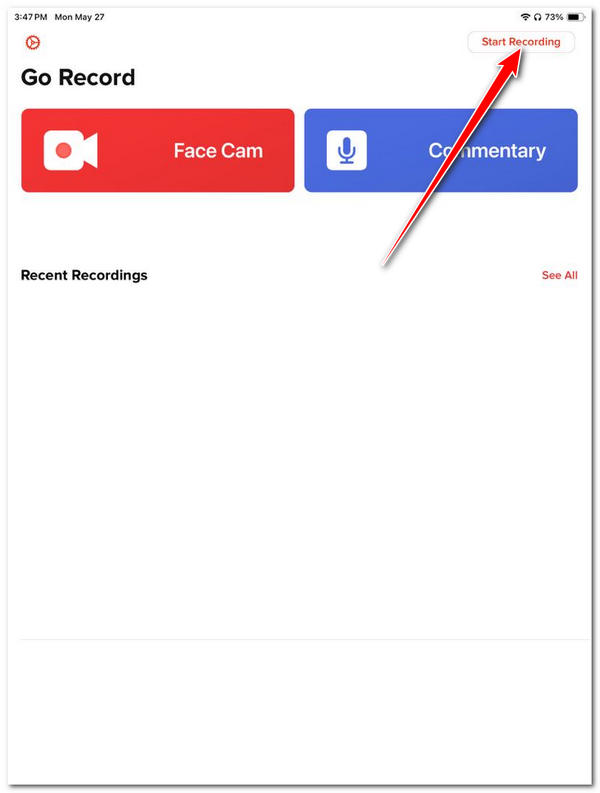
Bước 1.Cài đặt ứng dụng Go Record trên iPad của bạn. Sau đó, chạy ứng dụng và nhấn vào nút "Bắt đầu ghi" ở góc trên bên phải của ứng dụng.
Bước 2.Tiếp theo, nếu bạn muốn ghi lại giọng nói của mình trong quá trình ghi âm, hãy nhấn vào "Micrô" để bật. Sau đó, nhấn "Bắt đầu phát sóng" để bắt đầu quá trình ghi màn hình iPad.
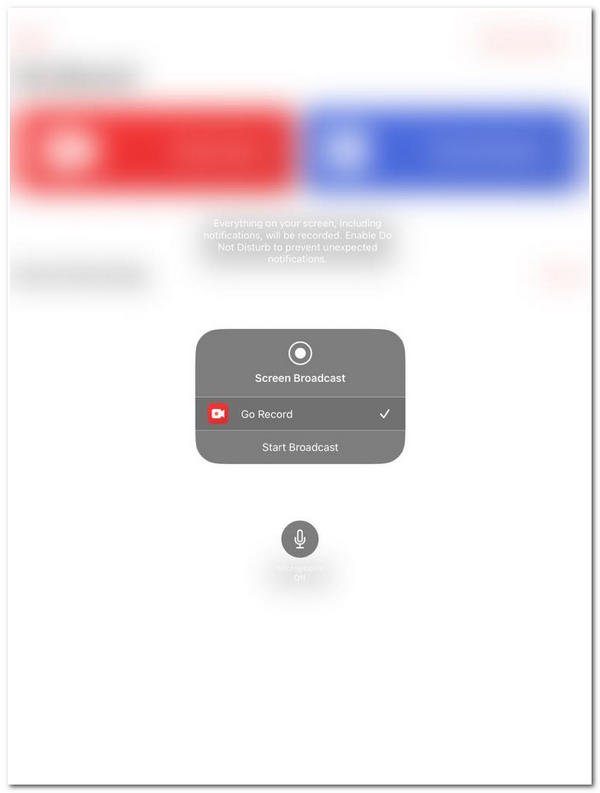
Bước 3.Sau đó, điều hướng đến chủ đề trên màn hình mà bạn muốn ghi trong khi đồng hồ đếm ngược 3 giây đang chạy. Sau khi hoàn tất, hãy nhấp vào nút "Dừng ghi".
FAQs
-
1. Làm cách nào để ghi lại màn hình trên iPad chạy phiên bản cũ hơn iOS 11?
Bạn có thể cài đặt ứng dụng ghi màn hình của bên thứ ba để ghi màn hình trên iPad với phiên bản cũ hơn 11. Bạn có thể tìm kiếm trên App Store và tìm kiếm ứng dụng tương thích với phiên bản iPad của bạn và cung cấp tính năng ghi màn hình.
-
2. Làm cách nào để bật mic quay màn hình iPad bằng QuickTime trên Mac?
Nếu bạn muốn ghi lại giọng nói của mình khi ghi âm bằng QuickTime, hãy làm theo các bước trong phần 2 của bài đăng này. Sau đó, ở bước số 3, đi tới danh mục/phần Loa và chọn iPad. Sau đó, giọng nói của bạn từ micrô của iPad sẽ được đưa vào bản ghi.
-
3. Làm cách nào để bật tính năng ghi màn hình trên iPad chạy iOS 17.5?
Bật tính năng ghi màn hình trên iPad chạy iOS 17.5 cũng giống như đối với iPad chạy iOS 11. Hãy làm theo các bước trong bài đăng này, cụ thể là ở phần 1, để thêm trình ghi màn hình vào Trung tâm điều khiển của bạn và truy cập nó để ghi một chủ đề trên màn hình
-
4. Trình ghi màn hình mặc định của iPad có cho phép tôi chọn độ phân giải cụ thể không?
Không. Trình ghi màn hình của iPad không cho phép bạn chọn độ phân giải cụ thể cho bản ghi của mình. Nó chụp màn hình của bạn ở độ phân giải gốc của iPad.
-
5. Kích thước tệp đầu ra của trình ghi màn hình iPad có lớn không?
Đúng. Kích thước tệp đầu ra của trình ghi màn hình mặc định của iPad có thể lớn, tùy thuộc vào độ dài và độ phân giải của bản ghi màn hình. Ghi lại các hoạt động trên màn hình với thời lượng ngắn sẽ tốt hơn để tránh không đủ dung lượng lưu trữ.
Phần kết luận
Sau khi khám phá năm cách sàng lọc bản ghi trên iPad Air/Pro/Mini của bài đăng này, giờ đây bạn đã được trang bị đầy đủ để ghi lại mọi hoạt động trên màn hình trên iPad của mình! Như bạn có thể thấy, thật dễ dàng để chụp các đối tượng trên màn hình bằng tính năng ghi màn hình mặc định của iPad. Nếu trình ghi màn hình mặc định cung cấp các điều khiển quá hạn chế hoặc phiên bản iPad của bạn không hỗ trợ tính năng này, bạn có thể sử dụng AnyRec Screen Recorder như một sự thay thế. Với tính năng ghi âm điện thoại dễ sử dụng và các bản ghi chất lượng cao của công cụ này, bạn có thể có được trải nghiệm tốt nhất khi ghi màn hình iPad! Tải về nó ngay bây giờ!
100% Bảo mật
100% Bảo mật
