Nóng

AnyRec Screen Recorder
Ghi lại video và âm thanh trên iPhone với chất lượng cực kỳ rõ nét.
An toàn tải
Cách quay màn hình trên iPhone 16 và tất cả các mẫu máy
Nếu bạn là thành viên mới của người dùng sản phẩm Apple và muốn biết cách sàng lọc bản ghi trên iPhone, hãy làm theo các bước tại đây. Bất kể bạn muốn ghi lại các cuộc họp trực tuyến, cuộc gọi video hoặc các hoạt động trên màn hình khác trên iPhone, bạn đều có thể sử dụng trình ghi mặc định. Cũng giống như điện thoại Android, iPhone cung cấp chức năng ghi âm tích hợp cho iPhone chạy iOS 11 trở lên. Ngoài ra, bài viết này còn hướng dẫn thêm 6 cách quay phim màn hình trên tất cả các dòng máy iPhone và phiên bản iOS. Hãy làm theo các bước ngay bây giờ!
Danh sách Hướng dẫn
Cách mặc định để ghi màn hình trên iPhone [iOS 11 trở lên] Sử dụng QuickTime để ghi màn hình iPhone trên máy Mac 5 công cụ khác để ghi màn hình trên tất cả các mẫu iPhone Mẹo hữu ích để quay màn hình iPhone 16 FAQsCách mặc định để ghi màn hình trên iPhone [iOS 11 trở lên]
Để bắt đầu tìm hiểu cách lấy bản ghi màn hình trên iPhone chạy iOS 11 trở lên, bạn có thể bắt đầu bằng cách tìm hiểu cách sử dụng tính năng ghi màn hình mặc định của iPhone. Trình ghi màn hình mặc định rất dễ sử dụng; bạn có thể nhanh chóng ghi lại mọi hoạt động trên màn hình trên iPhone chỉ bằng vài thao tác. Tuy nhiên, việc sử dụng nó sẽ nhanh chóng lấp đầy bộ nhớ của bạn và bạn không thể đặt vùng mong muốn để chụp.
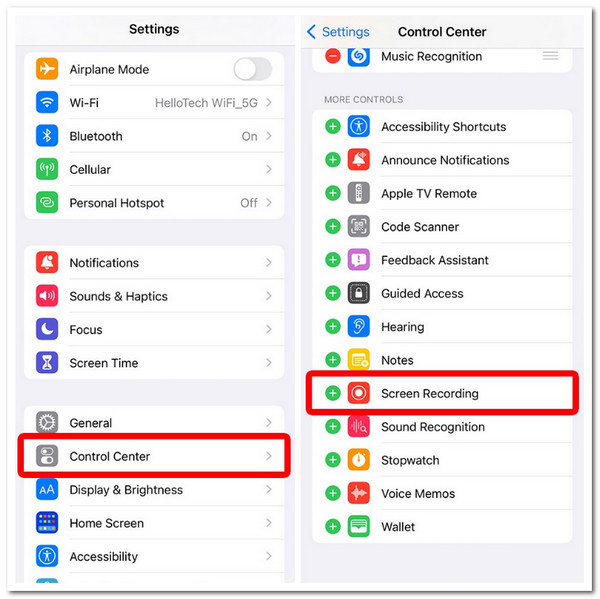
Bước 1.Chạy ứng dụng “Cài đặt” để thêm tính năng ghi màn hình vào trung tâm điều khiển của bạn. Sau đó, cuộn xuống, nhấn vào tùy chọn “Trung tâm điều khiển” và đi đến phần “KIỂM SOÁT THÊM”.
Bước 2.Sau đó, chọn tùy chọn “Ghi màn hình” và nhấn nút “Thêm” để thêm tùy chọn Ghi màn hình vào Trung tâm điều khiển của bạn.
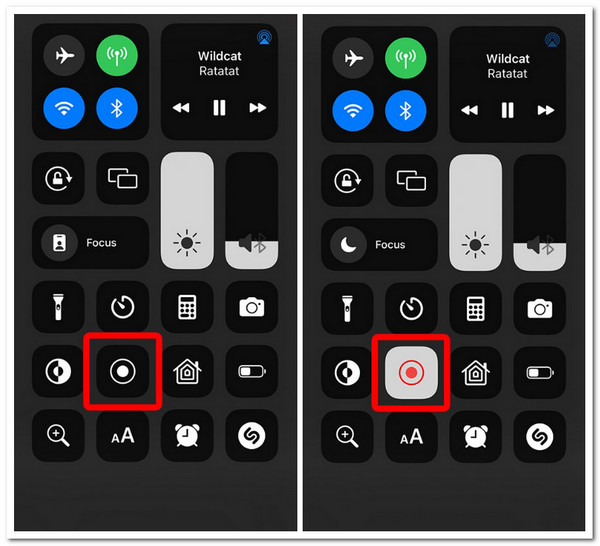
Bước 3.Tiếp theo, vuốt xuống “Trung tâm điều khiển” ở góc trên bên phải màn hình (iPhone dựa vào Face ID). Nếu không, hãy vuốt từ dưới lên nếu iPhone của bạn có nút Home.
Bước 4.Bật âm thanh micrô theo nhu cầu của bạn. Nhấn vào nút “Ghi màn hình” có hình tròn đặc bên trong để bắt đầu ghi màn hình trên iPhone.
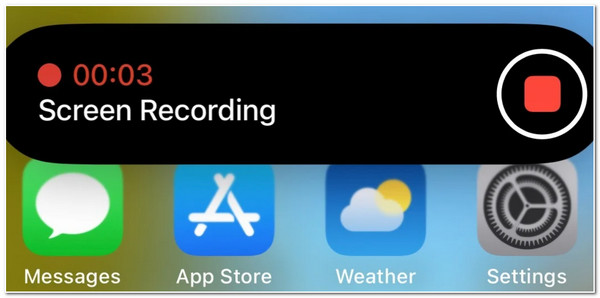
Bước 5.Sau khi quá trình ghi hoàn tất, hãy dừng quá trình đó bằng cách nhấn vào nút “Ghi màn hình” trên Trung tâm điều khiển. Bản ghi đã được lưu vào bộ nhớ cục bộ trên thiết bị của bạn.
Sử dụng QuickTime để ghi màn hình iPhone trên máy Mac
Một cách thay thế cho hướng dẫn đầu tiên về cách sàng lọc bản ghi trên iPhone là sử dụng QuickTime trên Mac. QuickTime có một tùy chọn cho phép bạn ghi lại mọi hoạt động trên màn hình trên iPhone của mình. QuickTime là một lựa chọn tuyệt vời nếu bạn vẫn sử dụng iPhone không có khả năng ghi màn hình, chẳng hạn như những iPhone cũ hơn iOS 11. Ngoài ra, ghi màn hình iPhone bằng QuickTime cung cấp đầu ra chất lượng cao và không có chỉ báo màu đỏ phủ trên màn hình của bạn.
Bước 1.Mở QuickTime trên máy Mac của bạn và cắm iPhone của bạn vào máy tính bằng cáp Lightning. Sau đó, nhấp vào tab “Tệp” ở trên và chọn tùy chọn “Ghi phim mới”.

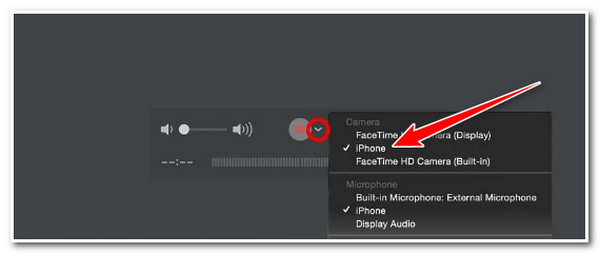
Bước 2.Tiếp theo, nhấp vào nút “thả xuống” bên cạnh vòng tròn màu đỏ trên hộp và đánh dấu “iPhone” của bạn làm màn hình/video và nguồn âm thanh. Sau đó, chạm vào nút “Ghi” để bắt đầu ghi iPhone.
Bước 3.Sau khi hoàn tất, nhấp vào nút tương tự để dừng ghi. Sau đó, lưu Ghi màn hình QuickTime trên máy Mac của bạn và bạn có thể chuyển sang iPhone.
Ghi chú: Không chuyển iPhone của bạn từ dọc sang ngang trong phiên ghi âm; nó sẽ tự động dừng ghi âm. Ngoài ra, hãy nhớ rằng QuickTime sẽ chỉ ghi lại âm thanh từ iPhone của bạn trừ khi bạn bật micrô.
5 công cụ khác để ghi màn hình trên tất cả các mẫu iPhone
Ngoài việc sử dụng QuickTime trên Mac, còn có nhiều công cụ của bên thứ ba mà bạn có thể sử dụng để ghi lại màn hình tất cả các kiểu máy iPhone. Trong phần cụ thể này, bạn sẽ thấy năm trong số chúng! Mỗi ứng dụng cho phép bạn ghi lại màn hình iPhone của mình một cách nhanh chóng và hiệu quả. Vì vậy, không cần phải chần chừ gì nữa, hãy khám phá từng bước và các bước của chúng!
1. Trình ghi màn hình AnyRec
Công cụ đầu tiên được đề xuất để ghi lại màn hình iPhone 16 là AnyRec Screen Recorder. Phần mềm này hỗ trợ tính năng ghi âm điện thoại để ghi lại nhiều hoạt động khác nhau trên màn hình từ các mẫu iPhone khác nhau. Nó ghi lại màn hình iPhone của bạn thông qua cáp USB hoặc kết nối Wi-Fi với máy tính của bạn và sau đó bạn có thể thực hiện quy trình ghi màn hình. Hơn nữa, chương trình này có thể ghi lại bất kỳ khu vực mong muốn nào với chất lượng cao 4K! Nếu bạn muốn khám phá thêm các tính năng của công cụ này và tìm hiểu cách sàng lọc bản ghi trên iPhone XR hoặc các phiên bản cũ hơn và mới hơn, hãy khám phá các phần tiếp theo bên dưới!

Ghi lại các hoạt động trên màn hình của iPhone mà không có hình mờ và giới hạn thời gian.
Quay màn hình iPhone với độ phân giải 4K, 60 FPS và không bị giật, lag.
Cho phép bạn ghi lại âm thanh và micrô của iPhone với bất kỳ âm lượng nào.
Đặt vùng chụp mong muốn, chụp ảnh màn hình, cắt bản ghi, v.v.
100% Bảo mật
100% Bảo mật
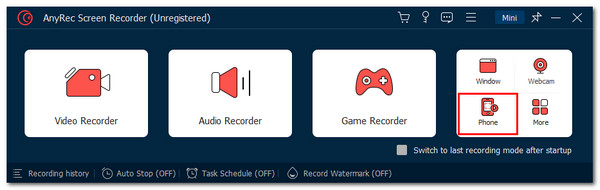
Bước 1.Cài đặt Trình ghi màn hình AnyRec trên máy tính của bạn. Sau đó, chạy công cụ, nhấp vào nút “Trình ghi điện thoại” và chọn tùy chọn “Trình ghi iOS”.
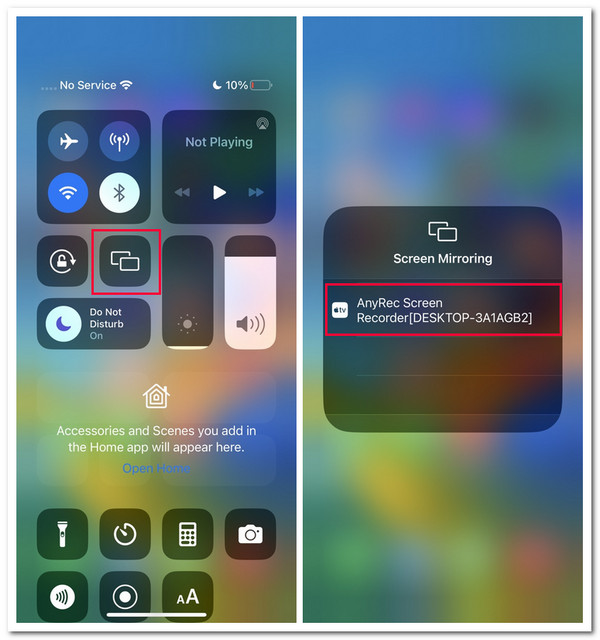
Bước 2.Tiếp theo, truy cập “Trung tâm điều khiển” của iPhone và nhấn vào tính năng “Phản chiếu màn hình”. Sau đó, chọn tùy chọn “Trình ghi màn hình AnyRec” và đợi cho đến khi kết nối thành công.
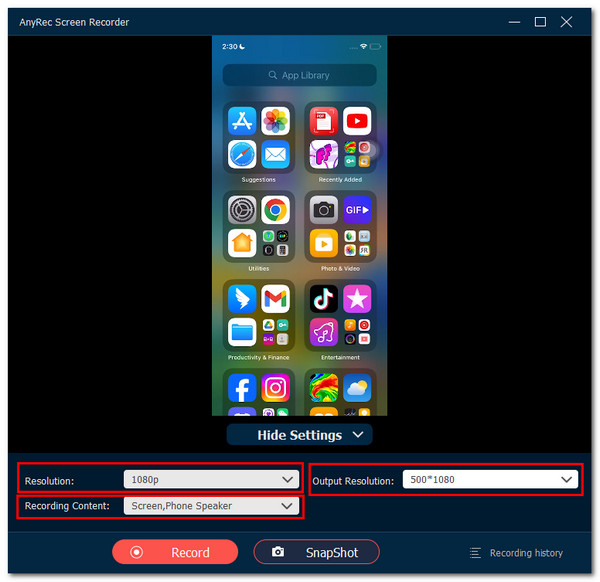
Bước 3.Sau đó, bạn có thể chọn “Độ phân giải” mong muốn và chọn có ghi lại âm thanh iPhone của mình trong phần “Nội dung ghi âm” hay không. Sau đó, nhấp vào nút “Ghi” để bắt đầu ghi màn hình iPhone.
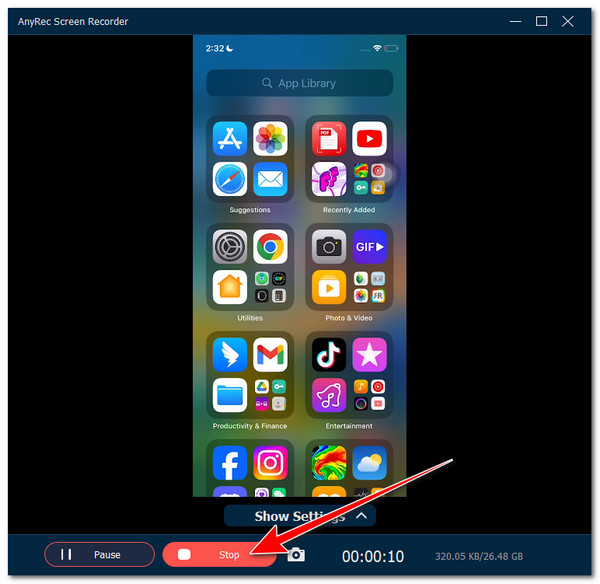
Bước 4.Khi bạn đã hoàn tất, hãy nhấp vào nút “Dừng”. Sau đó, bạn có thể cắt bớt một số phần của bản ghi và nhấp vào “Xong” để quay video MP4/MOV/MKV trên iPhone.
100% Bảo mật
100% Bảo mật
2. Hãy ghi lại!
Ngoài công cụ tương thích với máy tính để bàn đó, bạn cũng có thể sử dụng các ứng dụng để ghi lại màn hình iPhone. Một trong những đề xuất ứng dụng tốt nhất là Record It! Ứng dụng này cung cấp các tính năng liên quan đến ghi màn hình iOS đơn giản và dễ sử dụng. Nó có các tính năng như chế độ hình ảnh và các tính năng chỉnh sửa video cơ bản. Nếu bạn định sử dụng phiên bản miễn phí của ứng dụng này, bạn chỉ có thể ghi tối đa 3 phút. Hơn nữa, một số tính năng của nó bị khóa sau phiên bản trả phí. Dưới đây là các bước chỉ cho bạn cách đặt một ghi màn hình trên iPhone 12 chạy iOS 14.0 trở lên bằng ứng dụng này:
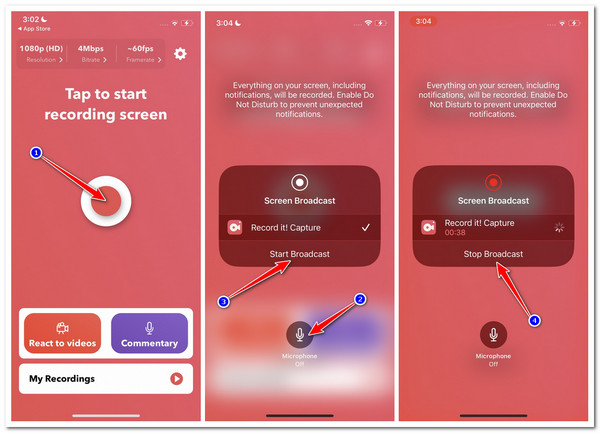
Bước 1.Chạy “Record it!” trên iPhone 16 và chọn Độ phân giải, Tốc độ bit và Tốc độ khung hình ưa thích của bạn. Sau đó, chạm vào nút “Vòng tròn màu đỏ”.
Bước 2.Tiếp theo, nhấn vào nút “Micrô” để ghi lại giọng nói của bạn trong khi ghi âm (nếu bạn muốn) và nhấn vào “Bắt đầu phát sóng” để bắt đầu ghi âm. Sau đó, truy cập chủ đề bạn muốn ghi lại.
Bước 3.Sau khi hoàn tất, hãy nhấn vào nút “Dừng phát sóng”. Và thế là xong! Đó là những bước đơn giản về cách sàng lọc bản ghi trên iPhone 14 Pro và các mẫu cũ hơn.
3. DU Recorder – Trình ghi màn hình
Một ứng dụng khác bạn có thể cài đặt và sử dụng để ghi trên iPhone là DU Recorder. Ứng dụng này cung cấp các tính năng dễ sử dụng và điều hướng, phù hợp cho người mới bắt đầu và người dùng iPhone mới. Hơn nữa, nó cũng hỗ trợ xác định lại các tính năng cho phép bạn thay đổi chất lượng đầu ra. Nó bao gồm một loạt các bộ lọc, hiệu ứng và các tùy chọn chỉnh sửa cơ bản. Đáng buồn thay, không giống như Record It, ứng dụng này không cung cấp chất lượng âm thanh xuất sắc. Mặc dù vậy, nó vẫn đủ để hỗ trợ nhu cầu ghi màn hình. Vậy làm cách nào để sàng lọc bản ghi trên iPhone 8 trở lên bằng DU Recorder? Dưới đây là các bước bạn nên làm theo:
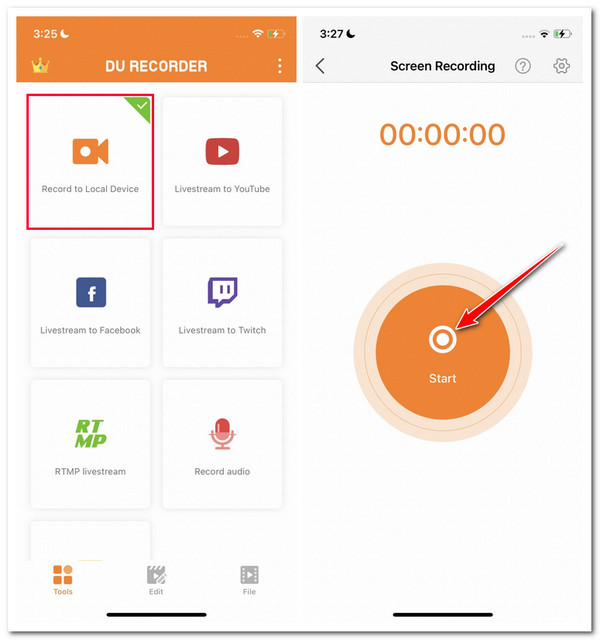
Bước 1.Cài đặt DU Recorder trên iPhone của bạn. Sau đó, khởi chạy ứng dụng, chọn tùy chọn “Ghi vào thiết bị cục bộ” và nhấn vào nút “Bắt đầu”. Tiếp theo, hãy đến chủ đề bạn muốn ghi lại.
Bước 2.Sau khi hoàn tất, hãy truy cập Trung tâm điều khiển và nhấn vào “Thanh ghi màu đỏ” để dừng ghi. Đó là cách sàng lọc bản ghi trên iPhone 13/12/14/15 bằng DU Recorder.
4. Trình ghi màn hình - V Recorder
Ngoài những ứng dụng nổi bật đầu tiên đó, một video khác và ứng dụng ghi âm bạn có thể sử dụng để ghi lại các hoạt động trên màn hình iPhone của mình là Trình ghi màn hình - V Recorder. Ứng dụng này là một trong những ứng dụng ghi màn hình tiên tiến nhất trên thị trường. Tại sao nó được coi là tiên tiến? Chà, nó có các tính năng được hỗ trợ bởi AI giúp quá trình ghi âm trở nên hiệu quả! Đáng buồn thay, bạn chỉ có thể tận hưởng các tính năng hỗ trợ AI của nó nếu bạn đã mua phiên bản cao cấp. Nếu dự định mua và sử dụng, bạn có thể sử dụng các bước bên dưới làm hướng dẫn cách sàng lọc bản ghi trên iPhone 7/8/6 bằng Trình ghi màn hình - V Recorder!
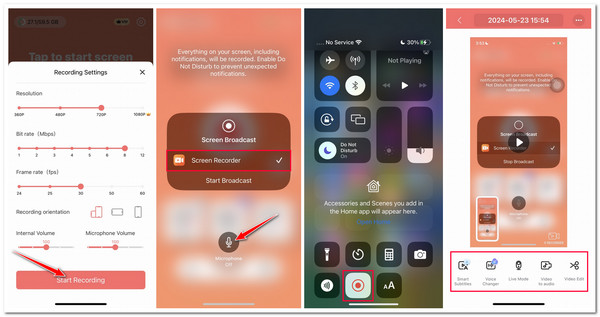
Bước 1.Tìm kiếm và cài đặt Trình ghi màn hình—V Recorder trên App Store. Sau đó, chạy ứng dụng, nhấn vào nút “Cài đặt ghi” và điều chỉnh cấu hình nếu cần.
Bước 2.Sau khi hoàn tất, hãy nhấn vào nút “Bắt đầu ghi âm”, nhấn vào nút “Micrô” nếu bạn cũng muốn ghi lại giọng nói của mình và nhấn nút “Bắt đầu phát sóng”.
Bước 3.Sau đó, đi đến chủ đề bạn muốn ghi lại. Sau khi ghi xong, hãy truy cập Trung tâm điều khiển của iPhone và nhấn vào nút “Ghi màn hình” để dừng ghi.
Bước 4.Sau đó, quay lại ứng dụng. Trong phần xem trước, bạn có thể phát và chỉnh sửa bản ghi.
5. Ghi màn hình – Go Record
Ứng dụng cuối cùng trong danh sách đề xuất này là Screen Record - Go Record. Ứng dụng này cung cấp tính năng chụp màn hình đơn giản, giúp toàn bộ quá trình trở nên dễ dàng. Không giống như một số ứng dụng nổi bật ở trên, Go Record không có nhiều tính năng và công cụ khác nhau. Tuy nhiên, bạn có thể gặp lỗi khi sử dụng ứng dụng này. Nhưng không đảm bảo 100% rằng bạn sẽ gặp lỗi, vì vậy hãy khám phá các bước bên dưới về cách ghi màn hình có âm thanh trên iPhone 16 bằng Screen Record - Go Record:
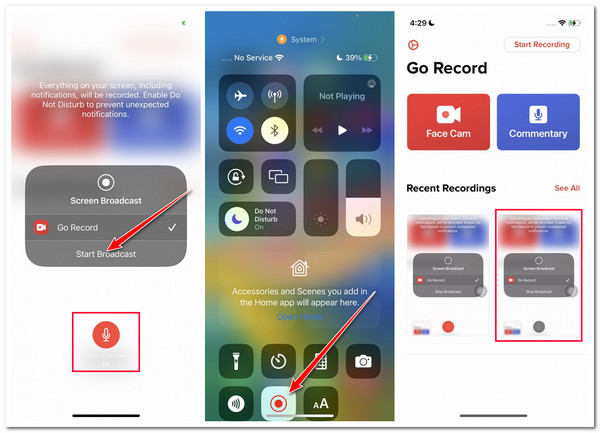
Bước 1.Cài đặt ứng dụng Go Record trên App Store. Tiếp theo, khởi chạy ứng dụng, nhấn vào nút “Bắt đầu ghi” ở góc trên cùng bên phải và nhấn vào nút “Micrô” để bật.
Bước 2.Sau đó, chạm vào nút “Bắt đầu phát sóng” để bắt đầu ghi. Tiếp theo, hãy chuyển đến hoạt động trên màn hình mà bạn muốn ghi lại.
Bước 3.Sau khi hoàn tất, hãy nhấn vào nút “Ghi màn hình” trên Trung tâm điều khiển và quay lại ứng dụng. Sau đó, nhấn vào bản ghi, chỉnh sửa chúng và nhấn nút “Xuất” để lưu chúng.
Mẹo hữu ích để quay màn hình iPhone 16
Bây giờ bạn đã khám phá bảy cách dễ dàng để sàng lọc bản ghi trên iPhone, đây là một số mẹo có giá trị giúp bạn có được đầu ra ghi trên màn hình tốt nhất! Hãy khám phá và lưu ý từng điều đó.
1. Giải phóng dung lượng lưu trữ - Đảm bảo bạn có đủ dung lượng lưu trữ để chứa các bản ghi dài trên màn hình. Bạn không muốn bị xáo trộn khi ghi lại chủ đề trên màn hình.
2. Tắt thông báo và cảnh báo - Tắt tất cả các thông báo hoặc cảnh báo có thể bật lên trong phiên ghi. Những thông báo có thể có này sẽ xuất hiện trong đầu ra của bạn và làm hỏng cảm giác chung của nó.
3. Đặt Chế độ chân dung- Luôn ghi ở chế độ ngang. Đầu ra (bản ghi) ở chế độ ngang mang lại trải nghiệm xem tốt hơn nhiều so với chế độ dọc. Ngoài ra, việc bật chế độ ngang của iPhone trước khi ghi sẽ giúp bạn tránh việc vô tình nghiêng/chuyển hướng thành dọc trong phiên ghi.
4. Sử dụng micro ngoài tốt—Nếu bạn ghi lại hoạt động trên màn hình trên iPhone đồng thời ghi lại giọng nói của mình trên micrô bên ngoài, hãy đảm bảo rằng bạn sử dụng micrô chất lượng cao. Micrô chất lượng cao có thể tạo ra chất lượng âm thanh đáng kinh ngạc khi ghi trên màn hình của bạn.
5. Ghi âm ở nơi yên tĩnh- Nếu bạn ghi lại hoạt động trên màn hình iPhone bằng giọng nói của mình, hãy đảm bảo môi trường xung quanh bạn yên tĩnh để tránh tiếng ồn không mong muốn và không cần thiết.
6. Chỉnh sửa bản ghi của bạn—Sau khi ghi xong, hãy chỉnh sửa nó. Đảm bảo bạn đã cắt bỏ những phần không mong muốn, làm cho bản ghi của bạn trông giống như bản ghi trên màn hình chuyên nghiệp và nâng cao chất lượng của chúng!
FAQs
-
1. Làm cách nào để ghi lại màn hình trên iPhone bằng trình ghi màn hình mặc định?
Thật không may, bạn không thể ghi lại màn hình iPhone của mình bằng trình ghi màn hình mặc định khi nó tắt. Ngoài ra, bạn có thể sử dụng ứng dụng của bên thứ ba để ghi lại màn hình iPhone của mình khi nó bị tắt. Bạn có thể thử sử dụng một trong những công cụ nổi bật ở trên.
-
2. Làm cách nào để ghi âm giọng nói khi quay màn hình trên iPhone?
Để ghi âm giọng nói của bạn trong khi ghi màn hình trên iPhone, trước tiên hãy truy cập Trung tâm điều khiển, chạm và giữ nút Ghi màn hình có biểu tượng vòng tròn liền và nhấn vào biểu tượng Mic để bật. Sau đó, nhấn vào nút Bắt đầu ghi và đi đến chủ đề bạn muốn ghi, thế là xong!
-
3. Làm cách nào để hiển thị các thao tác chạm khi ghi màn hình trên iPhone?
Đáng buồn thay, trình ghi màn hình mặc định của iPhone không cho phép bạn hiển thị các thao tác chạm vào màn hình trong khi ghi. Nếu bạn muốn hiển thị các thao tác chạm vào màn hình trong khi ghi, bạn có thể sử dụng ứng dụng của bên thứ ba. Hầu hết chúng đều được trang bị các tính năng cho phép bạn hiển thị các thao tác chạm vào màn hình.
-
4. Các bản ghi màn hình được lưu và lưu trữ ở đâu trên iPhone?
Các bản ghi màn hình sẽ tự động được lưu và lưu trữ trên ứng dụng Ảnh trên iPhone của bạn. Để truy cập chúng, hãy chạy ứng dụng Ảnh, nhấn vào Album, cuộn xuống và nhấn vào Bản ghi màn hình. Từ đó, hãy tìm các bản ghi màn hình mà bạn đã chụp.
-
Tôi có thể bắt đầu ghi màn hình bằng cách nhấn tổ hợp nút trên iPhone của mình không?
Không. Bạn không thể bắt đầu quá trình ghi màn hình trên iPhone bằng cách nhấn tổ hợp nút. Bạn chỉ có thể kích hoạt ghi trên màn hình bằng cách nhấn vào nút Ghi màn hình trong Trung tâm điều khiển của iPhone.
Phần kết luận
Bài đăng này giúp bạn dễ dàng tìm hiểu cách ghi màn hình trên iPhone thông qua trình ghi màn hình mặc định của nó. Nếu bạn muốn có được chất lượng tốt hơn nhiều với nhiều tính năng chỉnh sửa, hãy cân nhắc sử dụng một trong những ứng dụng nổi bật trong bài đăng này. Nhưng trong số những ứng dụng đó, AnyRec Screen Recorder là ứng dụng tốt nhất! Với giao diện đơn giản, các tính năng dễ sử dụng nhưng hiệu quả và đầu ra ghi âm chất lượng cao, việc sử dụng nó chắc chắn rất đáng giá! Bạn đang chờ đợi điều gì? Hãy đến máy tính Windows hoặc Mac của bạn, tải xuống và sử dụng nó để sàng lọc bản ghi trên iPhone ngay hôm nay!
100% Bảo mật
100% Bảo mật