How to Capture Screenshots in VLC with These 7 Proven Methods
VLC has been crowned as one of the best media players for PC and Mac. However, many users are struggling to figure out how to take a screenshot with VLC. It is such a shame that VLC has a powerful but little-known screen capture functionality that would be thoroughly explored in this article. We would introduce you to all the ways to utilize the built-in VLC screenshot taker tool, as long as an excellent alternative screenshot toolkit that would benefit your productivity greatly.
Overall Best Way to Take Screenshots How to Take Batch Screenshots with VLC 5 Other Ways to Take VLC Screenshots on Windows 10/8/7 and Mac FAQ about VLC ScreenshotsOverall Best Way to Take Screenshots
Taking a VLC screenshot is a seemingly easy task. However, what if you want to create customized edits and annotations? AnyRec Screen Recorder is considered the most powerful screenshot utility that has an all-in-one package for any screenshot-related issues. It has a rich list of features such as:

Capture and crop screenshots on Windows with simple clicks.
Provide full screen and selected region for you to choose freely.
Editing tools with multiple shapes, lines, arrows, texts, etc.
Shortcut to crop a screenshot on Windows anywhere and anytime.
Secure Download
Secure Download
Step 1.Download and install the most powerful screen recorder. Open the program, and click on the "Snapshot" button on the upper right side of the screen. Alternatively, you could press the "Ctrl+Alt+C " key combinations.

Step 2.Hover your mouse cursor over the region that you intend to take a screenshot, in this case, the VLC media player window. Select the screen by drag-and-drop.

Step 3.Once the screenshot has been taken, the editing toolbox would be displayed right beneath it. You could edit the snapshot such as inserting texts, arrows, rectangles and adding special effects. Click on the "Save" button to export the snapshot.

Secure Download
Secure Download
How to Take Batch Screenshots with VLC
Sometimes you want to take VLC screenshots at certain intervals. Let’s imagine you want to take screenshots every 10 seconds, and save all the files to a folder path with a prefix that starts with "IMAGE". To take batch VLC screenshots, read the following guide and learn how to achieve this.
Step 1.Find "Tools > Preference" on the VLC menu bar, and click on it. On the next screen, select the "All" option and click on the "Show Settings" button next.
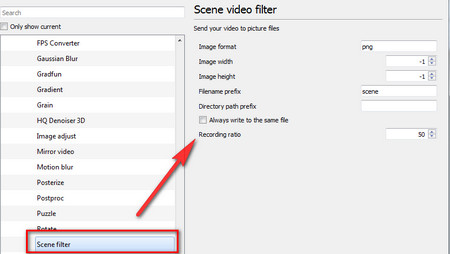
Step 2.A new screen named "Advanced Preferences" would pop up. On the left panel, find the "Filters" button. Move to the right side of the panel and find the "Screen Video Filter" option. Tick the box to enable the function, and click on the "Save" button.
Step 3.Visit the "Video > Filters" tab, select it on the left panel. On the right panel, you could set the parameters to take batch screenshots, such as format, width, height, filename prefix, directory path prefix, etc. Change the "Recording Ratio" to determine how many frames are between two screenshot intervals.

Step 4.Save all the changes. Play the video and screenshots would be taken automatically to the folder you’ve just set up. Don’t forget to reset all the settings back to the original after you’ve completed taking batch screenshots.
Tips
If you are suffering from issues with regard to VLC, read the guides we provided to fix them such as VLC not recording or recording screen with audio through VLC.
5 Other Ways to Take a Screenshots in VLC on Windows 10/8/7 and Mc
1.Take a Screenshot in VLC via Menu Bar Options
Step 1.Play a video with VLC. Click the "Stop" button once you encounter the frame you intend to take a screenshot at.
Step 2.On the menu bar of the VLC program, Navigate to "Video > Snapshot" and click on the option.

2.Take VLC Screenshots with Keyboard Shortcuts
Step 1.Stop your video at the exact frame you wish to take a screenshot.
Step 2.Press the snapshot key combinations on your keyboard. For Windows, press "SHIFT + S". On Mac OSX, press "CMD + ALT + S" instead.
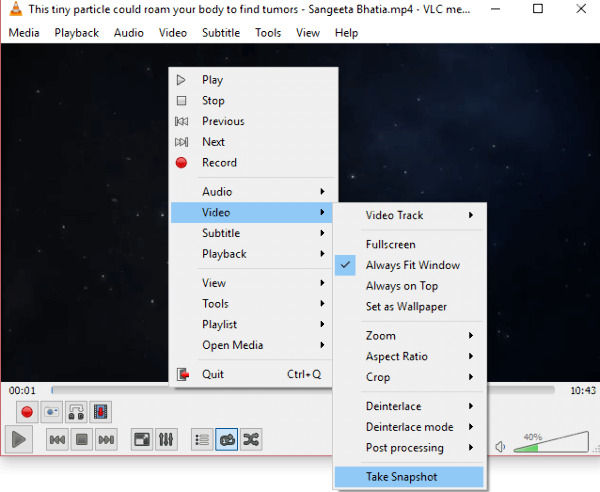
3.Take VLC Screenshots with Context Menu
Step 1.Click the "Pause" button at the frame you want to take a screenshot at.
Step 2.Right-click on the video to summon the "Context Menu". Then click the "Snapshot" button.

Step 3.As you have successfully taken a screenshot, a thumbnail would appear at the top left side of the corner before it quickly vanishes.
4.Capture VLC Screenshots with Snapshot Button
Step 1.Make sure you are on Windows 10. Navigate to the "View > Advanced Controls" option to enable the controls section on the bottom of the window.
Step 2.Now you have successfully enabled the snapshot button. It locates next to the "Play/Pause" button. Click on it to take a snapshot at any moment.
5.Capture VLC Screenshots with the Print Screen Button
Step 1.If you are using a Windows PC, there is a Prtscn button sitting at the top right corner of your keyboard. Press the button to take a full-screen screenshot.
Step 2.Open an image editor such as Microsoft Paint. Paste the screenshot from your clipboard to the image file. Make necessary edits and save your VLC screenshot. You can go to the Screenshots folder to have a check.
Further Reading
FAQ about VLC Screenshots
-
1.How do I take a high-quality screenshot in VLC?
You could change the codecs option in the VLC "Settings" window. Open the VLC settings and locate the "Input / Codecs" option. Expand the "Video Codecs" option, click on jpg and change the quality level as you wish.
-
2.Where VLC screenshots are saved?
The default path where your snapshots would be saved is located in the "My Pictures" folder. This could be altered manually in the "Preferences" tab. You would be given the option to change the default image format from PNG to other formats such as JPG, etc.
-
3.Why do my VLC screenshots don’t include subtitles?
This is a known but for older VLC versions. Upgrade your VLC media player to versions above 3.0.0 to solve this issue.
Conclusion
As we have discussed in the article, there are multiple possible methods to take screenshots with VLC. Whether you want to capture a frame of the video or take continuous snapshots with a customized interval, we have provided you with a detailed step-by-step solution, as well as professionally designed software to assist your need. As for most beginners, it is highly suggested to screenshot VLC with AnyRec Screen Recorder. You can add custom annotations and get multiple support while taking screenshots. Just free download the program and have a try right now.
Secure Download
Secure Download
 Convert VLC to MP4