How to Sync Your Messages from iPhone to Mac - Ultimate Guide for You
If you want to continue a conversation on your Mac computer, it is a good way to synchronize messages from iPhone to Mac. Performing this task will certainly be of great help and benefit to viewing or sending text messages. Moreover, it is useful because synchronized or transmitted messages can also be used as backups. Learn about three ways to sync your messages from your iPhone to your Mac right now!
Guide List
Part 1: 3 Best Methods to Sync Messages from iPhone to Mac Extra Tip: How to Sync iPhone Messages to Windows Part 3: FAQs about Syncing Messages from iPhone to MacMethod 1: How to Sync Messages from iPhone to Mac with Text Message Forwarding
When you want to send and receive messages on your Mac without using other software or applications, you can set up Text Message Forwarding to sync messages from iPhone to Mac. After setting, you must use the same Apple ID, and your iPhone messages will be synchronized and accessible on Mac. Here are the specific steps to sync messages from your iPhone to your Mac in this way.
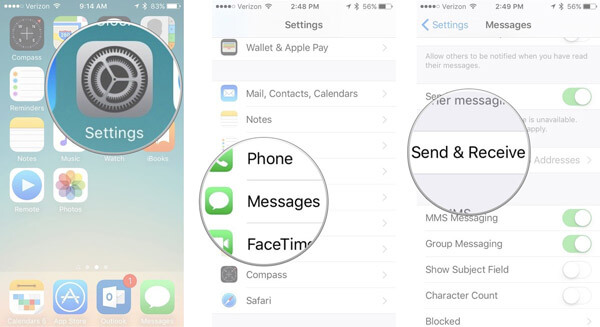
Step 1.Before syncing, you must ensure that you log into iMessage with the same Apple ID account on your iPhone and Mac. And you need to unlock your iPhone and go to "Settings". Then tap the Messages button to choose the "Send & Receive" option
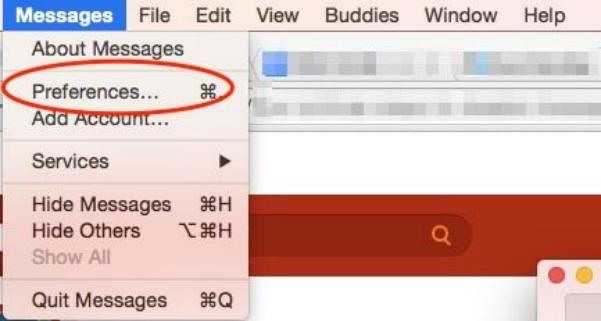
Step 2.On your Mac, you should go to the "Messages" app to click the "Messages" button. Click the "Preference" button from the Messages list. Then click the "iMessage" button.
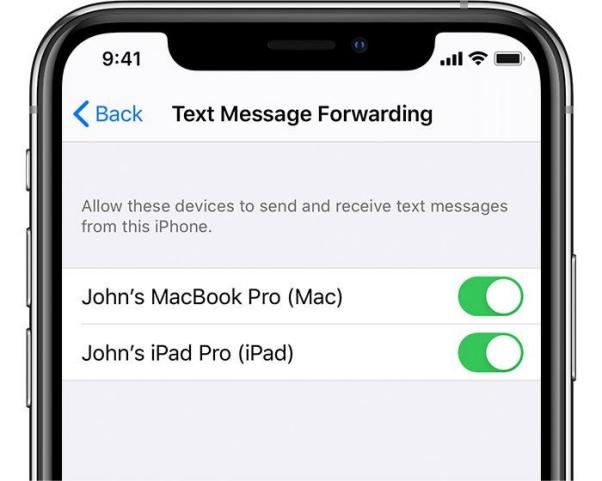
Step 3.Now, you should go to "Settings" on your iPhone again and tap the "Messages" button to choose the "Text Message Forwarding" option.Choose your Mac to sync the text messages from your iPhone. Then you need to use the two-factor authentication or verification code to allow this setting. Now, you can sync messages from your iPhone to your Mac.
If your Apple ID is not using two-factor authentication, a verification code will appear on your other devices. You can enter a verification code on your iPhone.
Method 2: How to Sync Messages from Your iPhone to Mac via iCloud
iCloud is a famous tool for backing up your data, including Contacts, Messages, and Music. You can also use it to sync messages from iPhone to Mac. Moreover, you don’t need a USB cable to connect two devices to transfer messages. Note that you need an internet connection and sign in with the same iCloud account.
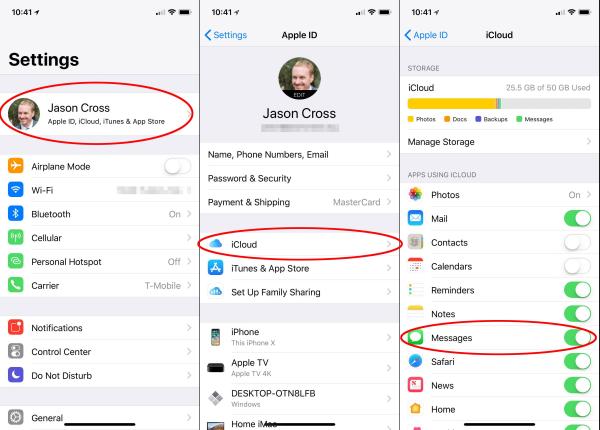
Step 1.Launch the Settings app directly on your iPhone. Tap on ["Your Name"] to open the Apple ID page. Then tap the iCloud button to turn on the Message.
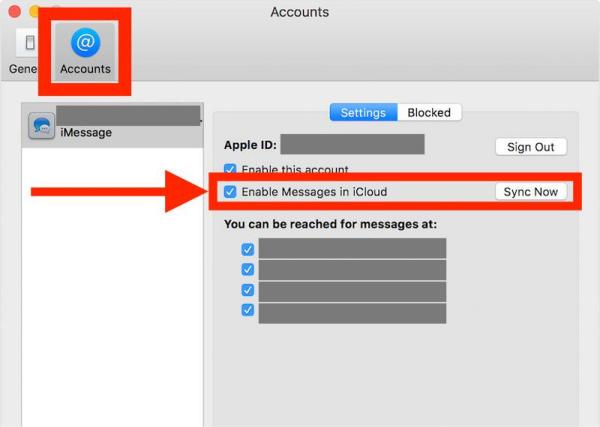
Step 2.Open the "Messages" app on your Mac and click the "Messages" button at the top. Then choose the Preferences option and the Accounts option from the menu. You can select the "Enable Messages" on "iCloud "option from the Accounts window. Lastly, click the "Sync Now" button to sync messages from iPhone to Mac.
Methods 3: How to use Finder to Sync Messages from iPhone to Mac
If you are using iOS 8.0 or later, you can also use Finder to sync messages from iPhone to Mac. It is the default data manager, which you can edit, organize, and back up your files on iPhone/Mac.
Step 1.Launch the "Finder" app on your Mac directly. And you should connect your iPhone and Mac with a stable USB cable first.
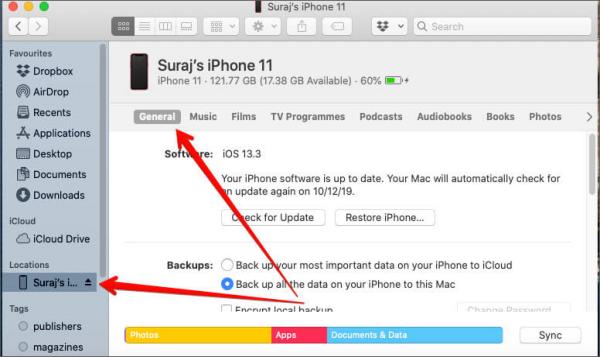
Step 2.Click the "iPhone Name" on the left side to open a new interface. You will see information about your iPhone, like Name, Type, and Storage. Then click the General button to check the "Back up all the data on your iPhone to this Mac" option.
Step 3.The last one is to click the "Back Up Now" button to sync messages from your iPhone to a Mac.
Extra Tip: How to Sync iPhone Messages to PC
If you aren't a Mac user, you can also sync messages from your iPhone to your PC. AnyRec PhoneMover is an all-in-one tool that you can sync files between any iOS, Android, and PC. This excellent tool is also an iPhone manager that allows you to organize your data, such as editing, adding, deleting, changing, duplicating, and playing.
Sync messages from your iPhone to your PC in a batch with one click.
Sync messages from your iPhone to your PC in a batch with one click.
Find and delete duplicate files to free up more space on your iPhone.
Powerful function to create unique ringtones for your iPhone.
100% Secure
Step 1.When installing AnyRec PhoneMover, launch it now. You can use a tight USB cable to connect an iPhone to your computer. Scanning the QR code is another way to connect iPhone to the computer, but you need to download the "MobileSync" app.
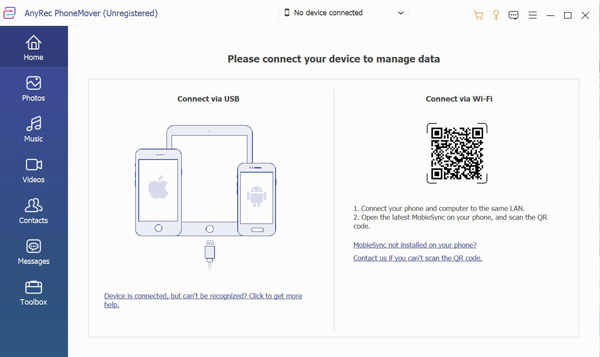
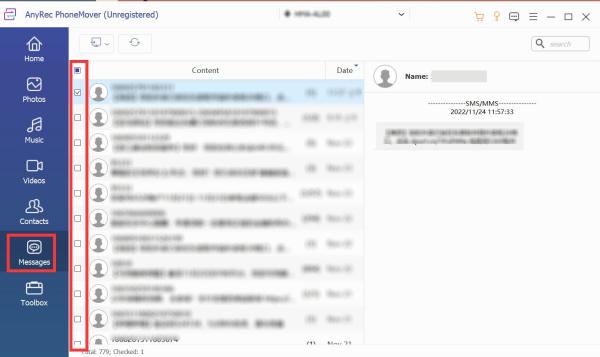
Step 2.Click the "Messages" button at the left, then you will view all messages from your iPhone at the right window. You can click the checkbox to preview the content of the messages in real-time. Choose some messages to sync on your computer by clicking the checkbox behind the message. You can also click the first checkbox to choose all messages.
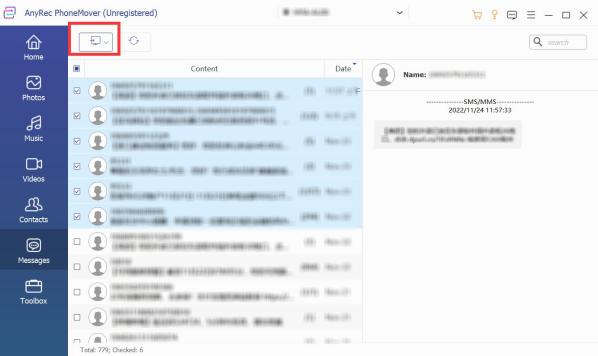
Step 3.To transfer messages, click the "Export to PC" button. You should select three file formats to download your messages, including "CSV File, HTML File", and "TXT" File. Then choose the output folder to sync messages from your iPhone to your computer.
Part 3: FAQs about Syncing Messages from iPhone to Mac
-
1. Why iMessages can’t sync messages from iPhone to Mac?
Maybe your iPhone and Mac use different Apple IDs. You must ensure to log in iMessages with the same Apple ID and password to sync messages from iPhone to Mac.
-
2. What is the difference between iMessage and SMS/MMS?
You can send text, images, and videos to other iOS devices through the network with iMessage. And these messages are always encrypted. But you can send SMS to any mobile device without encryption.
-
3. How to sync messages from an iPhone to a Mac with iTunes?
Open iTunes on your Mac and connect your iPhone and Mac. Click the iPhone button and choose the This Computer option to sync messages from iPhone to Mac.
Conclusion
Now you can choose one of the three methods to sync messages from iPhone to Mac. Most importantly, all the above solutions are carefully selected and efficient. But if you want to sync messages from iPhone to Windows, AnyRec PhoneMover is ready to wait for your choice!
100% Secure
