Record Webex Meeting – 3 Ways to Save Video as a Participant
How to record Webex meetings, especially you are only a participant? When the pandemic hits the whole world, a lot has been changed in the way we live. Due to the virus, face-to-face interactions have been restricted. Cisco Webex is one of the best solutions to virtual meetings, video conferences, webinars, and screen share activities. But there are many limits for the built-in recording features of Cisco Webex, such as the recording permission, scheduling recording, and even playing the recorded Webex videos. Here is the ultimate guide you should know to capture meeting video and audio from Webex.
Guide List
2 Best Methods to Record A Webex Meeting As Participant [Desktop/Phone] How to Record a Webex Meeting as Host or Co-host Smart Tips when You Cannot Record Webex MeetingsIf You Are a Participant, Record Webex Meeting with Those Steps
Just like other online meeting platforms, Webex grants all functions to the host only. If you want to record a Cisco Webex meeting as a co-host, presenter, or participant, you need to get the Webex host's permission first.
As for people with Webex Starter, Plus, and Business subscriptions, you can record and save Webex meeting video to the cloud. But the free Webex user has no "Save to the cloud" choice.
In general, if you are a Webex meeting participant with free plan, it is better to use a third-party meeting recorder. So you can get rid of the granted recording permission and get more recording controls.
Method 1: The Professional Tool to Record Webex Meeting as Participant on Windows/Mac
AnyRec Screen Recorder is the all-in-one Webex recorder on Windows and Mac. It enables you to record videoconferences without notification as a participant or a host. You can choose the desired video format, frame rate, video quality, and more other settings. Even if you cannot attend scheduled videoconferences, you can have a scheduled recording to capture Webex meetings automatically.

Record Webex videoconferences as a participant or a host without notification.
Add annotations, commentaries, system sound, and webcam to the recording.
Save and play the recordings to MP4, MOV, WMV, and more other video formats.
Provide schedule recording to capture the Webex meetings without attending.
Secure Download
Secure Download
Step 1.Download and install AnyRec Screen Recorder, you can launch the program on your computer and click the "Video Recorder" button. Click the "Custom" button and adjust the recording area for the Webex meeting.

Step 2.Enable the "System Sound" menu to capture the audio file from videoconference. You can also turn on the "Microphone" and the "Webcam" options to add your voice and webcam footage as commentaries.

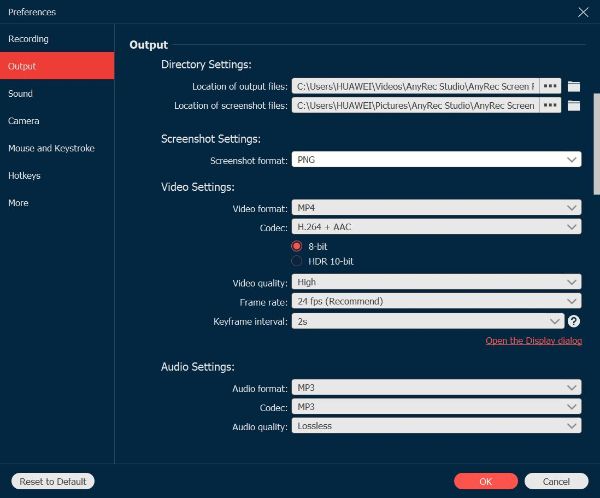
Step 3.Before recording your Webex meeting, you can click the "Settings" button to choose the desired video codec, video quality, frame rate, audio quality and other parameters. It enables you to remove the audio noise and enhance quality.
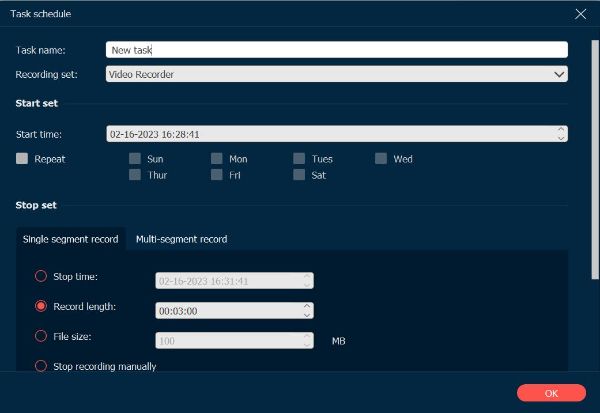
Step 4.When you need to capture the Webex meeting without attending, you can also go to the "Task Schedule" option to create a new task. After that, you can arrange the recording with start time, record length, and more others.
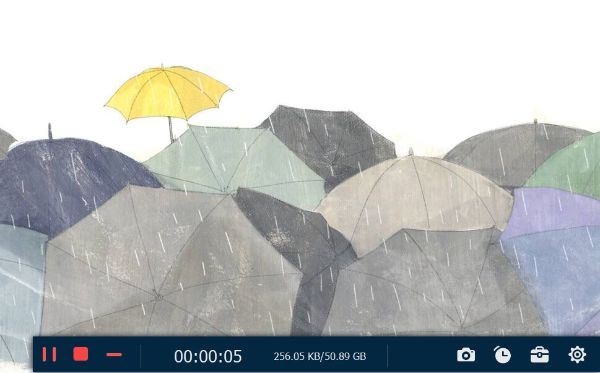
Step 5.Click the "REC" button to start recording on Webex without notification. During the Webex recording process, there are some annotations, lines, arrows, and callouts to mark up the highlights. When you get the desired video, click the "Stop" button to save the file.
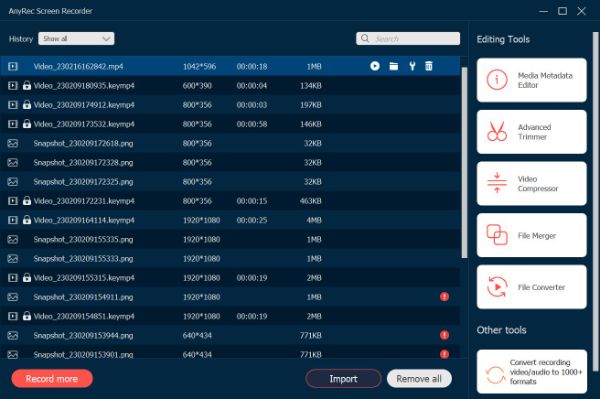
Step 6.You can play the recorded Webex meeting within the program directly, or even go to the "Recording history" icon to trim the desired part. It enables you to save the video to another folder or share it with social media websites directly. You can record meetings from BlueJeans, Lync, and other online platforms.
Method 2: How to Record a Webex Meeting on Your iPhone as Participant
When you need to use your mobile phone to participate in Webex meetings, recording videos to record important events is an essential action. But how to achieve this quickly and easily on mobile phones? Fortunately, iOS 11 and later versions provide iOS's built-in screen recording function. If you are an iOS user, please learn how to record Webex meetings on your mobile phone as a participant.
Step 1. If you are using this built-in screen recording function for the first time, you need to enable the Apple screen recording function manually. Unlock your iPhone and find the "Settings" app. Go to the "Control Center" and tap the "Add" button with a green icon before Screen Recording. After a successful startup, the next time you want to record a Webex meeting on your iPhone, you do not need to repeat the process.
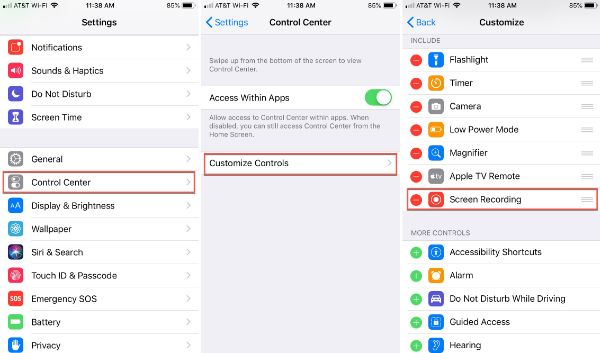
Step 2.Return to the main screen and slide from the bottom of the screen to visit the "Control Center". And tap the "Screen Recording" button. Later, you need to tap the "Microphone" button at the bottom to turn it red. So you can record your Webex meeting now.
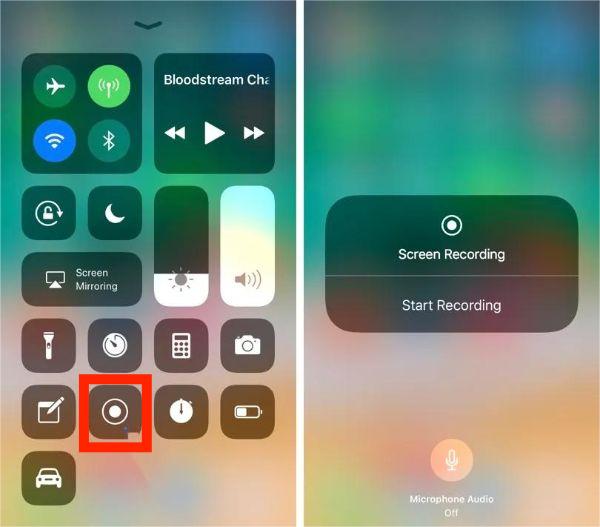
Step 3.When you want to end the screen recording, just go to the status bar at the top and tap the "Stop" button.
Video Guide to Record Webex Meeting

Secure Download
Secure Download
How to Record a Webex Meeting as Host or Co-host [Steps & Settings & More]
1. Steps to Record Webex Meeting Video and Audio
When you need to record meetings on Webex, you should have the host, co-host, or presenter account. Even if you are a co-host or presenter, you cannot start recording a meeting if the host is in the meeting.
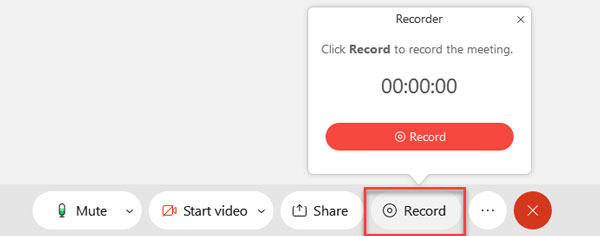
Step 1.Launch the Webex and start the Webex Meetings. Locate and click the "Record" button at the bottom of the screen. After that, you can click the "Record" button again from the popup window to start recording the Webex meetings.
Step 2.There will be an audio message for all participants, This meeting is being recorded. In the upper right corner it states Recording in progress with a red record icon. The information is available in the whole recording process.
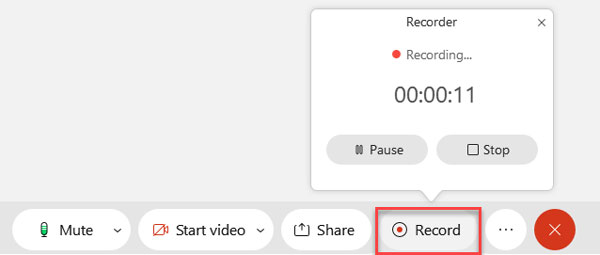
Step 3.Click the "Stop" button to end the recording of your meeting session. After that, you have to go to the meeting host to check the recordings. If a co-host records the meeting, the meeting host still receives and owns the recording after the meeting ends.
2. Adjust Webex Meeting Recording Settings
Go to "Settings" first. In the "Recording" tab, you can get all recording settings. Here are quick overview of options and related functions.
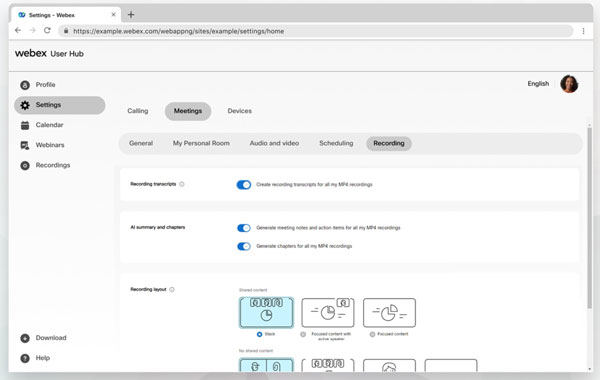
If You Are the Host, Enable Auto Recording Transcripts
Toggle on the "Create recording transcripts for all my MP4 recordings" option. By doing so, you can get meeting transcripts in English in real time. No need to use extra voice-to-text tools.
Record a virtual Webex meeting without participant
- 1. Click "Focused content" or "Focused content with active speaker" under "When the meeting has shared content".
- 2. Click "Focus" under "When the meeting has no shared content".
Get AI Summary and Chapters in Cloud-based Recordings
Toggle on the options before "Generate meeting notes and action items for all my MP4 recordings" and "Generate chapters for all my MP4 recordings". After recording, you can see the summary and chapters display in your MP4 video file.
3. Where to Find a Recorded Webex Meeting
Once you have captured the desired video, you can go to the Host account and download and play the recorded Webex file in MP4. You can also prevent participants from downloading the recording themselves.
Step 1.Log in to your Host account and select the "Recordings" from the left navigation bar and your recordings will appear as a list from the most recent starting. Select the desired files you want to playback or edit from the list.
Step 2.Click the Download icon to download the Webex meetings from the Host account in MP4 format. To share an Internet link to your recorded session, click the "Share" icon and add emails. You can play the MP4 files on any compatible device.

4. What to Do If You Have Webex Recording Issues
1. Record Meeting Button Greyed Out (Not Showing Up)
It is because you don’t have the permission to recording meeting on Webex. During this time, contact the host of this meeting or use AnyRec Screen Recorder to record an online meeting.
Secure Download
Secure Download
If you use a Webex free account, you cannot record meeting on Webex app. Go ahead to do it on your desktop computer or laptop instead.
2. Insufficient Storage
The Webex recording will stop if your storage space is not enough. The storage limit does not mean the hard drive storage. It is your Webex site's maximum storage. You need to delete previous recordings or contact the meeting host to increase it.
Smart Tips when You Cannot Record Webex Meetings
-
Can I record a Webex meeting from a smartphone directly?
No. Recording on your computer is currently only available from the desktop app. If you start a meeting from a device using the Webex app, such as a Chromebook, you can't record it. Of course, you can also mirror the content and use a video recorder for Windows or Mac to capture the Webex meetings.
-
Why the Webex recordings are saved in ARF/WRF format?
Because some recorded videos in the old versions are saved in ARF or WRF format, which contains additional information, such as video, audio, pools, Q&A results, annotation, and more others. When you need to play the recorded video in ARF or WRF format, you have to convert ARF to MP4 beforehand.
-
How to prevent participants from downloading the Webex meetings?
Go to the "Recordings" menu from the left navigation bar, you can choose the desired files and click the "Edit or Delete" button. You can checkmark the "Prevent Downloading" checkbox or even set up a password to download the recording.
Conclusion
When you need to record a meeting or webinar on Webex, here is the ultimate guide you should follow. Since the recording feature is only available to the Host account, whether you need to capture the videos as a participant or record Webex videos without notification, AnyRec Screen Recorder is always the best choice you can take into consideration.
Secure Download
Secure Download


